Project Management
/Time Tracking
Time Tracking
Time tracking helps monitor and record work activities efficiently. Our system offers two methods for tracking time:
Method 1: Time Tracking Module
The Time Tracking module provides an overview where you can log your work hours. Below is an example of the module interface:
![]()
Fig: Time Tracking Module
The top section allows you to select start and end dates, limited to a range of 3 days backward or forward.
To change the range, navigate to the Control Panel: On the Home Screen, click the top-left corner icon, select the 'Wrench' icon, and go to Other Settings.
There you will find the option for changing the range of the tracking time.
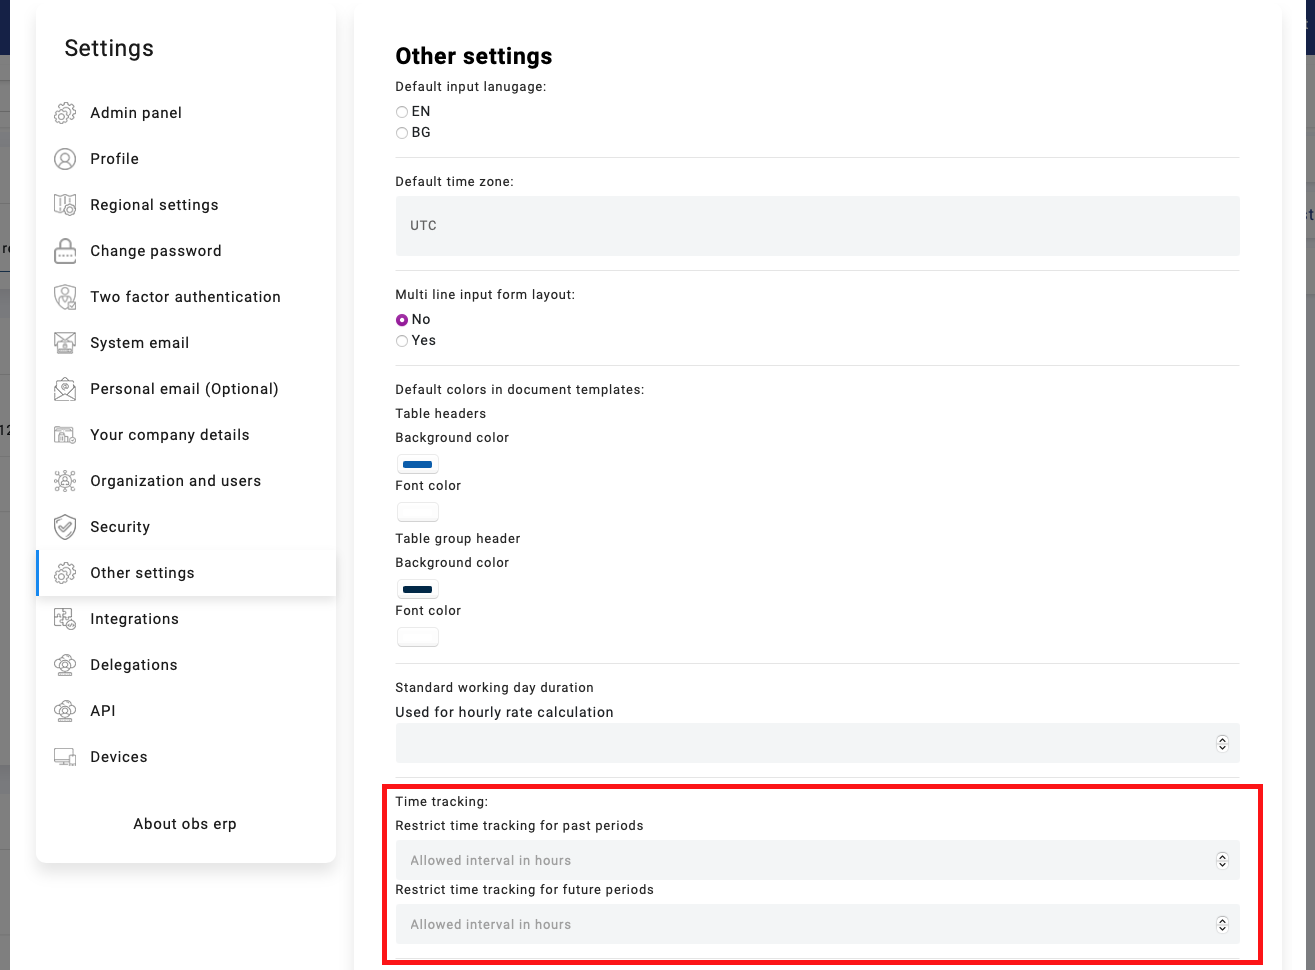
You can choose a category from the following options:
- Administrative
- Project Work
- Billable Work
- Non-Billable Work
- Overhead
- Research and Development (R&D)
The selected category determines additional fields:
- Administrative, Overhead, Research and Development: Includes a Comment field for notes.
- Project Work, Billable Work, Non-Billable Work: Includes fields for Project, Task, and Comment.
After filling in the details, click Submit. Your entries will appear in a table below:
![]()
Fig: Submitted Time Tracking Table
Method 2: Track Time from Task List or Task View
You can also track time directly from a task, using two convenient access points:
Option 1: From the Task Table
Navigate to the list of tasks in your workspace.
Each task row includes a clock icon for quick time tracking.
- Click the clock icon next to the relevant task.
- This will open the Track Time pop-up, pre-filled with task and project information.
![]()
Fig: Time tracking in module Tasks
Option 2: From Inside a Task
Alternatively, open a task by clicking on its row.
Inside the task view, you'll also see a Track Time button.
Clicking it opens the same Track Time interface as above.
Track Time Pop-up
Once the pop-up is open, you can:
- Select the date (within the allowed tracking window — default is 3 days before/after today)
- Drag the time bar to set your start and end time visually
- Leave a comment (optional, but useful for context)
The category is automatically set to "Project Work", and the task is pre-filled.
Important: The drag time range respects remaining available time. For example, if you've already tracked 9:00–12:00, you can only log time after 12:00 or before 9:00 for that day.
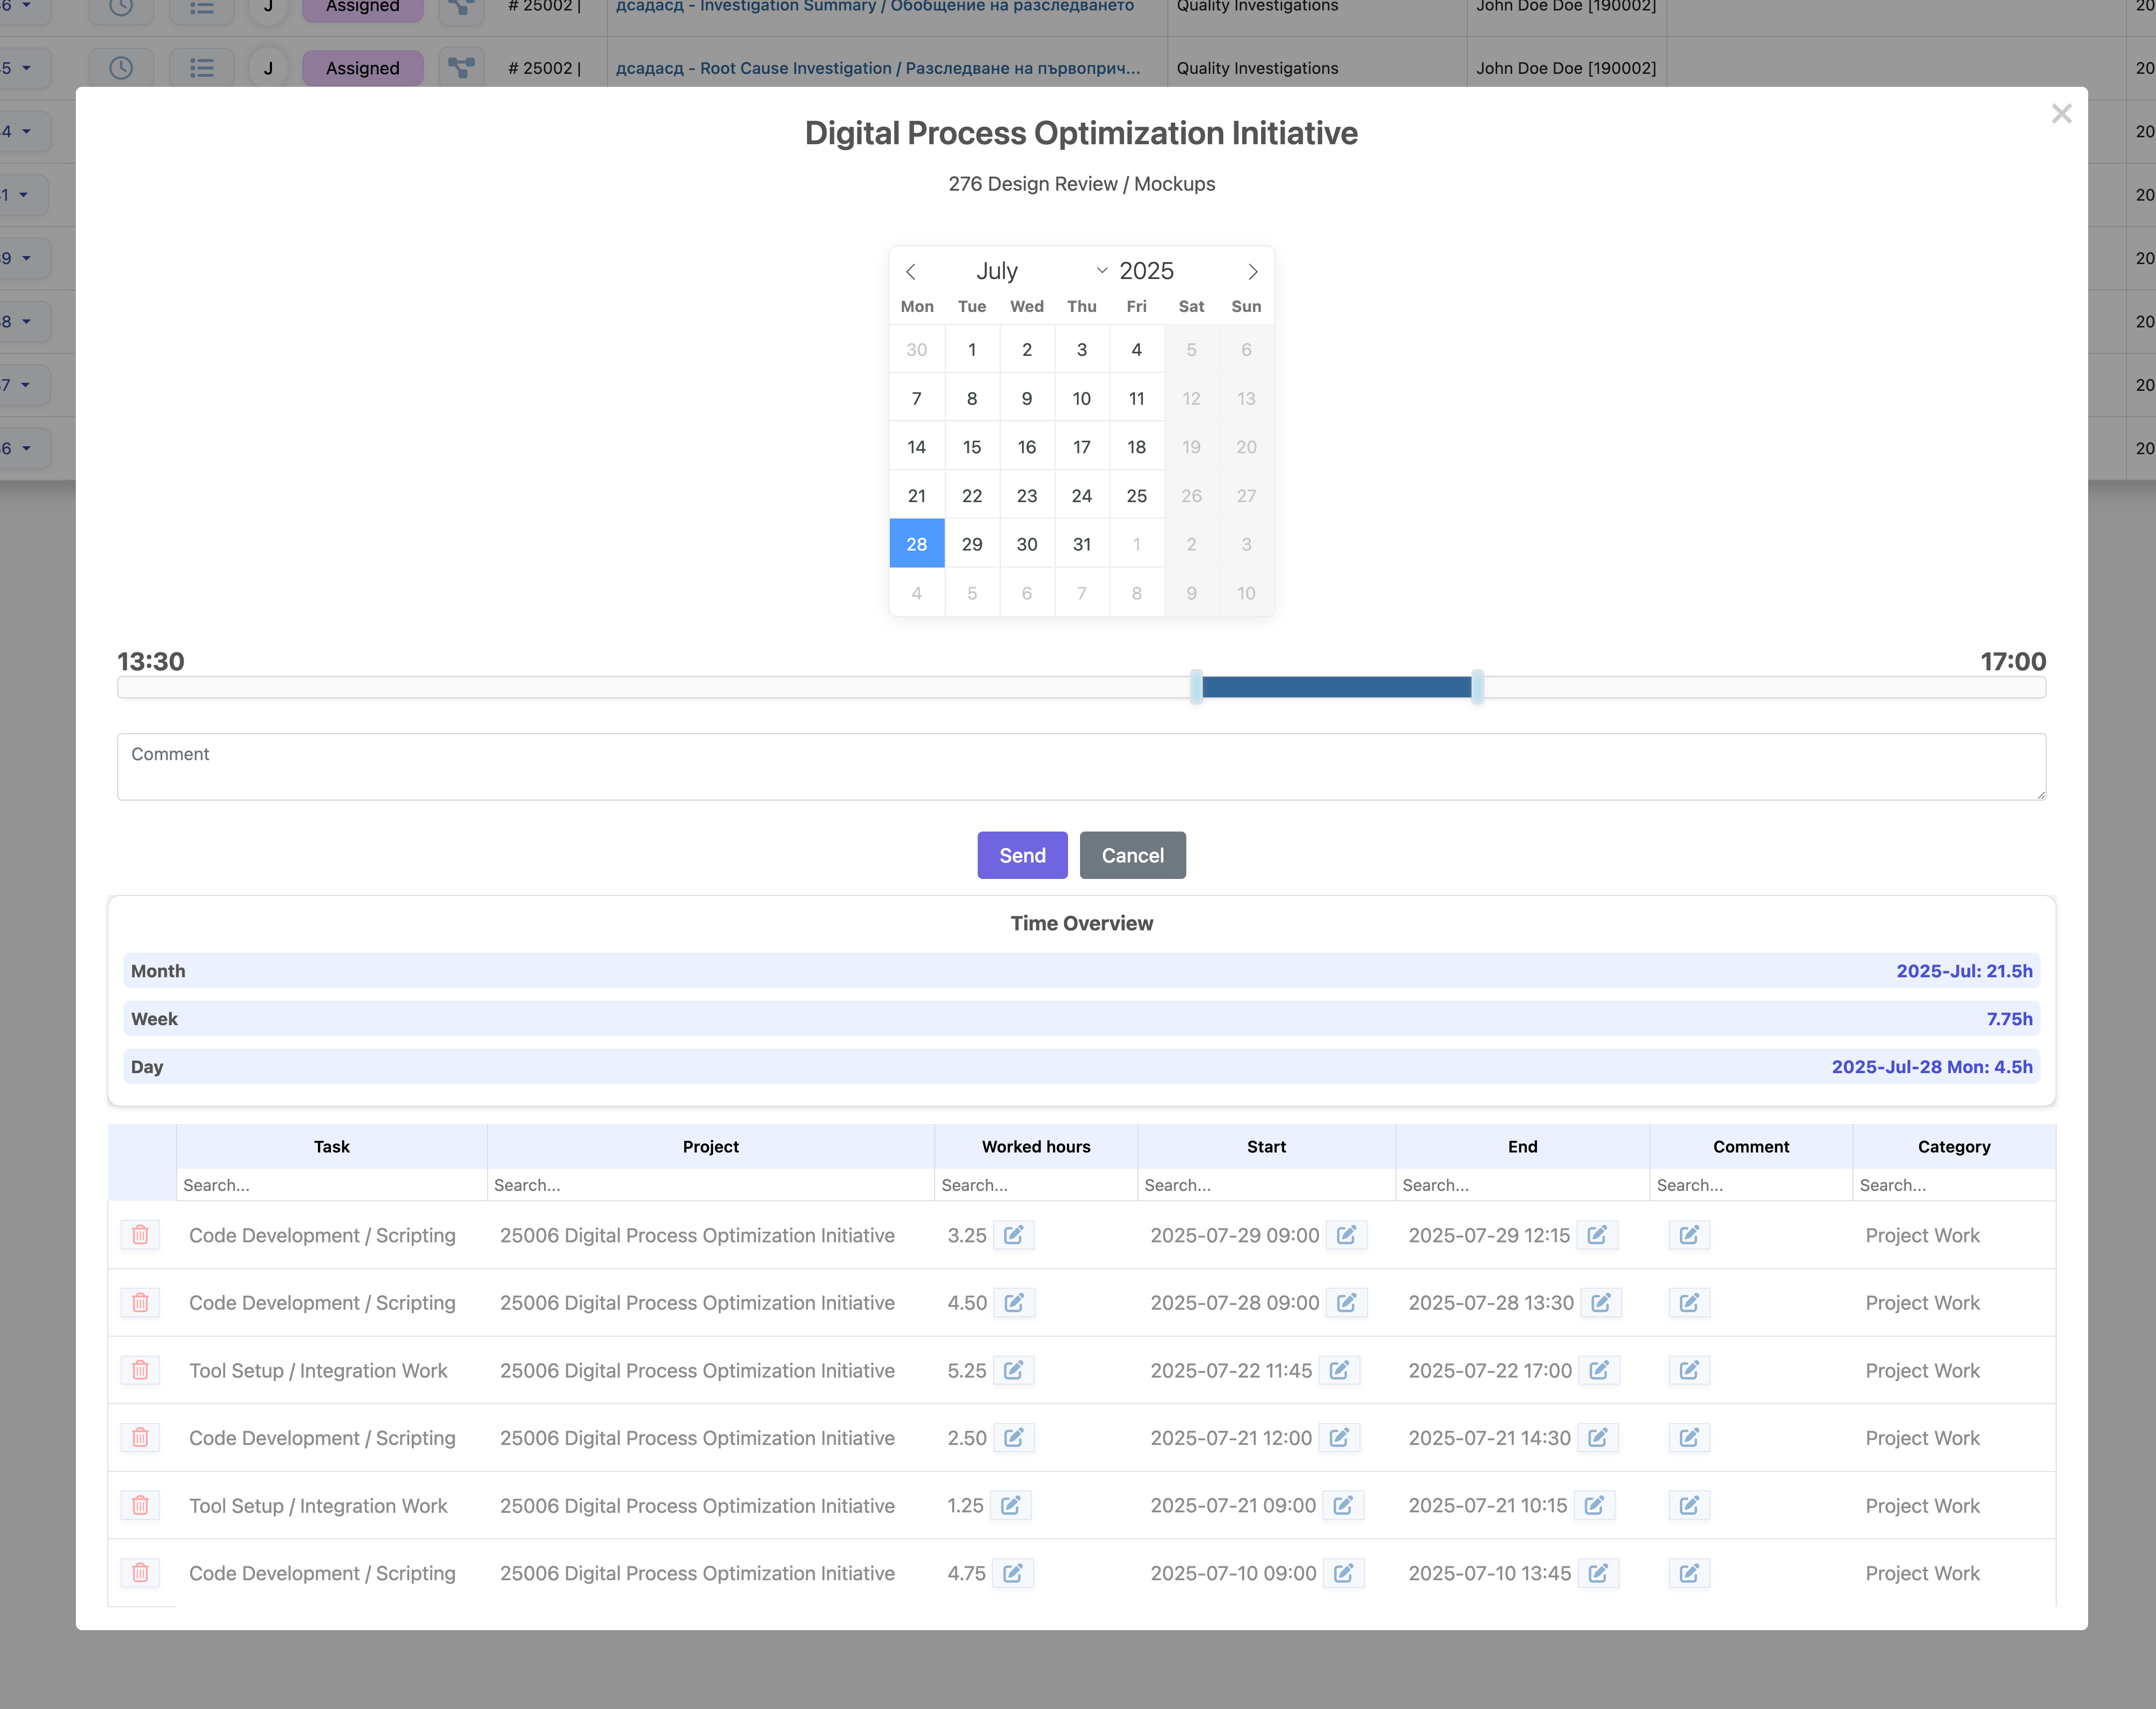
Fig: Track Time Pop-up
Time Entry Overview and Editing
Once submitted, your time entry appears immediately in a Time Overview table below the pop-up.
This table includes:
- Task
- Project
- Worked Hours
- Start / End Time
- Comment
- Category
You can edit any of your past entries directly from this table using the pencil icons — including adjusting start/end times or modifying your comments.
Important Note
The drag option is limited to the remaining available time. For instance, if you track time from 9:00 to 12:00, the next available range will be from 12:00 to 24:00 or 00:00 to 9:00.
Constraints for Time Tracking
Tracking time is subject to specific constraints to ensure accurate and relevant entries. These constraints are:
- Task Assignment: You can only track time on a task if the task is assigned to you or you are added as a colleague in the task.
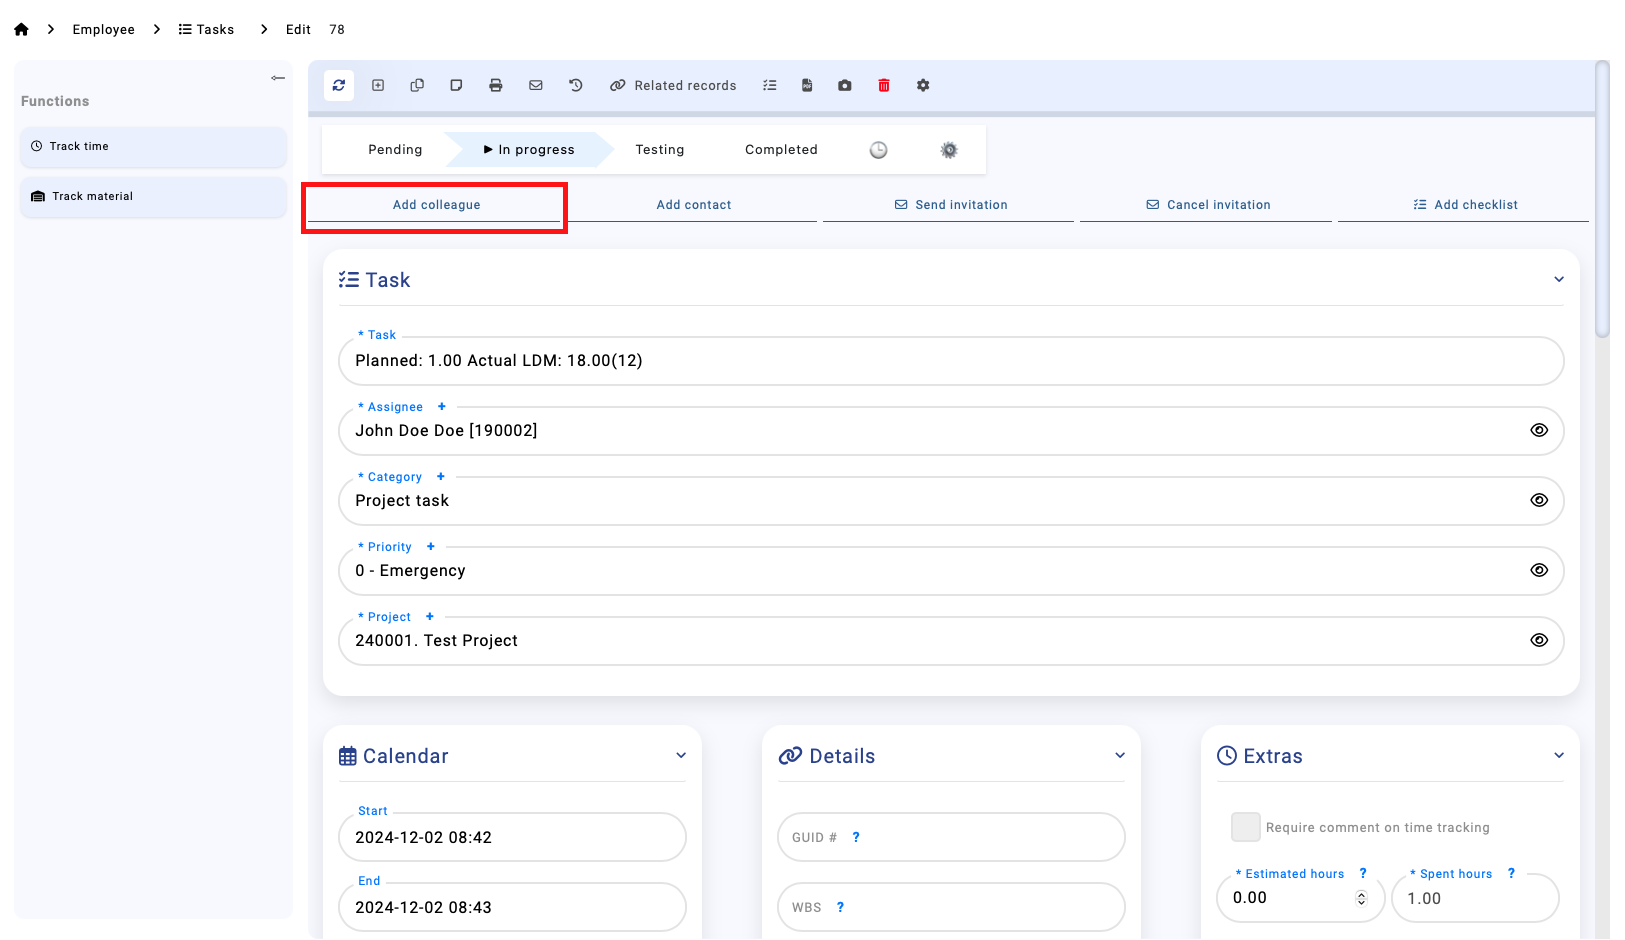
Fig: Task Assignment Example
- Task Status: Time can only be tracked if the task is in the In Progress step. Tasks in other statuses will not allow time tracking.
FAQ
❓ Why do I get the error “The selected time frame is overlapping with another entry”?
This means that you're trying to enter time in a period that already has a submitted entry.
For example, if you already have a record from 9:00 to 12:00, and you try to submit another entry from 11:30 to 12:30, the system will show this error because the two entries overlap.
To resolve this:
- Scroll down to the Time Overview section below the time tracking pop-up.
- Either edit the existing entry to include the new time, or delete it and create separate entries that do not overlap.
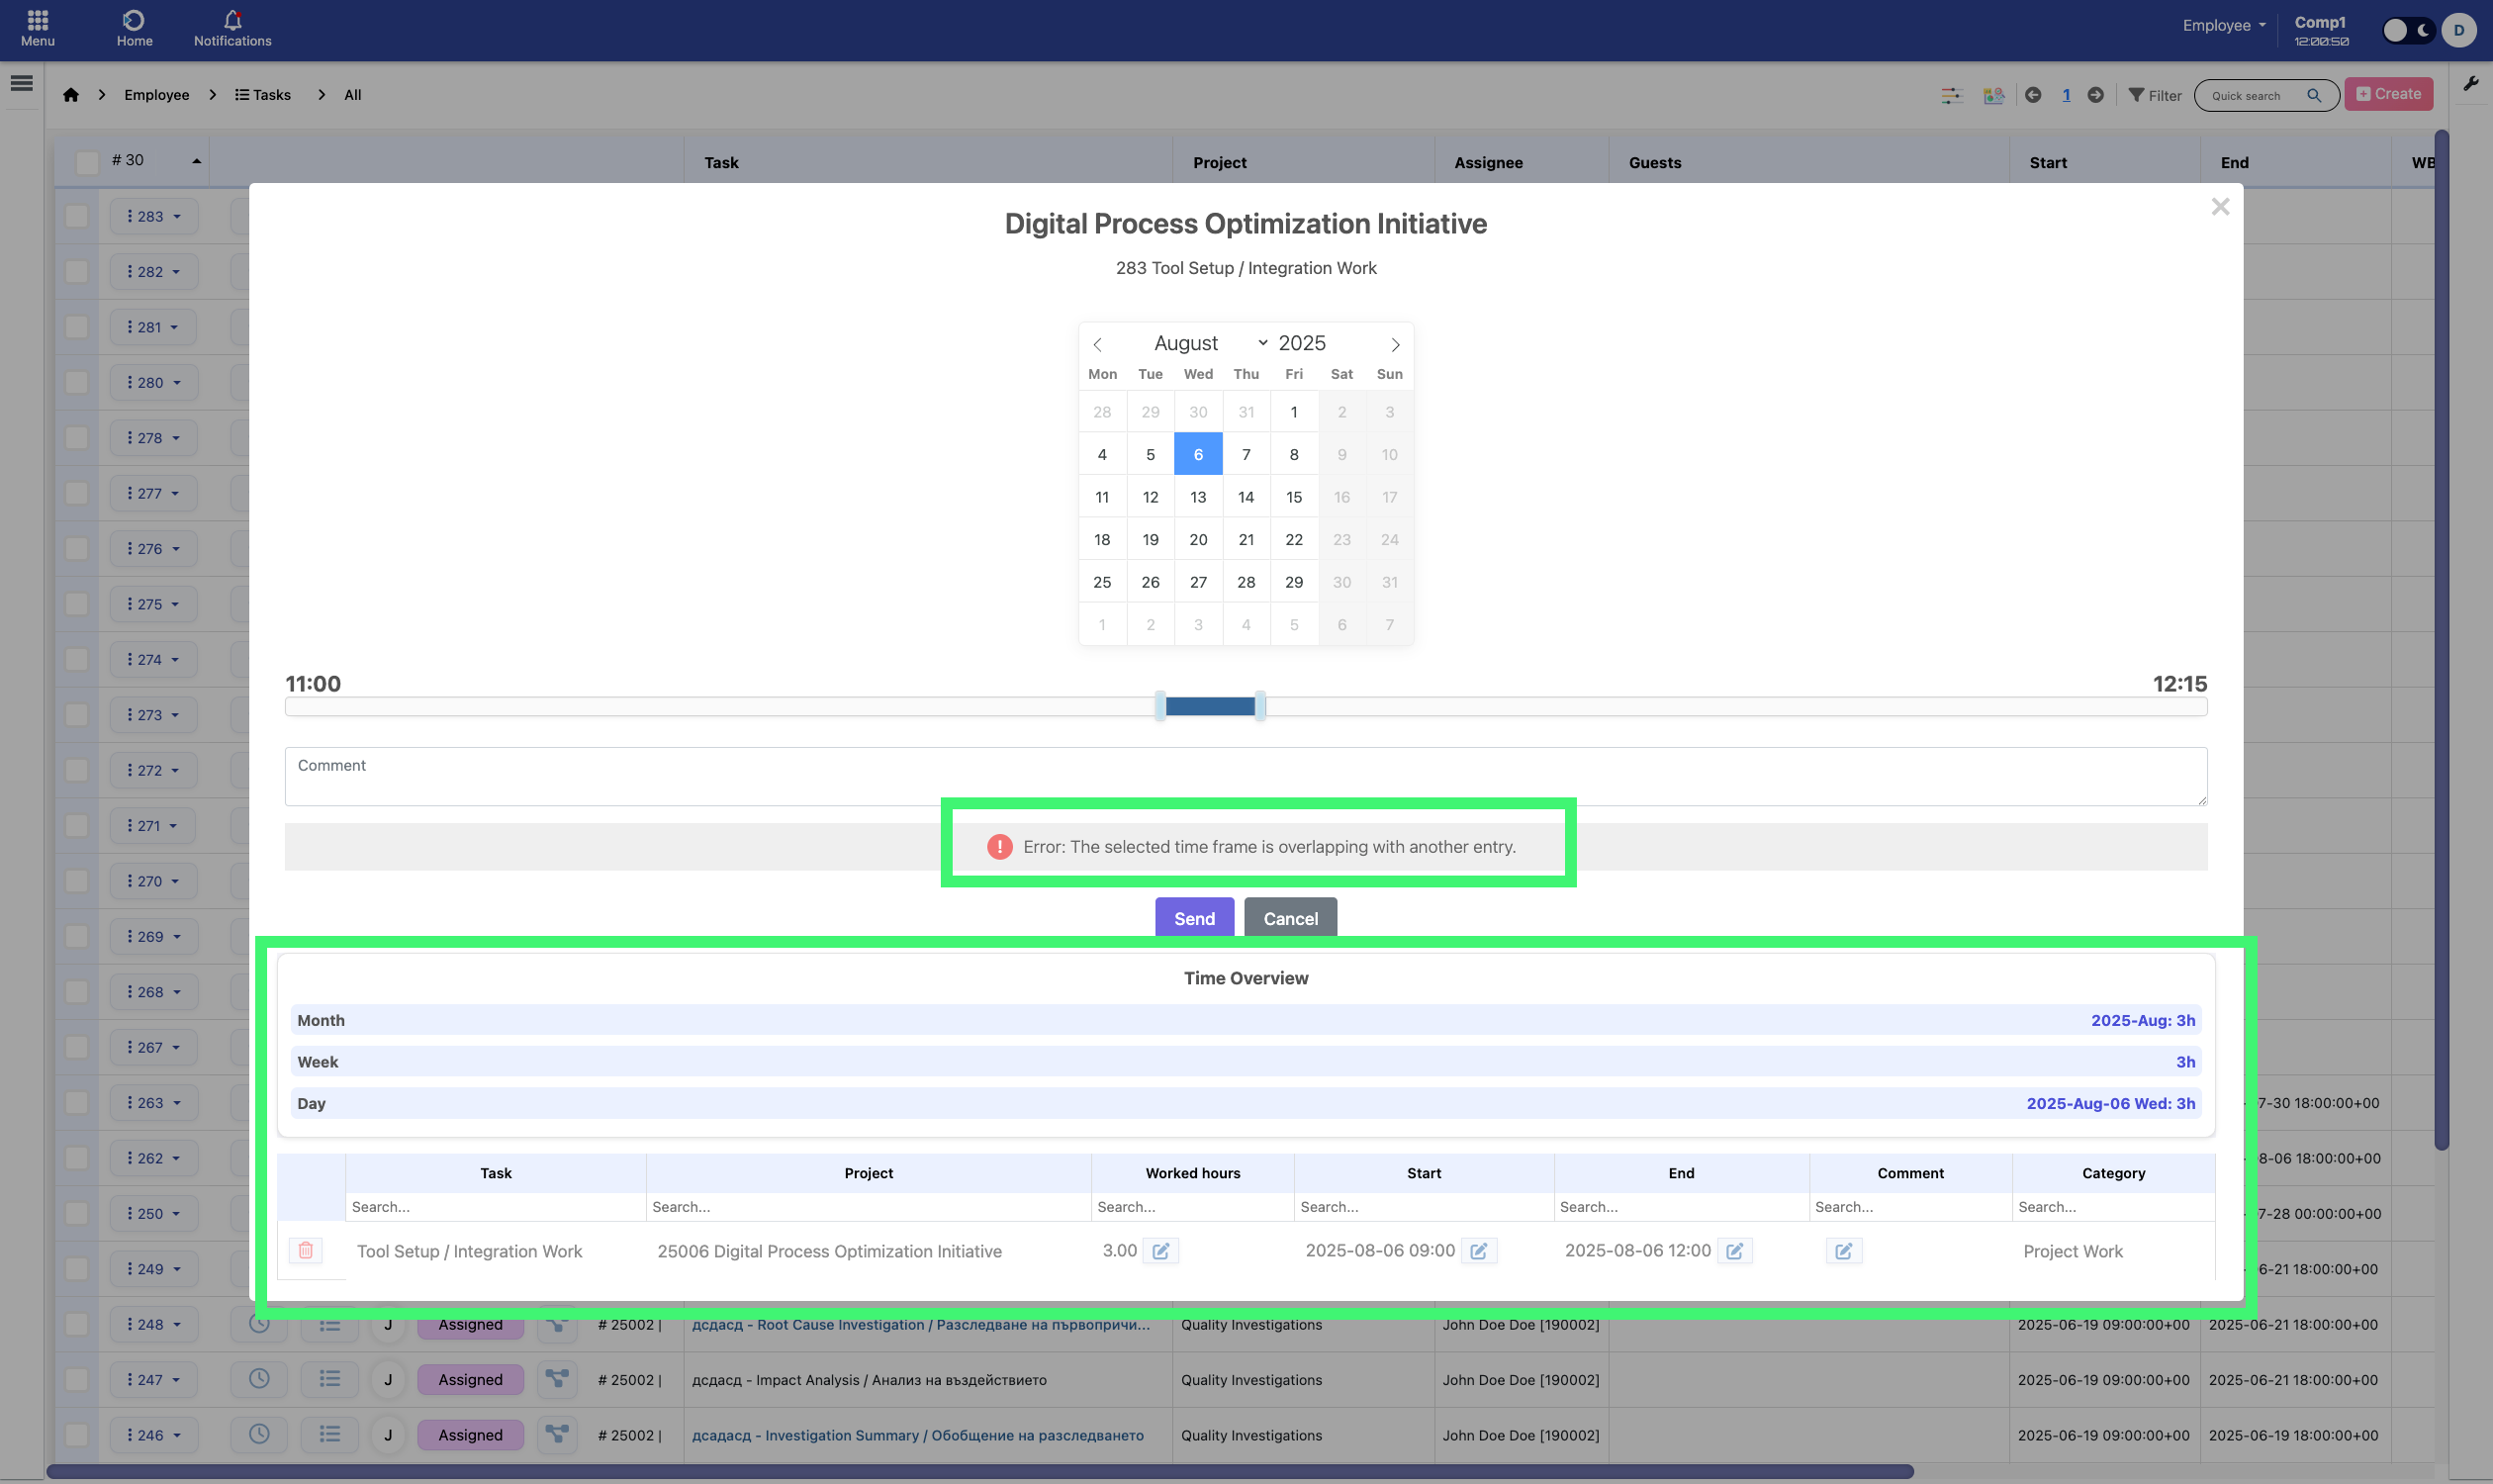
Fig: Example of overlapping time entry error. The system blocks submission when the selected time overlaps with an existing entry. The "Time Overview" table below helps identify and resolve conflicts.
Make sure the selected time range does not conflict with existing entries before clicking Submit.
❓ Why does the slider show 00:00 – 00:00 and not let me select any hours?
If the slider appears to be stuck at 00:00 – 00:00, it usually means that the entire available time for that day has already been tracked.
This happens when you already have time entries covering the whole day — for example, from 09:00 to 19:00. In such cases, the system assumes there's no available time left and visually collapses the slider.
Good news: You can still click and drag the slider manually to enter hours — even outside regular business time — as long as the selected period does not overlap with existing entries.
So even if it looks like you can’t track time, you still can. Just drag the handles to select your desired range.
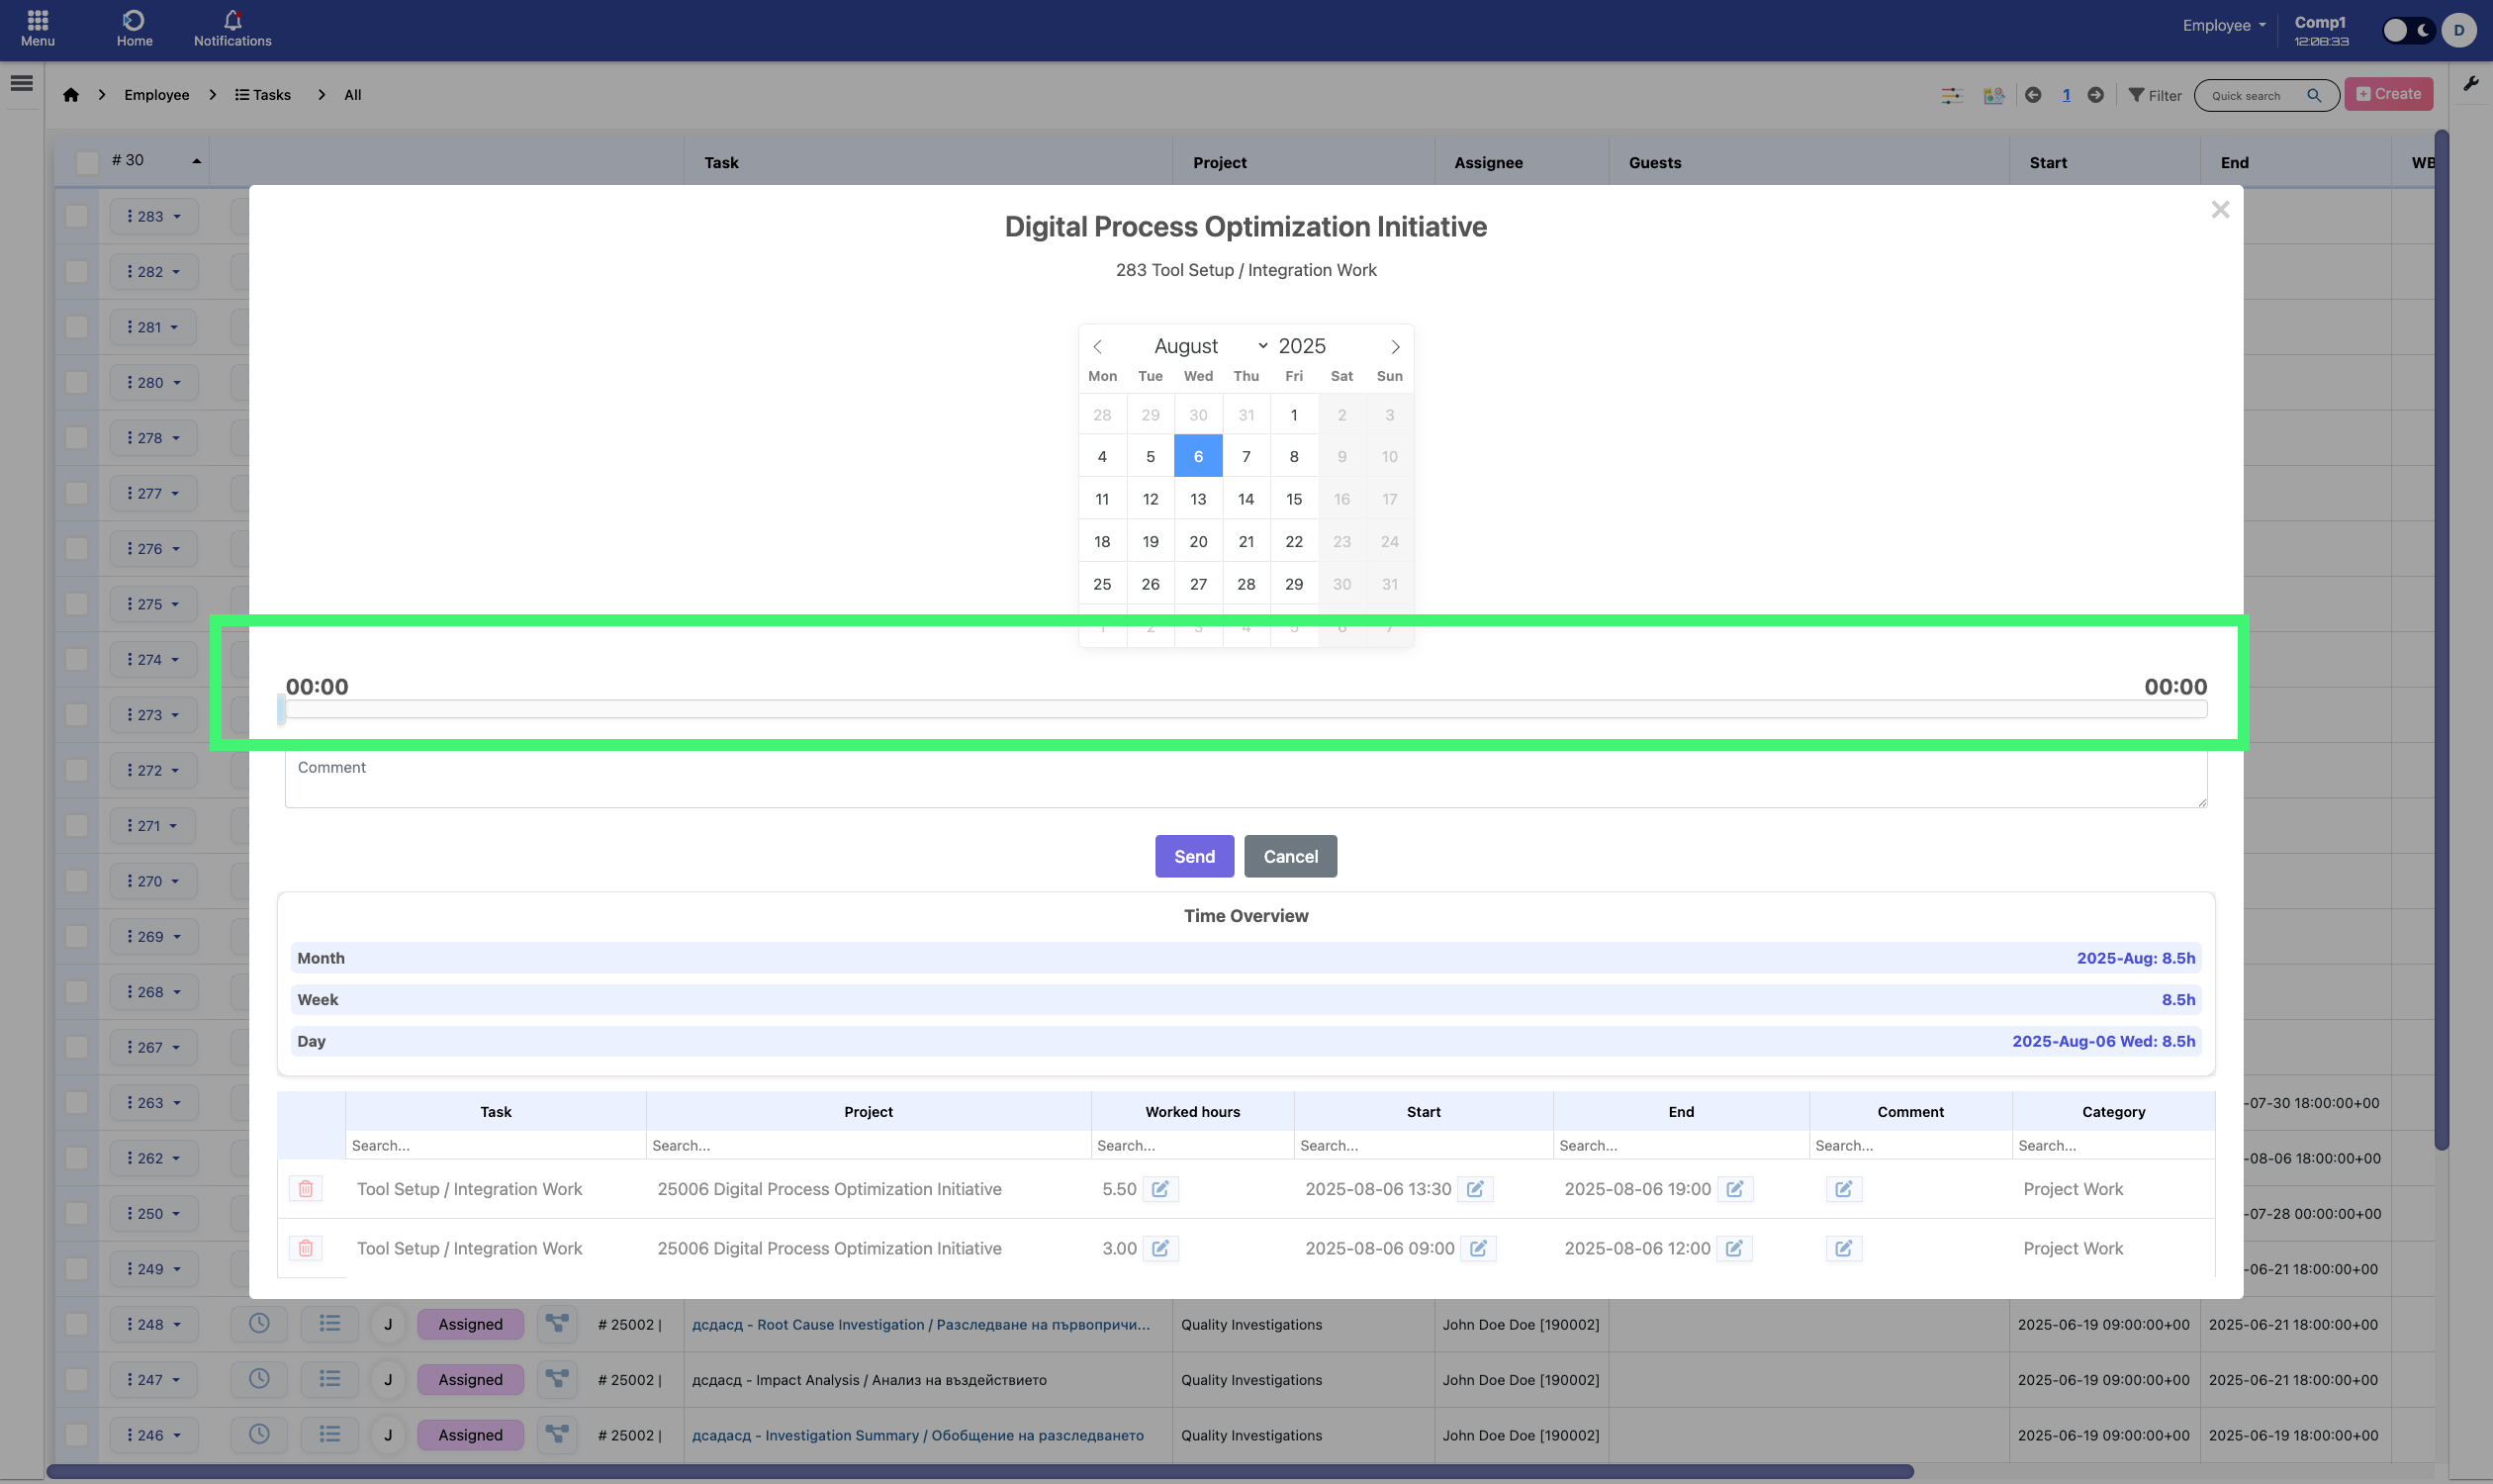
Fig: Example of 00:00–00:00 slider. Even if it appears locked, users can still click and move the handles to select a valid time range that does not overlap with existing entries.
Always check the Time Overview section to understand what time ranges have already been logged.