Human capital
/Configuration
Configuration
Company Data
Input the company data in module "Our companies". You can register unlimited number of companies.
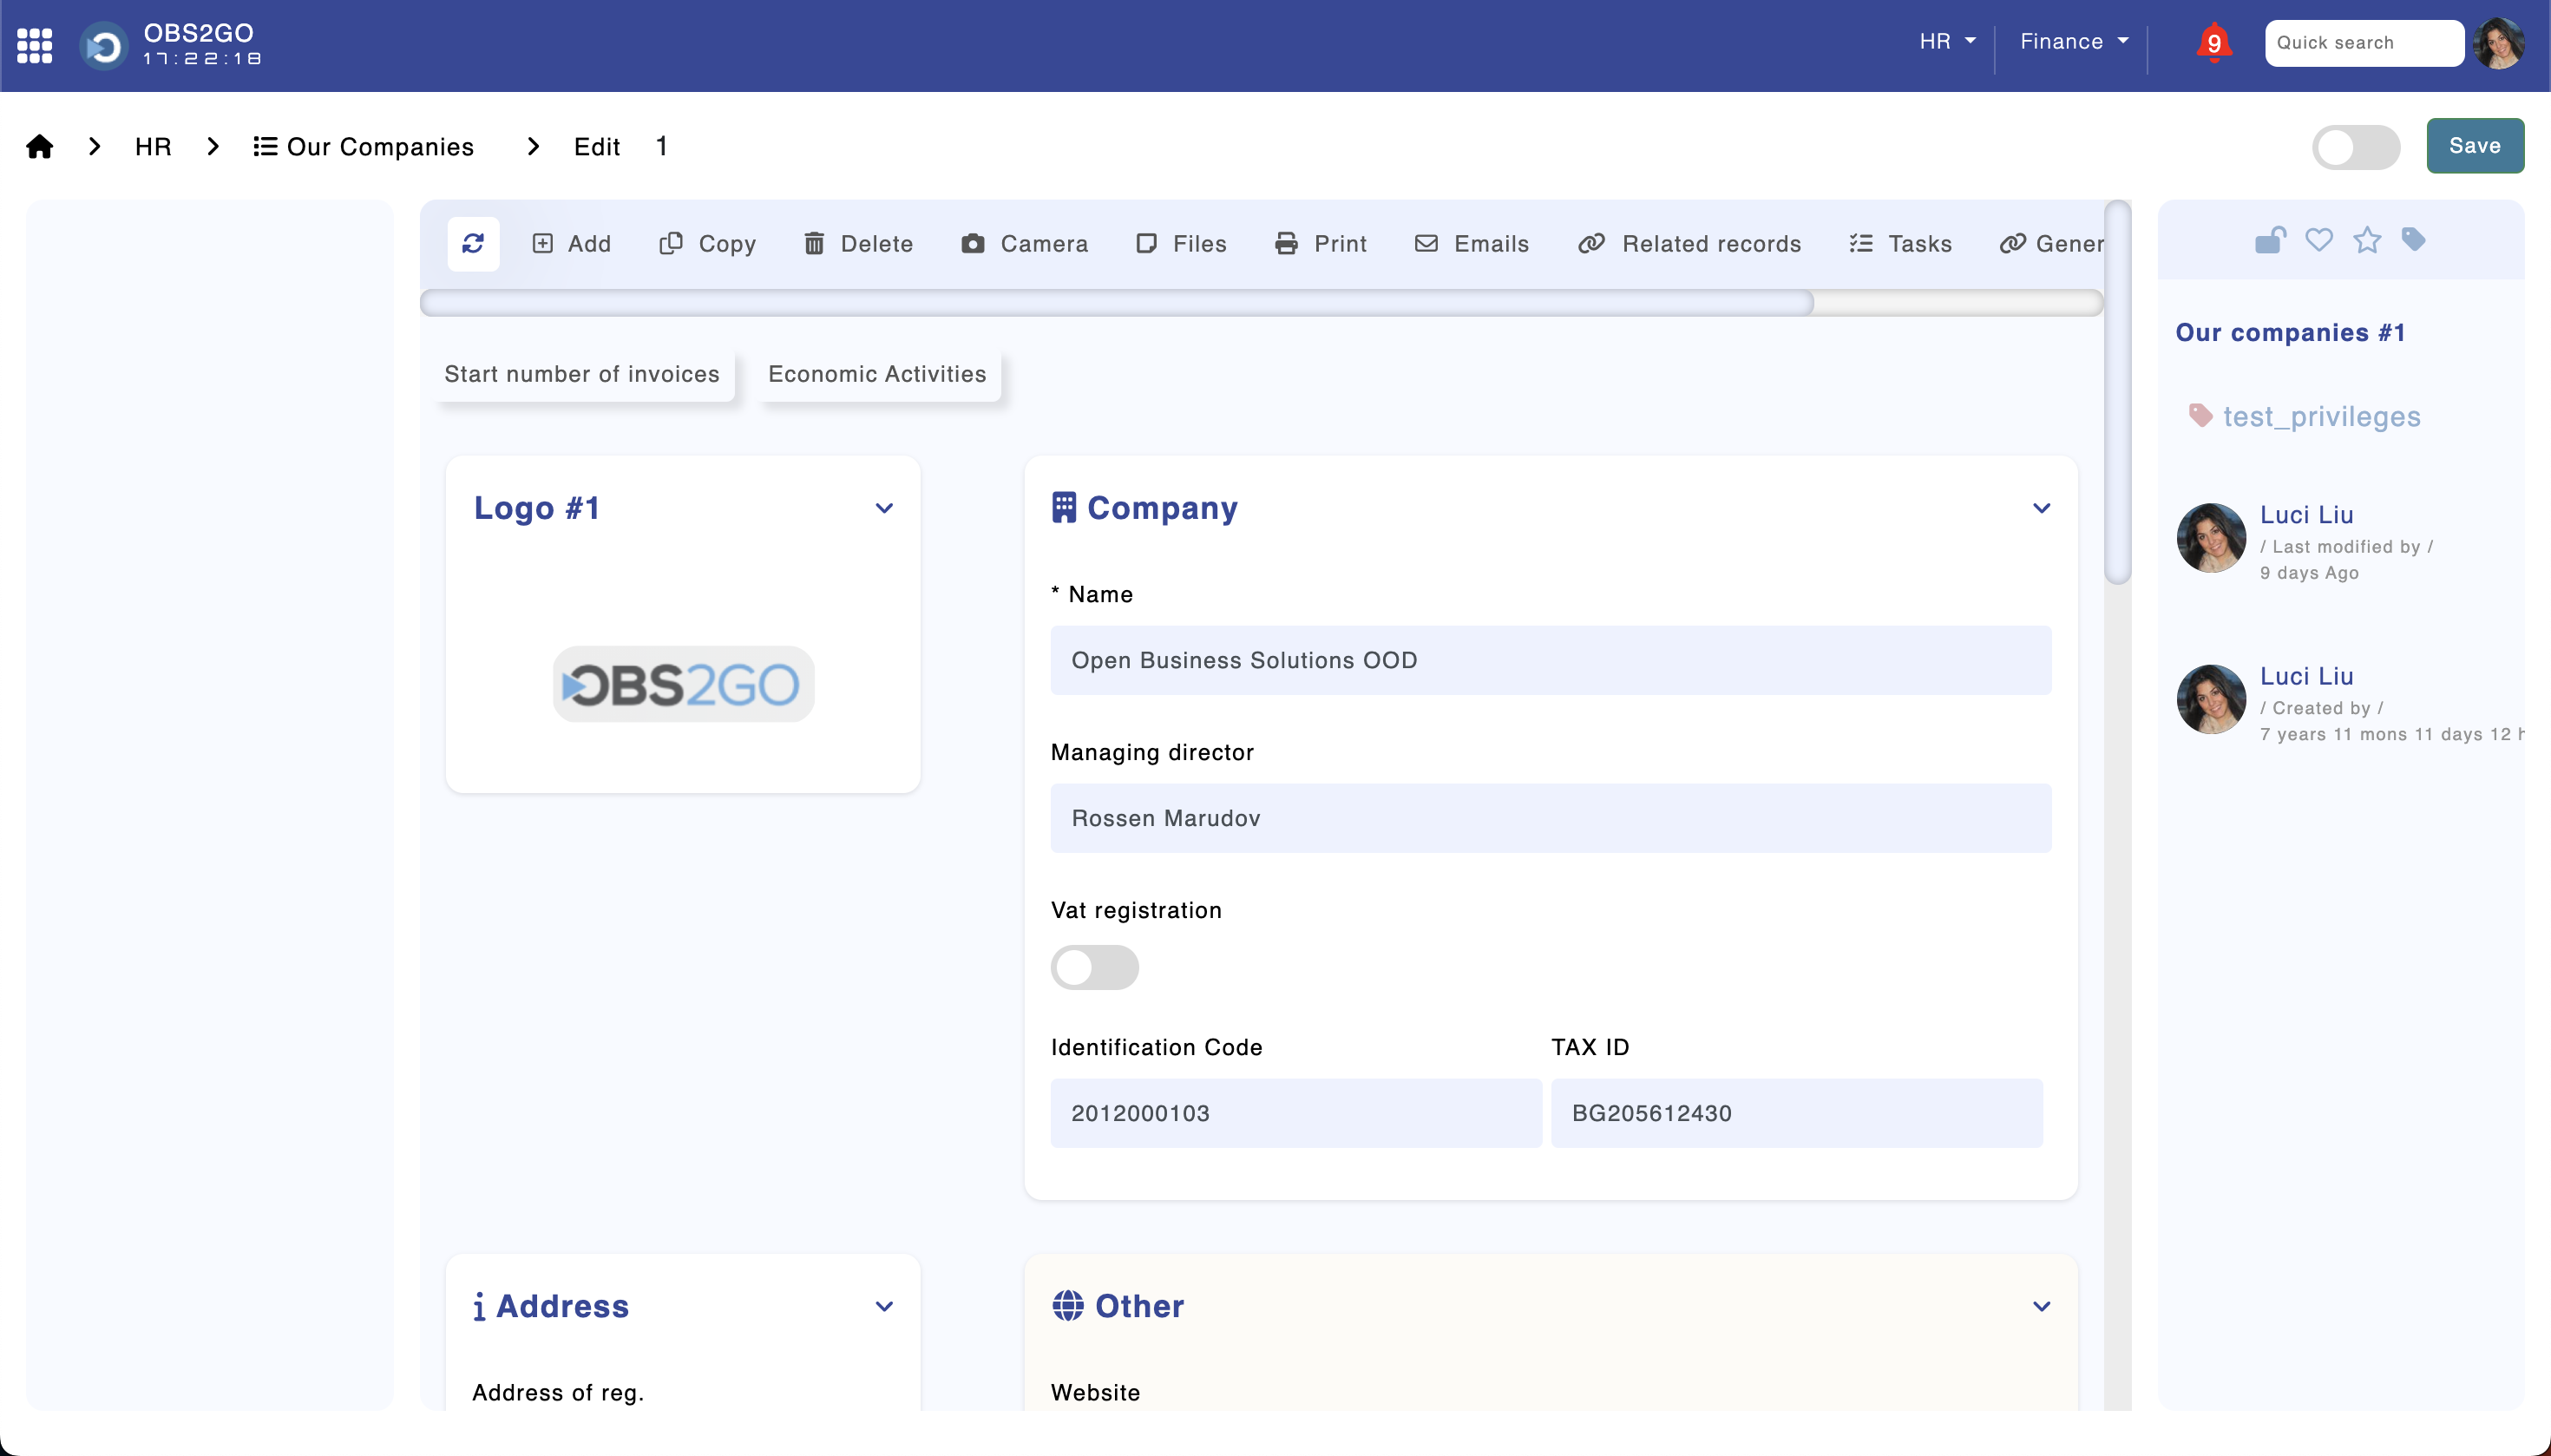
Module "Our Companies"
Departments
Input the departments in module "Departments". You can register unlimited number of departments.
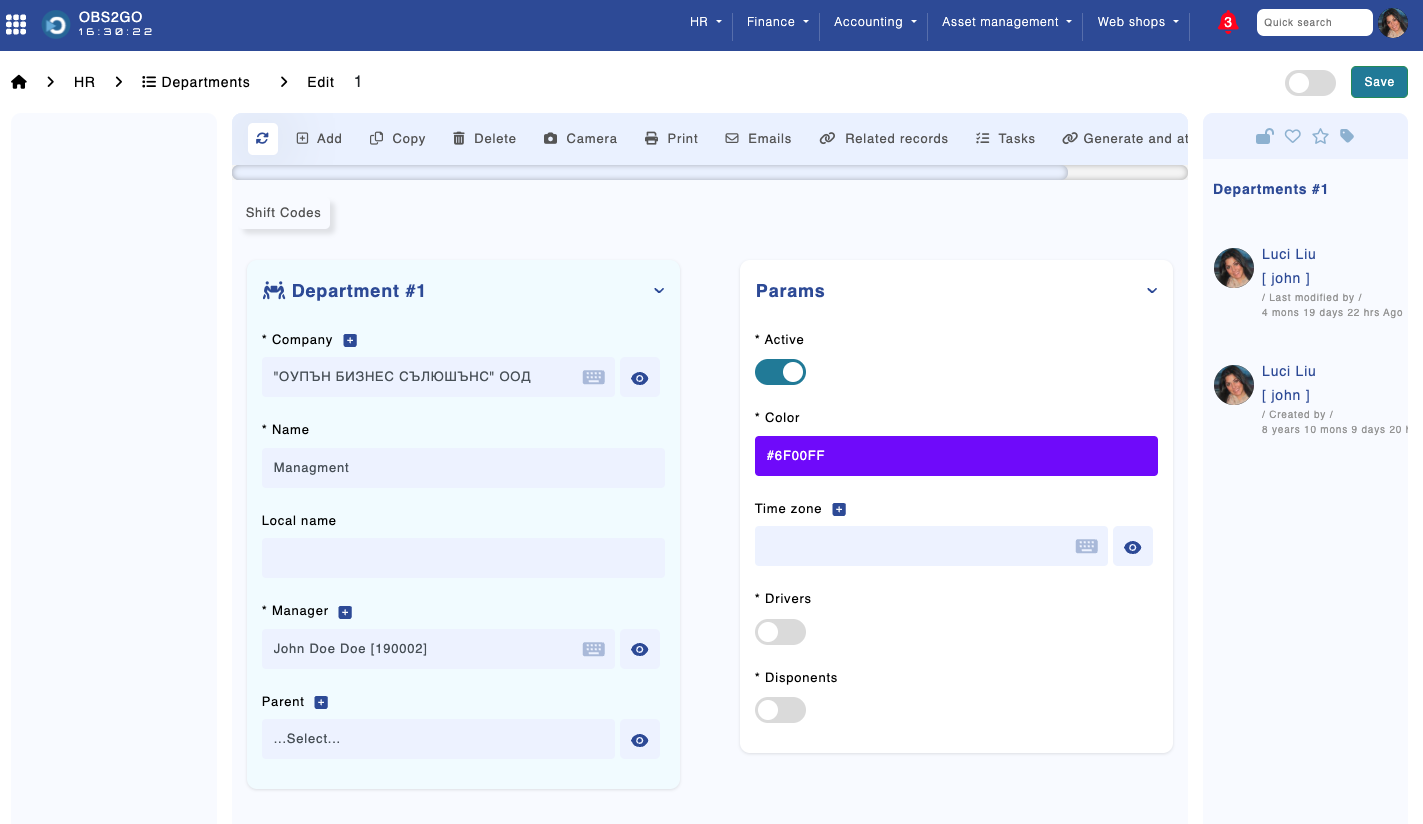
Module "Departments"
Positions
Input the positions in module "Positions". You can register unlimited number of positions.
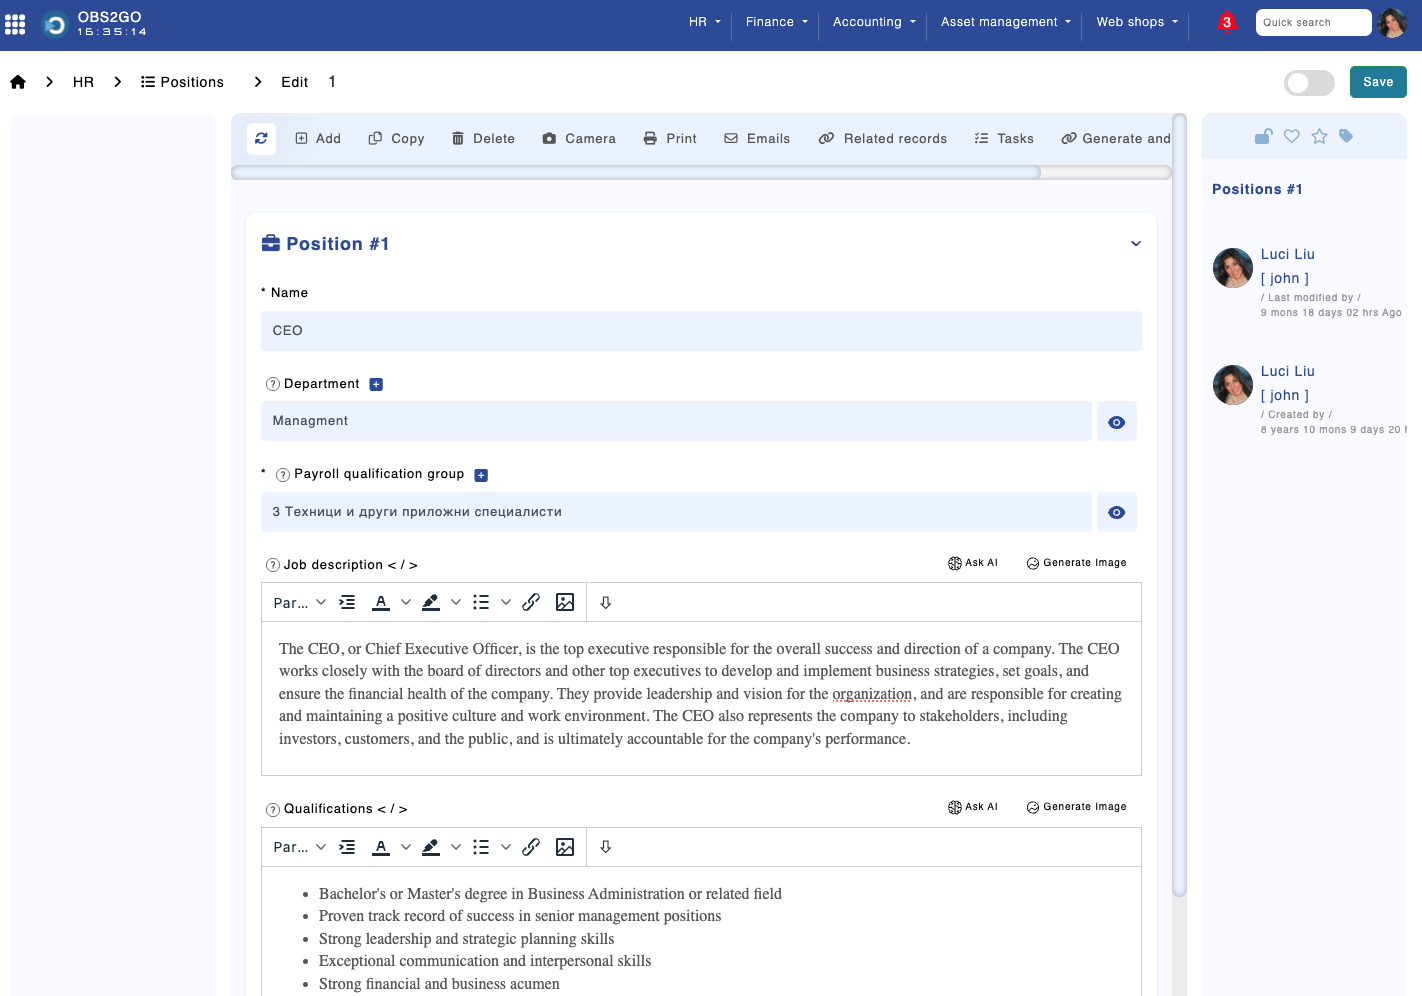
Module "Positions"
Employees
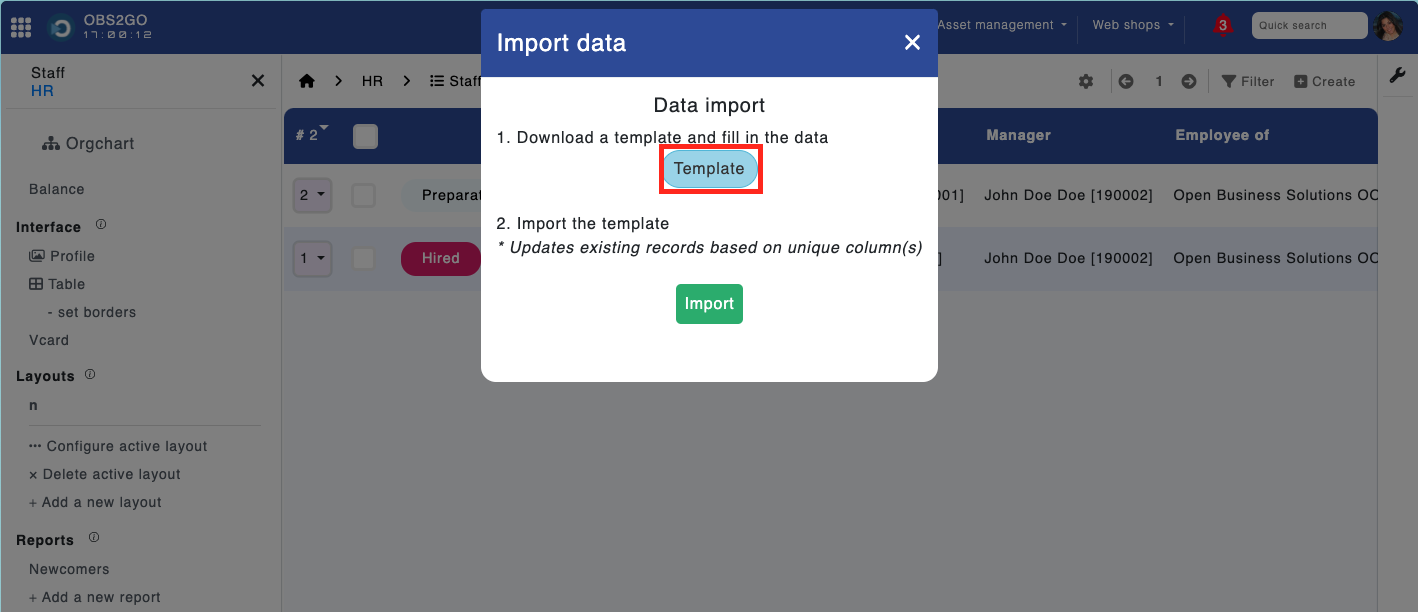
In the "Staff" module, you can import data using the "Data Import" option located in the left-hand side menu.
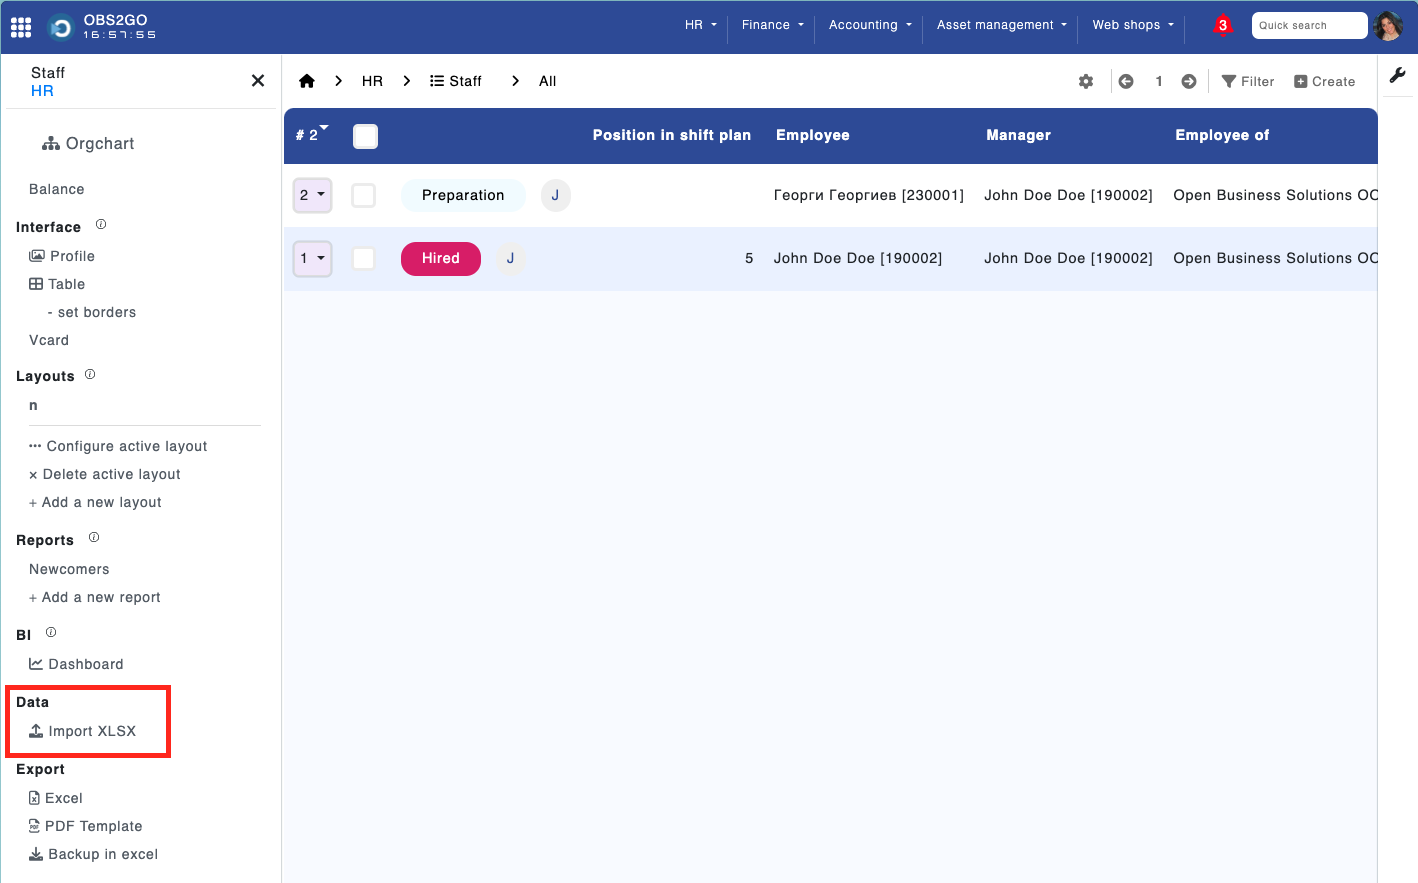
Module "Staff"
Upon selecting this option, a pop-up window will appear.
Module "Staff"
Initially, you'll be prompted to download a template, which is provided as an Excel file. Once downloaded, ensure to complete all mandatory fields, including names, email addresses, corporate numbers, departments, positions, and managers.
It's important to note that in the template file, managers should be listed at the top, and departments should be included beforehand.
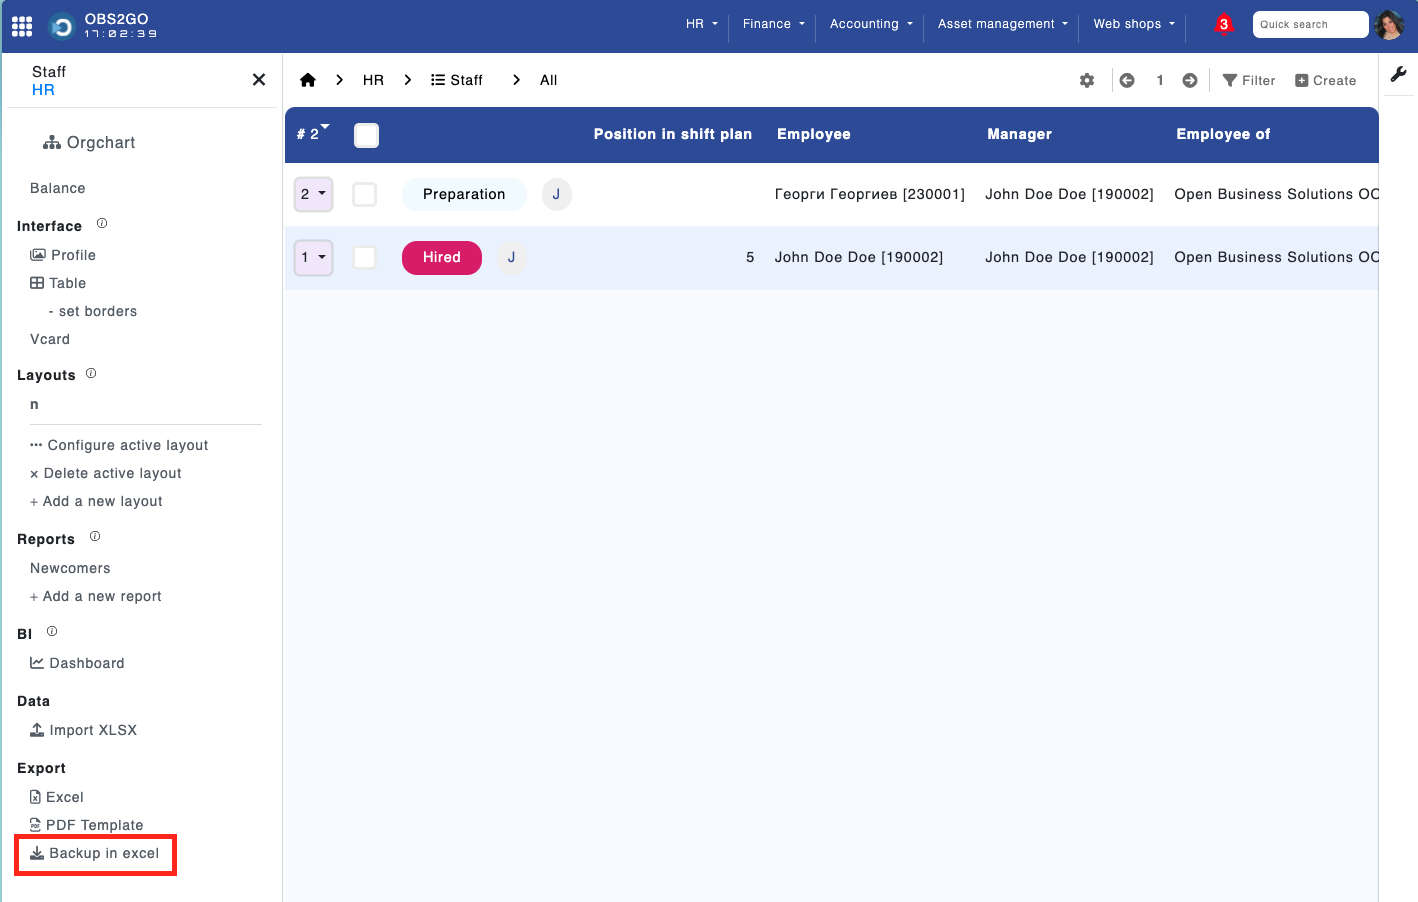
Additionally, there's a backup feature available for updating records. You can download a backup file in Excel format from the left-hand side menu.
Module "Staff"
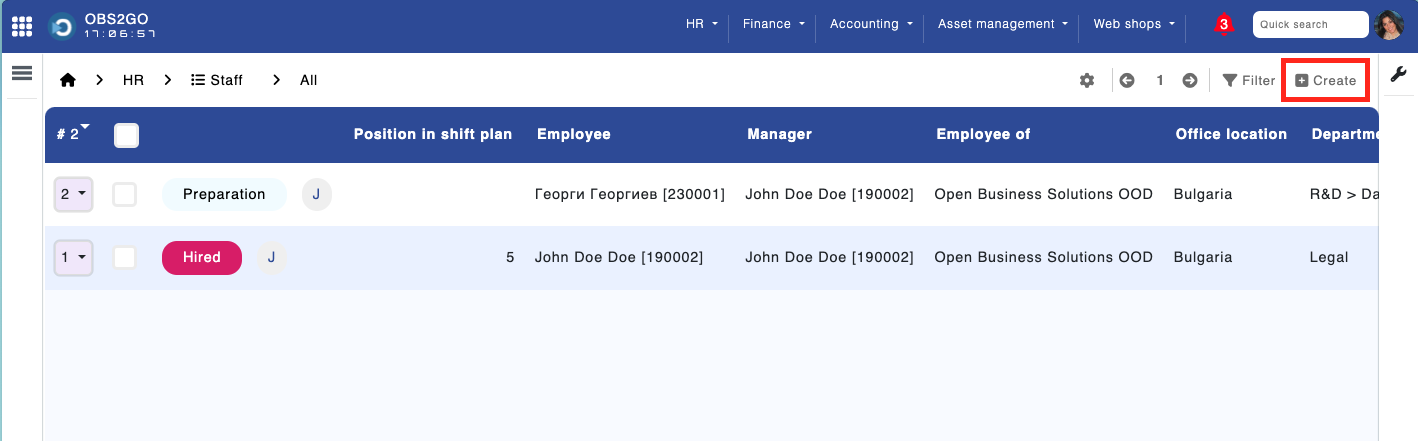
For manual entry of employee data, navigate to the "Employees" module and click the "Create" button located in the top-right corner of the screen.
Module "Staff" > Create
It's essential to note that before creating employees, you must first create departments, with the initial employees designated as managers.
So you want to add a section in the HTML documentation describing the staff_filter_active setting — similar to how the other settings are documented. Here's the addition to place in the Employees section or as a separate configuration entry: htmlActive Staff Filter
Setting Name: Filter Staff List to Active Only
Setting Key: staff_filter_active
Valid Values: true or false
Default: false (show all staff)
What This Setting Does
Controls whether the staff list displays only active employees or all employees regardless of their active status.
- When set to
true: Only employees withactive = trueare returned. Inactive or terminated staff are hidden from all staff listings and dropdowns. - When set to
falseor not set: All staff are returned regardless of their active status, including inactive and terminated employees.
When to Enable This Setting
- Your organization has a large number of inactive or terminated employees that clutter staff dropdowns and listings.
- You want to prevent assigning tasks, shifts, or documents to inactive employees.
- Staff selectors across modules should only show currently employed personnel.
When to Keep Disabled
- You need to view or report on historical data involving inactive employees.
- HR requires access to all staff records including past employees.
- You are auditing or reviewing terminated employee records.
Important Notes
- If the key does not exist in settings, or has any value other than
true, the system defaults to showing all staff. - This setting affects all staff listing queries system-wide.
- Existing records and assignments linked to inactive employees are not affected — only their visibility in listings.
Automatic Shift Insertion for Administrative Staff
The system can automatically generate shift codes for administrative employees based on a predefined configuration. This process ensures that shifts are filled in advance across multiple months and aligned with the employee’s working hours and classification.
Settings Required
- Name: Shift code ID per working hours in format {"H":CODE_ID} — e.g. {"2":101, "4":102, "6":103, "8":104}
Key: auto_shift_admin_shift_code_by_hours
Value: {"2":101, "4":102, "6":103, "8":104} - Name: Period (in months) for generating admin shift schedule
Key: auto_shift_admin_period_months
Value: 6 - Name: Staff classification IDs (comma-separated) for auto-filled admin shifts (e.g. 3,4,7)
Key: auto_shift_admin_classification_ids
Value: 3,4,7 - Name: Fill Shifts on Non-Working Days with a Non-Working Code
Key: auto_shift_admin_fill_non_working_days
Value: true / false
How It Works
The system goes through each active employee and checks their working hours, staff classification, and schedule gaps. Then it inserts the correct shift code per day, only on days where no holidays or existing shifts are present.
If shift settings are missing or empty:
- If shift code mapping is missing — fallback logic will try to find a D* shift from the database that matches the employee's hours and is not absence-related.
- If months value is missing — the system will default to 6 months.
- If classification filter is missing or empty — all active employees will be considered.
Automatic Shift Code Creation
If an employee has working hours that do not match any existing shift code (neither via the JSON mapping nor the database fallback), the system will automatically create a new shift code by cloning the base 8-hour working day code (D or D8, or whatever it is).
The auto-created shift code:
- Is named using the pattern D + hours — e.g. D3.5, D4.8, D7
- Copies all properties from the base D8 code (break times, flags, team, country, pay rate, etc.)
- Overrides only: name, day_hours, description, color, and active = true
- Is assigned a random light color for visual distinction in the schedule
If no base D8 code exists in the system, the auto-creation is skipped. The affected employee/date is skipped without interrupting the rest of the process.
The logic also ensures that:
- If an employee has no working hours set, 8 is assumed by default.
- No shifts are added on weekends according to office policy.
- Employees with start/end dates outside the target day are skipped for that day.
Best Practices
- To see classification IDs, go to the Staff Classifications module and check the ID column.
- To see shift code IDs, open the Shift Codes module and look at the codes that start with "D" and match the number of hours.
- You can change the settings anytime — changes apply only for future generated shifts.
- After automatic shift code creation, you can review and adjust the auto-generated codes (name, color, description) in the Shift Codes module.
This logic ensures that your schedule is always filled accurately and automatically for your administrative team without manually selecting codes each time.
Planning Lock Strategies
Overview
The system allows organizations to control when modifications to shift planning, overtime requests, vacations, and home office requests can be made. This is done using a setting called planning_lock_strategy, which determines when the schedule becomes locked.
There are four possible strategies for locking the schedule:
- lock_planning_first_working_day – Locking happens on the first working day of the following month.
- lock_planning_first_of_month – Locking happens on the 1st of the following month.
- lock_planning_final_working_days_restriction – Locking happens in stages during the last few working days of the month.
- lock_planning_payroll_cutoff_NN – Locking happens on a configurable calendar day of the current month, aligned with payroll processing.
Each option ensures that schedule changes follow company policies while maintaining flexibility where needed.
1. Lock Planning on the First Working Day of the Month (lock_planning_first_working_day)
How it Works:
- The last day to make changes is the first working day of the following month.
- After this day, all modifications are blocked.
- If an employee or manager needs an exception, they must contact HR.
Example:
- If an employee requests a vacation for March 15, changes to this request are allowed until the first working day of April.
- If April 1 is a weekend, the deadline extends to April 2 (Monday).
Who Can Still Make Changes?
- Certain privileged roles (as defined in system settings) can bypass the lock.
- HR has the option to temporarily unlock the schedule if needed.
2. Lock Planning on the 1st of the Month (lock_planning_first_of_month)
How it Works:
- The last day to make changes is the last day of the current month.
- The schedule becomes fully locked on the 1st of the new month.
- After that, changes require manual intervention by HR.
Example:
- If an employee submits an overtime request for March 20, they can still edit or cancel it until March 31.
- As soon as April 1 arrives, no more changes are allowed.
Why Use This?
- This is the simplest locking method.
- It prevents last-minute adjustments that could disrupt planning.
3. Lock Planning in the Final Working Days of the Month (lock_planning_final_working_days_restriction)
How it Works:
This method gradually locks the schedule as the month comes to an end. The process is as follows:
- On the fourth-to-last working day of the month, changes are restricted.
- Between the third and last working day, a temporary unlock period allows last-minute adjustments.
- After the last working day, the schedule is permanently locked.
Example:
- If the last working day of the month is March 29 (Friday):
- Changes start being restricted on March 26 (Tuesday).
- A brief unlock period is allowed between March 27 and March 29.
- After March 29, the schedule is permanently locked.
Why Use This?
- This method provides structured flexibility, allowing final adjustments before a complete lock.
- HR can still manually unlock the schedule if needed.
4. Lock Planning at Payroll Cutoff Day (lock_planning_payroll_cutoff_NN)
How it Works:
- The setting follows the format lock_planning_payroll_cutoff_NN, where NN is a configurable calendar day between 1 and 31 (e.g. lock_planning_payroll_cutoff_25).
- Starting from day NN of the current month, all modifications to that month are locked.
- The lock is based on the calendar day, not working days – it applies regardless of whether the day is a weekend, holiday, or regular working day.
- Future months remain open for changes at all times.
- Past months are permanently locked.
- Sick leave is exempt – sick leave requests (entries marked as sick leave in the vacation_types configuration) can still be submitted, edited, or cancelled even after the cutoff day. This applies to both vacations and cancelled vacation requests.
Example (cutoff day = 25):
- Until June 24 – June requests can be submitted, edited, or cancelled freely.
- From June 25 onwards – June is locked, but July, August, and later months remain open.
- Sick leave for June can still be entered after June 25, since sick leave cannot be predicted in advance.
- HR can still temporarily unlock the period if a manual correction is required.
Edge Cases:
- If NN = 31 and the target month has only 30 days (e.g. June, September, November), the cutoff effectively becomes the 1st of the next month, meaning the entire month remains open until it ends.
- The same applies for NN = 30 or 31 in February – the cutoff falls on March 1.
- For typical payroll cutoff days (20–28), this edge case never triggers.
Why Use This?
- Aligns with payroll processing cycles, where data must be finalized by a specific day each month.
- Provides a predictable, calendar-based deadline that all employees can plan around – no need to track working days, weekends, or holidays.
- The sick leave exemption ensures that legitimate, unpredictable health-related absences are never blocked.
- The cutoff day is fully configurable per organization – simply change the number at the end of the setting value.
What Happens If Someone Tries to Modify a Locked Schedule?
- The system will display a message explaining why the schedule is locked.
- If necessary, HR or an administrator can manually override the lock.
Choosing the Right Strategy
| Strategy | Last Day for Changes | Can HR Unlock? | Best For |
|---|---|---|---|
| lock_planning_first_working_day | First working day of next month | Yes | Ensuring all changes are finalized at the beginning of the month |
| lock_planning_first_of_month | Last day of the current month | Yes | A simple approach with a clear cut-off date |
| lock_planning_final_working_days_restriction | Fourth-to-last working day, with final unlock period | Yes | Allowing last-minute flexibility while maintaining structure |
| lock_planning_payroll_cutoff_NN | Day NN-1 of the current month (configurable) | Yes | Aligning lock with payroll processing cycles, with sick leave always allowed |
Leave Management Settings
Overview
The system provides advanced configuration options for leave (vacation) management to accommodate different workforce types and scheduling requirements. These settings allow organizations to customize how vacation days are calculated, how shift schedules interact with time-off approvals, and what validation requirements must be met before vacation approval—all based on employee shift patterns and operational needs.
1. Shift-Aware Vacation Day Calculation
Setting Name: Vacations: Shift-Aware Day Calculation
Setting Key: vacations_shift_aware_calculation
Valid Values: true or false
Default: false
What This Setting Does
When enabled, the system calculates vacation days by taking into account the employee's actual shift schedule from the shift management system, rather than using only the standard calendar-based calculation (weekends + holidays). This setting applies to both regular vacation requests AND sick leave requests.
Standard Calculation (when disabled):
- Counts all calendar days in the vacation period
- Subtracts weekends based on office configuration (Saturday, Sunday, or both)
- Subtracts official holidays
- Adds back official working days that fall on weekends
Shift-Aware Calculation (when enabled):
- Counts all calendar days in the vacation period
- Subtracts weekends based on office configuration
- Subtracts official holidays
- Additionally subtracts days marked as non-working in the employee's shift schedule
- For sick leave: counts scheduled work shifts even if they fall on weekends or holidays
- Uses a unique date union method to avoid double-counting days that are both weekends and non-working shifts
Why You Would Need This Setting
This setting is essential for organizations with non-standard work schedules, particularly:
Manufacturing Facilities:
- Employees work rotating shifts (day shift, night shift, rotating patterns)
- Some employees have 4-day work weeks or compressed schedules
- Shift patterns include planned non-working days that aren't weekends
- Production schedules require precise tracking of actual working vs non-working days
24/7 Operations:
- Healthcare facilities with rotating nursing schedules
- Call centers with varying shift patterns
- Security services with non-traditional work weeks
- Any operation where employees regularly work weekends or holidays
Example Scenarios:
Vacation Request Example:
An employee works a 4-day week (Monday-Thursday) with Fridays marked as non-working days in their shift schedule:
- Without shift-aware calculation: A Friday vacation request would count as 1 vacation day
- With shift-aware calculation: A Friday vacation request would count as 0 vacation days (because Friday is already a non-working day in their schedule)
This prevents employees from "wasting" vacation days on days they weren't scheduled to work anyway.
Sick Leave Example:
A production line operator is scheduled to work Saturday and Sunday (their regular work week is Tue-Sat):
- Without shift-aware calculation: Employee calls in sick on Saturday = 0 sick days used (it's a weekend)
- With shift-aware calculation: Employee calls in sick on Saturday = 1 sick day used (they were scheduled to work)
This prevents employees from having "unlimited" sick time on weekends/holidays when they're actually scheduled to work those days, and ensures fair and accurate sick leave tracking for organizations with non-traditional work schedules.
Compliance and Policy Requirements:
- Some labor laws require tracking sick leave based on scheduled work, not calendar days
- Union agreements may specify that sick leave during scheduled shifts counts regardless of day type
- Internal policies requiring accurate sick leave accrual and depletion tracking
2. Shift Planning Approval Requirement
Setting Name: Vacations: Require Complete Shift Planning for Approval
Setting Key: vacations_require_shifts_before_approval
Valid Values: true or false
Default: false
What This Setting Does
When enabled, this setting enforces a strict workflow requirement: vacation requests can only be approved if the employee has shift assignments for every single day of the requested vacation period in the shift management system.
The system performs a validation check when a manager attempts to approve a vacation request:
- Counts the total number of days in the vacation period
- Counts the number of shift entries assigned to the employee for those dates
- If the counts don't match → approval is blocked with an error message
Example Validation:
- Employee requests vacation from March 1-5 (5 calendar days)
- Shift management has shifts assigned for March 1, 2, 3, 4 only (4 entries)
- Manager clicks "Approve" → System blocks approval
- Error message: "In order to approve a vacation request, the planning in shift management for [Employee Name] between 01.03.2025 and 05.03.2025 shall be completely filled in."
Why You Would Need This Setting
This setting is designed for organizations where shift coverage planning must be completed before approving time off. It enforces operational discipline and ensures no gaps in workforce planning.
Manufacturing and Production Facilities:
- Production lines require continuous staffing - every position must have coverage
- Shift replacements must be planned before vacation approval
- Prevents last-minute scheduling gaps that could halt production
- Ensures managers plan replacement workers in advance
24/7 Operations:
- Healthcare facilities where every shift must be covered
- Security operations requiring constant staffing
- Call centers with mandatory coverage requirements
- Any operation where understaffing creates safety or operational risks
Compliance and Workflow Requirements:
- Union agreements requiring documented replacement planning
- Internal policies mandating shift coverage before time off approval
- Audit requirements showing proper workforce planning
- Organizations needing to prove shift gaps were addressed before approvals
How It Works in Practice
Standard Approval Workflow (setting disabled):
- Employee requests vacation
- Manager reviews and approves
- Shift planning happens separately (before, during, or after approval)
Enforced Planning Workflow (setting enabled):
- Employee requests vacation
- Manager reviews the request
- Manager must fill in shift schedule for all vacation days (assign replacements, mark as off-days, etc.)
- Only then can the manager approve the vacation request
- System validates that every day has a shift entry before allowing approval
What counts as a "shift entry":
- Any record in the shifts table for that employee and date
- Can be a work shift, off-day, vacation code, or any shift type
- The system only checks that something is scheduled - not what type of shift it is
When to Enable This Setting
Enable when:
- Your organization uses the shift management module extensively
- Shift coverage is critical to operations (manufacturing, healthcare, 24/7 services)
- You need to enforce planning discipline before approving time off
- Gaps in shift schedules cause operational disruptions
- Managers must document replacement workers before approving absences
- Labor agreements require advance coverage planning
Keep disabled when:
- You run a standard office environment without shift management
- Shift planning and vacation approval are separate, independent processes
- Your organization handles coverage informally or after vacation approval
- You don't use the shift management module
- Flexible coverage arrangements don't require pre-planning every day
Important Notes
- This validation only applies when approving vacation requests (changing status to "approved")
- The setting does not affect vacation request creation or editing
- Employees can still submit vacation requests without having shifts assigned
- The check happens at the approval moment - managers will see an error if shifts are incomplete
- Every calendar day in the vacation period must have a shift entry, including:
- Weekends (if employee works weekends)
- Holidays (if employee works holidays)
- Any day that falls within the start and end dates
- Administrators with appropriate privileges may be able to bypass this check if necessary
- The system checks for the existence of shift entries, not their type - vacation codes, off-days, work shifts all count
Example Scenarios
Scenario 1: Manufacturing Plant
A production line operator requests vacation for an entire week (Monday-Friday, 5 days):
- With setting enabled: The shift manager must first schedule a replacement worker for all 5 days, then approve the vacation
- Without setting enabled: Manager can approve immediately, shift planning happens separately
Scenario 2: 24/7 Healthcare Facility
A nurse requests 3 days off including a weekend (Friday-Sunday):
- With setting enabled: The scheduling coordinator must assign all 3 shifts (including weekend) to replacement nurses before approving
- Without setting enabled: Approval can happen independently of shift coverage planning
Scenario 3: Incomplete Planning
An employee requests vacation for 10 days, but the manager has only planned shifts for 8 of those days:
- With setting enabled: System blocks approval with error message identifying the date range
- Without setting enabled: Approval proceeds, manager handles remaining 2 days later
3. Respect Non-Working Shifts
Setting Name: Vacations: Respect Non-Working Shifts
Setting Key: vacations_respect_non_working_shifts
Valid Values: true or false
Default: false
Related Setting: Works independently but commonly used together with vacations_shift_aware_calculation
What This Setting Does
When enabled, this setting controls how the system handles vacation and sick leave approvals when employees have planned rest days (non-working shifts) already scheduled in the shift management system.
Standard Behavior (when disabled):
- When a vacation or sick leave is approved, the system replaces ALL existing shift codes in the vacation period with vacation/sick leave codes
- This includes replacing pre-planned rest days (non-working shifts) with vacation codes
- All days in the vacation period get the same vacation/sick leave code
Respecting Non-Working Shifts (when enabled):
- Before inserting vacation/sick leave codes, the system checks if the employee already has a shift marked as "non-working day"
- If a day is marked as non-working (such as a scheduled rest day in a rotation), the system preserves that rest day code and does not overwrite it with a vacation code
- Only days with actual work shifts (or no shifts) are replaced with vacation/sick leave codes
- This maintains the integrity of pre-planned shift schedules and rest day rotations
Why You Would Need This Setting
This setting is crucial for organizations that plan shift schedules in advance and need to distinguish between scheduled rest days and vacation days.
Rotating Shift Operations:
- Manufacturing plants with rotating 4-on-3-off or 5-on-2-off schedules
- Healthcare facilities where nurses have rotating rest days (not always weekends)
- Security operations with non-standard rest day rotations
- Any operation where rest days are pre-planned and part of the shift rotation
Payroll and Reporting Accuracy:
- Organizations that need to distinguish between paid vacation days and unpaid rest days in reporting
- Systems that track vacation balance separately from scheduled rest days
- Compliance requirements to show actual vacation days taken vs. scheduled rest days
- Payroll systems that process vacation differently from rest days
Shift Schedule Integrity:
- Maintaining accurate historical records of planned vs. actual work schedules
- Preventing vacation codes from obscuring the original shift plan
- Preserving the ability to analyze shift patterns and coverage accurately
How It Works in Practice
Standard Behavior Example (setting disabled):
Employee has a 5-day rotation schedule:
- Mon-Thu: Work shifts (D8 codes)
- Fri: Scheduled rest day (N code - non-working)
Employee requests vacation for Mon-Fri:
- Result: All 5 days replaced with VAC code (Mon-Fri all show as vacation)
- Issue: The scheduled rest day (Fri) is now marked as vacation, potentially affecting vacation balance tracking
Respecting Non-Working Shifts Example (setting enabled):
Same employee with same rotation:
- Mon-Thu: Work shifts (D8 codes)
- Fri: Scheduled rest day (N code - non-working)
Employee requests vacation for Mon-Fri:
- Result: Mon-Thu replaced with VAC code, Fri keeps N code (rest day preserved)
- Benefit: Clear distinction between vacation days (4) and scheduled rest day (1)
Sick Leave Behavior
This setting also applies to sick leave approvals:
When enabled:
- Sick leave codes only replace actual work shifts
- Scheduled rest days remain as rest days (not sick days)
- This ensures sick leave tracking reflects days the employee was actually scheduled to work
Example:
Employee calls in sick for Thu-Sat, where Saturday is their scheduled rest day:
- With setting enabled: Thu-Fri = sick leave codes, Sat = rest day code (2 sick days)
- Without setting enabled: Thu-Sat = all sick leave codes (3 sick days, including rest day)
When to Enable This Setting
Enable when:
- Your shift schedules include pre-planned rest days that are part of the work rotation
- You need to distinguish between vacation days and scheduled rest days in reporting
- Vacation balance tracking must exclude scheduled rest days
- Payroll or compliance requires separate tracking of vacation vs. rest days
- You operate rotating shift schedules (4-on-3-off, 5-on-2-off, etc.)
- Maintaining shift schedule integrity is important for historical analysis
Keep disabled when:
- Rest days in your organization are always weekends (handled by office configuration)
- You don't pre-plan rest days in the shift management system
- Vacation should cover all days in the period regardless of shift type
- Your organization doesn't distinguish between vacation and scheduled rest days
- Simpler vacation tracking without shift-level granularity is preferred
Important Notes
- This setting checks the
non_working_dayflag in theshift_codestable - Shift codes must be properly configured with the
non_working_dayflag for this setting to work correctly - This setting affects shift code insertion during vacation/sick leave approval, not the vacation day calculation itself
- Paternity leave always overwrites all shifts (including rest days) regardless of this setting, as paternity is continuous time off
- This setting works independently but is commonly used together with
vacations_shift_aware_calculationfor comprehensive shift-based leave management
Example Scenarios
Scenario 1: Manufacturing Plant with 4-on-3-off Rotation
A production worker has a rotation: Mon-Thu work (D8), Fri-Sun rest (N code). They request vacation for the entire week Mon-Sun:
- With setting enabled: Mon-Thu = VAC codes (4 vacation days), Fri-Sun = N codes preserved (3 rest days)
- Without setting enabled: Mon-Sun = all VAC codes (7 vacation days, including scheduled rest)
- Impact: Accurate tracking shows 4 vacation days used instead of 7
Scenario 2: Healthcare Rotating Schedule
A nurse works Tue-Sat with Sun-Mon as scheduled rest days. They call in sick for Sat-Mon:
- With setting enabled: Sat = sick leave code (1 sick day), Sun-Mon = rest codes preserved
- Without setting enabled: Sat-Mon = all sick leave codes (3 sick days)
- Impact: Sick leave balance correctly reflects 1 day instead of 3
Scenario 3: Mixed Vacation Request
Employee with varied schedule requests vacation: Mon-Wed work shifts, Thu rest day, Fri work shift:
- With setting enabled: Mon-Wed = VAC, Thu = N (preserved), Fri = VAC (4 vacation days total, Thu not counted)
- Without setting enabled: Mon-Fri = all VAC codes (5 vacation days)
- Impact: Employee doesn't "waste" a vacation day on their scheduled rest day
How These Settings Work Together
These three settings work independently but complement each other to provide comprehensive shift-based leave management:
vacations_shift_aware_calculation = trueenables the system to look at shift schedules when calculating how many vacation days a request consumes (applies to both vacation and sick leave)vacations_require_shifts_before_approval = trueenforces workflow discipline by requiring complete shift planning before approvalvacations_respect_non_working_shifts = truepreserves scheduled rest days when inserting vacation/sick leave codes into the shift schedule
Key Differences Between Settings #1 and #3:
While both settings deal with shift schedules, they serve different purposes:
- Setting #1 (shift-aware calculation): Determines how many vacation days are subtracted from the employee's balance based on shift schedule
- Setting #3 (respect non-working shifts): Determines which shift codes are overwritten when vacation is approved
Organizations with rotating shifts often enable both settings together to get complete shift-aware behavior for both calculation and shift code management.
Combined Example:
An employee with a Tue-Sat work schedule (Sunday-Monday rest days) requests sick leave for Friday-Monday. All three settings are enabled:
- Setting #1 (calculation): Fri-Sat are work days = 2 sick days calculated (Saturday counts because it's a work shift even though it's a weekend)
- Setting #2 (approval requirement): Manager must have shifts scheduled for all 4 days before approving
- Setting #3 (respect non-working): Sun-Mon rest day codes are preserved, only Fri-Sat get sick leave codes
Final Result:
- Vacation balance: 2 sick days deducted
- Shift schedule: Fri-Sat = sick leave codes, Sun-Mon = rest day codes (preserved)
- Approval: Required shifts for all 4 days before approval allowed
Configuration Best Practices
When to Enable These Settings:
- Your organization uses a shift management system
- Employees have non-standard work schedules or rotating shifts
- You operate 24/7 or have weekend/holiday operations
- You need precise tracking of working vs non-working days
- Labor regulations require shift-based leave calculations
- Shift coverage planning is critical to operations
- You need to distinguish between vacation days and scheduled rest days
When to Keep Disabled:
- All employees work standard Monday-Friday schedules
- You don't use the shift management module
- Your organization follows simple calendar-based vacation rules
- Weekend work is rare and handled through other mechanisms (overtime, compensatory time off)
- Shift planning and vacation approval are separate, independent processes
- You don't pre-plan rest days in the shift management system
Recommended Combinations:
For rotating shift operations:
- Enable settings #1 and #3 together for accurate day calculation and shift code preservation
- Consider setting #2 if shift coverage is critical
For standard office environments:
- Keep all settings disabled (default behavior)
For 24/7 operations with critical coverage:
- Enable all three settings for comprehensive shift-based leave management
Important Notes:
- Setting #1 only affects vacation type ID 1 (Annual Paid Leave) and sick leave types
- Changes to these settings apply to new vacation requests; existing approved requests are not recalculated
- The system uses the shift schedule at the time the vacation request is created/approved
- If shifts are modified after vacation approval, the original calculation and shift codes remain unchanged
- Setting #2 enforces validation at approval time, not at request creation time
- Setting #3 requires proper configuration of the
non_working_dayflag in shift codes
Technical Requirements
To use these features, ensure:
- The
shiftstable is populated with employee shift schedules - The
shift_codestable has codes marked withnon_working_day = truefor rest days (required for settings #1 and #3) - The
shift_codestable has codes marked withnon_working_day = falsefor work shifts - Employee shift assignments are up to date before vacation requests are submitted
- Managers have access to both vacation approval and shift planning functions (for setting #2)
- The shift management module is active and in use
- Rest day shift codes are properly configured if using setting #3
Final Notes
- The default setting can be adjusted in system settings.
- HR or administrators have the ability to unlock schedules manually when needed.
- These rules apply to shifts, overtime, vacations, and home office requests.
This structured locking system helps maintain clear deadlines, ensures fairness, and prevents last-minute disruptions to planning.