First steps
First Steps
The following steps describe the actions you need to take in order to promote OBS ERP into production. As any other ERP software, OBS ERP needs configuring in order to meet your requirements. The process might take a while, so please be patient and do not miss steps.
Change your password
It is not recommended to use the default password you have received on your email. The first thing you need to do is to login and change your default password with a new and secure one.
To achieve this, click on the Navigation icon positioned at the upper left corner of the screen. A navigation menu will be displayed, and then proceed to select the "wrench" icon in order to access the Settings.
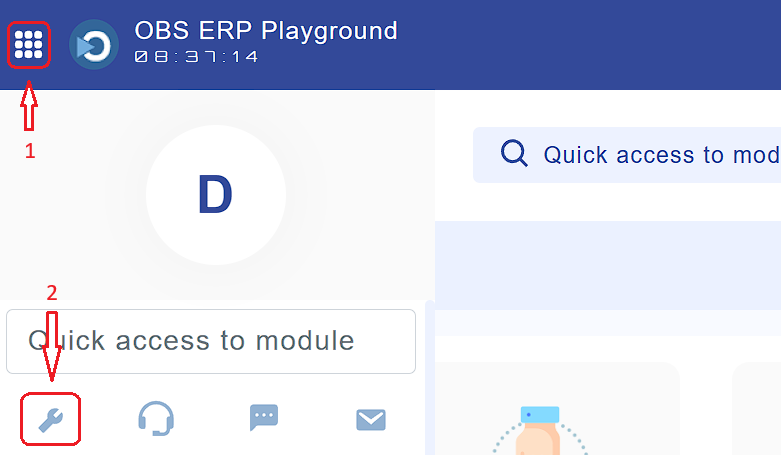
Fig. 1
The following pop-up will appear:
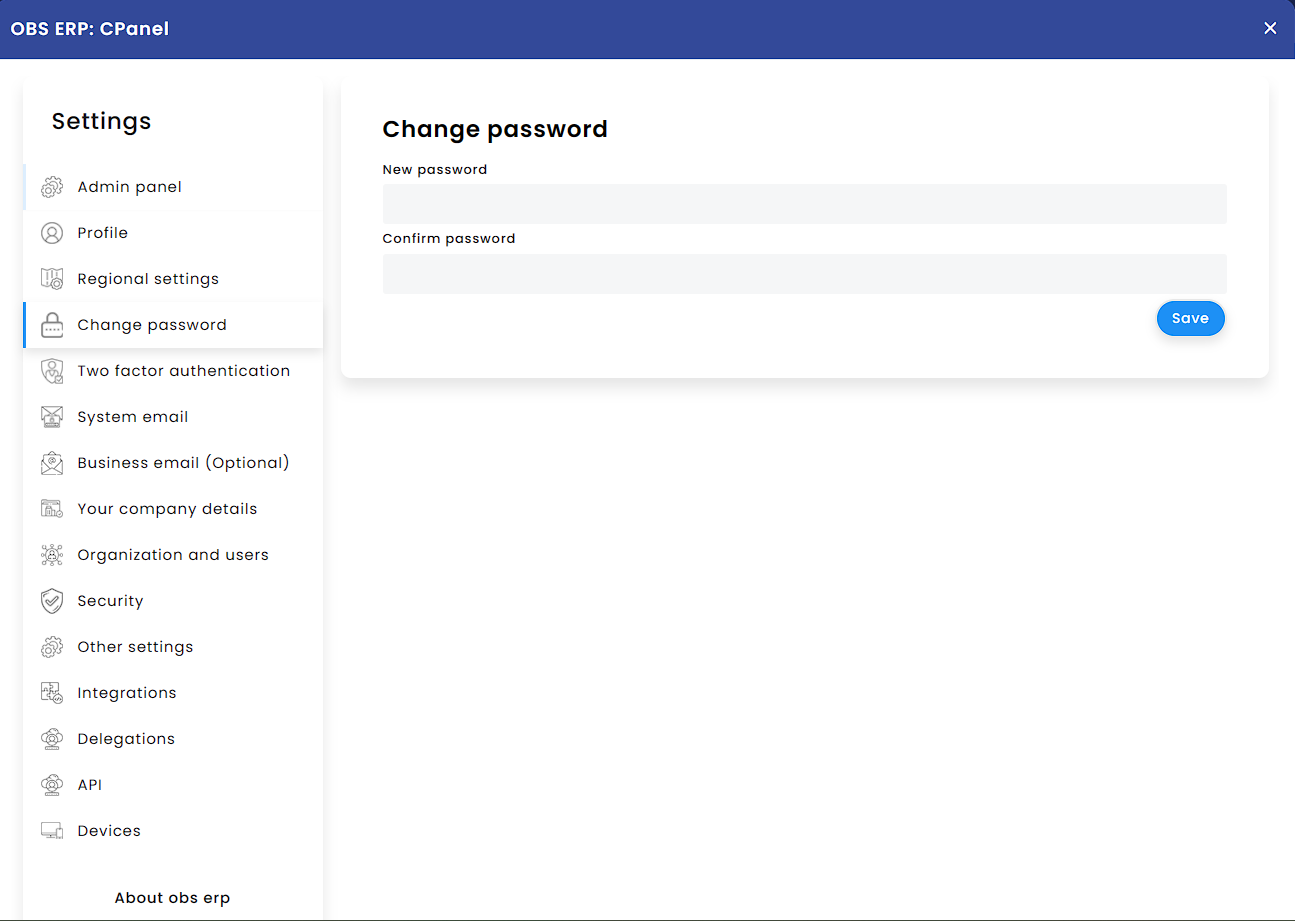
Fig. 2
Click Change password tab and fill-in the new password, click Save.
To reset forgotten password, you need to open the login page of your OBS ERP instance and click Forgotten password. OBS ERP will send out further instructions to your email.
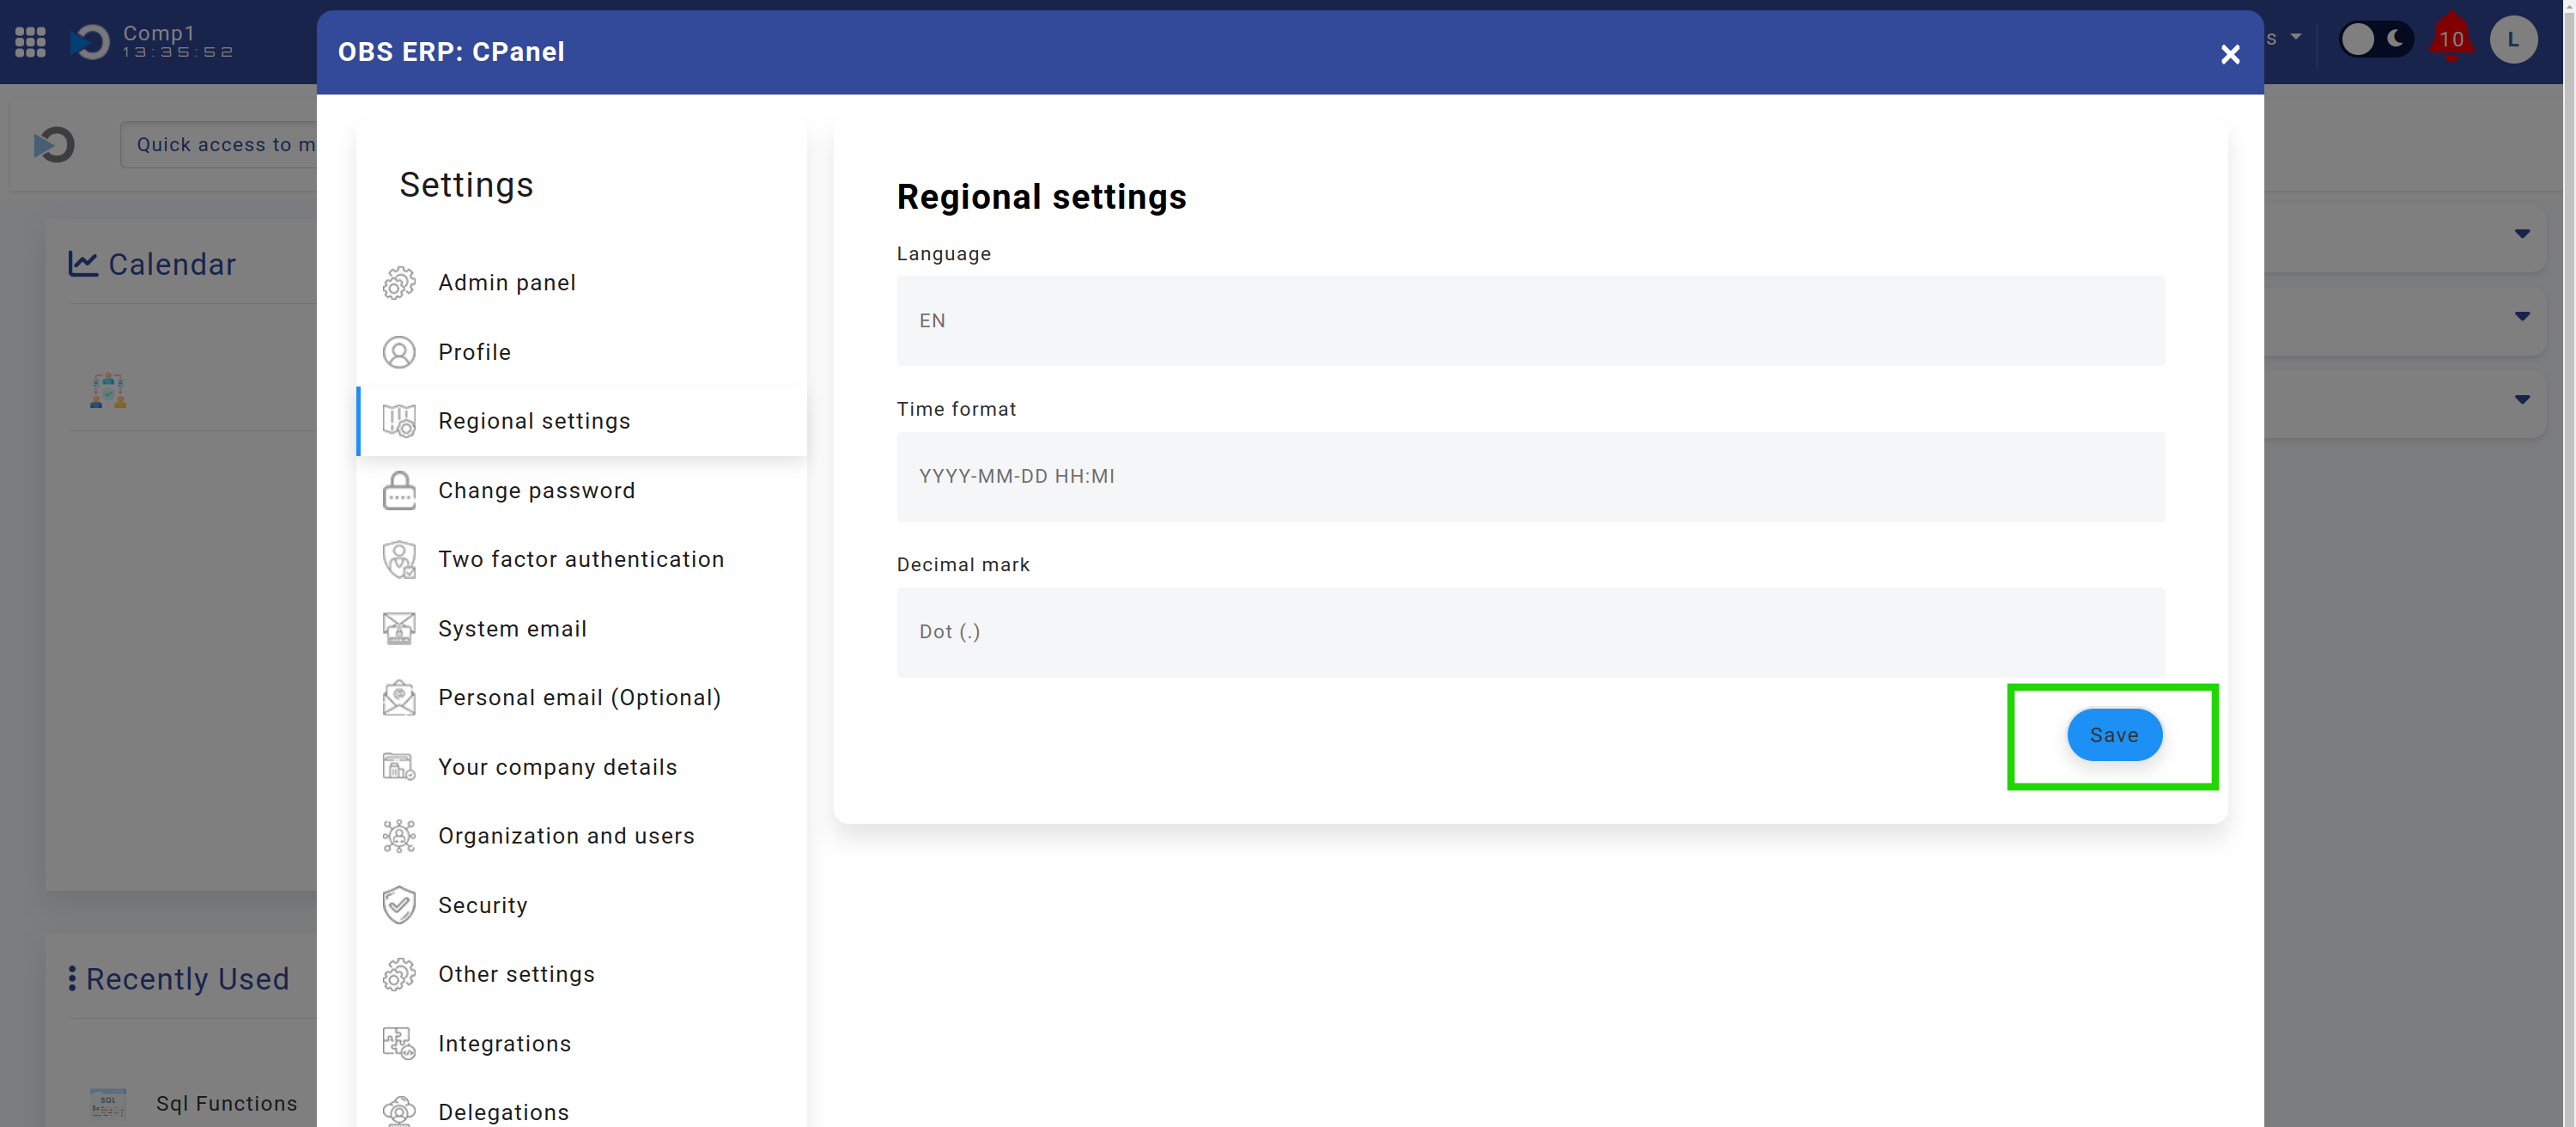
Regional settings
Take a look at the regional settings and perform modifications where necessary.
Click Settings link (Fig. 1) and Regional Settings.
Select your preferred options, click "Save", and reload the page to apply the new settings.
Note: time zone is automatically updated on every login depending on client's device settings.
- Language - OBS ERP supports multiple languages, with English set as the default.
- Time Format - YYYY-MM-DD or DD.MM.YYYY
- Decimal Mark - dot or comma
Email settings
OBS ERP relies on email to send out notifications, reminders, alerts and other messages. As soon as you set up your email, you will be able to send messages directly from OBS ERP, as it has an integrated web email client.
In order to setup your email you would need to have a valid email account.
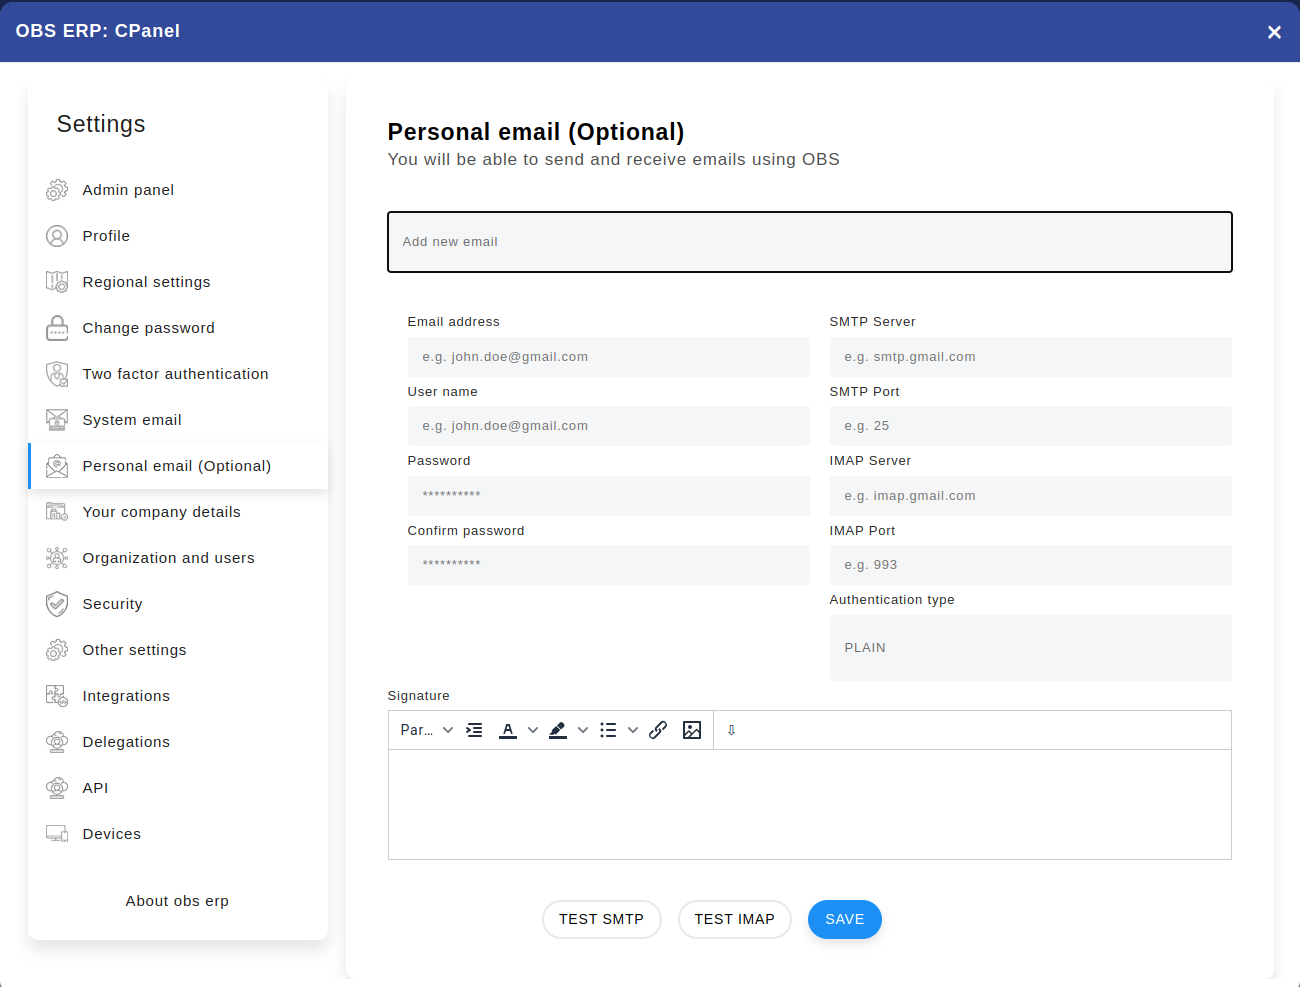
Step 1: Click Settings (Fig. 1) and Email (Fig. 2). Fill-in the email settings provided by your email provider.
- Email - your email address
- SMTP/IMAP User name - SMTP and IMAP username. Note: OBS ERP considers it is the same for both protocols
- SMTP Server - SMTP server name or IP address
- SMTP Port - SMTP Port
- IMAP Server - IMAP server name or IP address
- IMAP Port - IMAP Port
- Password - email password
- Confirm - confirm email password Security - deprecated.
- Authentication type
Step 2: Press "Test IMAP" and "Test SMTP" to check if the settings are correct.
Step 3: Press "Save".
OBS ERP allows setting up more than one email accounts per user.
Note: The contents of your emails are not stored or indexed by OBS ERP.
Note: OBS ERP uses the IMAP protocol to read and search the messages.
System email
OBS ERP requires a system email to send out notifications. You might want to create a new email on your email server specially for that purpose. For example: [email protected].
In the following 1 min video, you can see demonstration of the process: https://youtu.be/mFpTMFOPCtI?si=TkB20iVaiJPj0isK
Instructions:
Navigate to Administration -> Settings -> System Email -> Edit row 1 or Add.
Step 1: Fill in the form shown on Fig. 3.
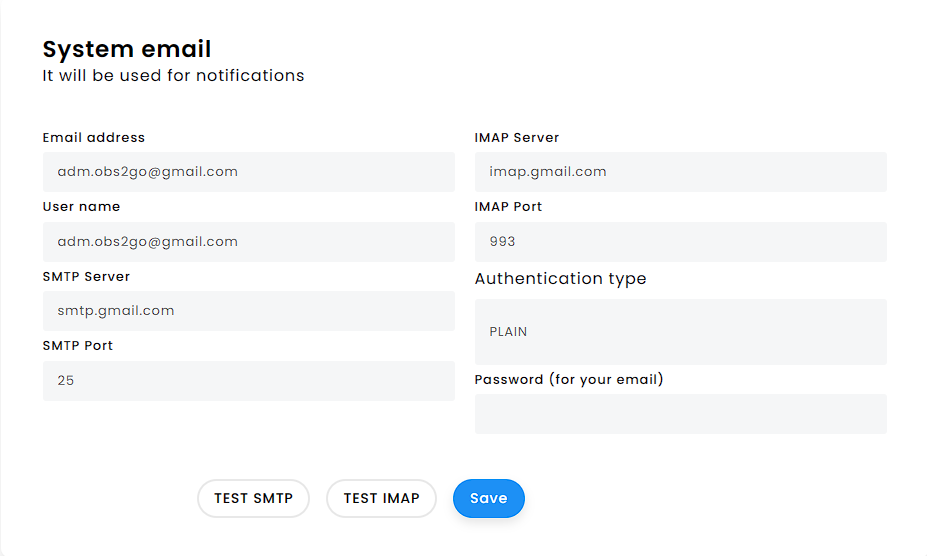
Fig. 3
Step 2: Click on Menu and test the settings by pressing "Test SMTP" and "Test IMAP".
Step 3: Press "Save" to update the settings.
Company details
Now it is time to set up your company. You would need your company's logo in PNG image format, TAX Number, address and other company related information. As soon as you have it, navigate to Administration -> Settings -> Our companies.
By default, OBS ERP creates a company record based on the information provided in the registration form (https://www.obs2go.com). You can edit the default company record by clicking the button on row one and choosing "Edit".
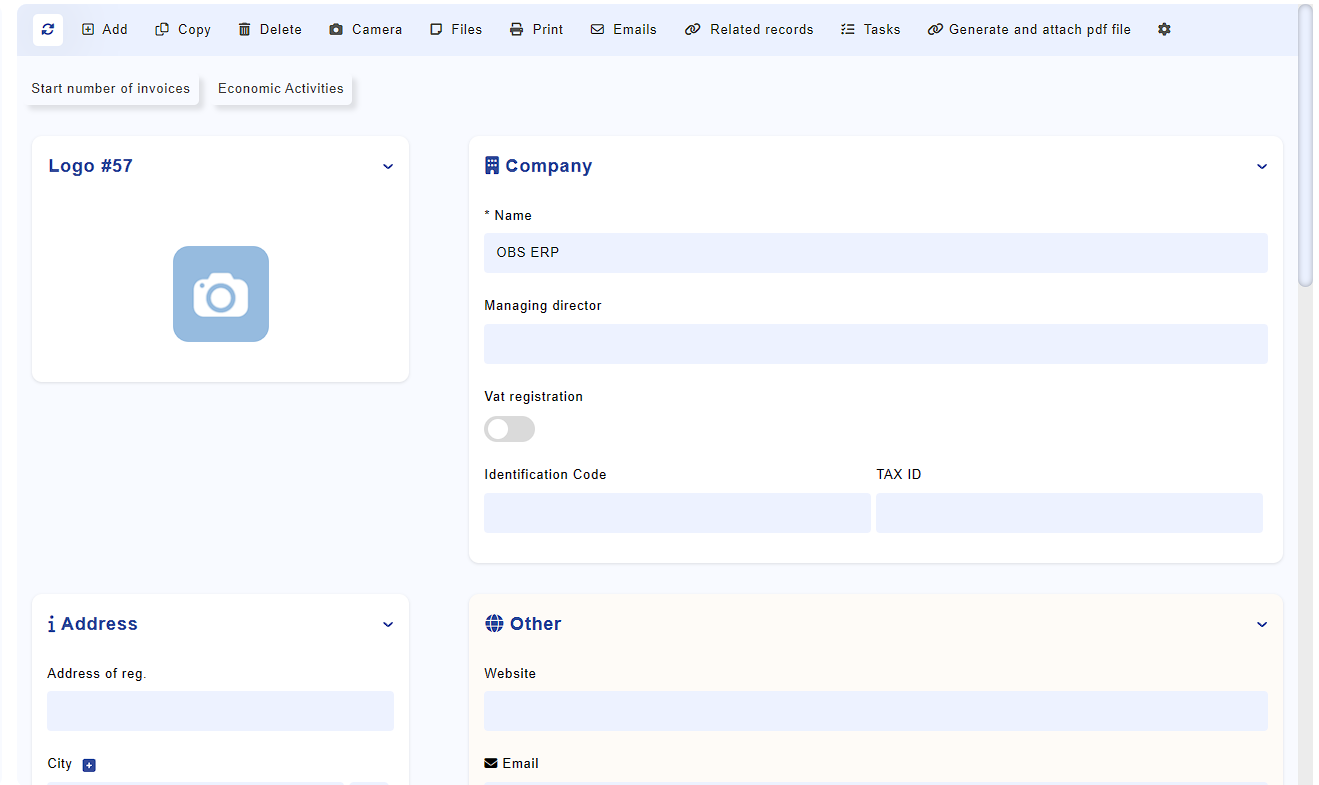
Fig. 4
Click on the image to upload your logo in PNG format. Where applicable, the logo will appear in the generated ERP documents.
OBS ERP supports multiple companies. You can add information about other companies in the same module.
In case you use module Finance, you would need to set up starting invoice number for each company by pressing Start number of invoices.
So far so good. Now you might want to take a look at the main ERP modules.
Options bar in records
- Refresh: Refresh the record you are currently editing
- Add: Instantly generates a new record without the need to navigate back to the module and manually click the "Create" button at the top-right.
- Copy: Duplicates the currently opened record.
- Files: Displays all files attached to the current record.
- Print: Offers three options upon clicking (Preview, Generate, and Generate and Attach PDF File), allowing you to view and create a PDF file for the record.
- Emails: Facilitates email generation with the option to attach a PDF file, which is subsequently linked to the record.
- Activity: Provides an overview of all actions and interactions within the specific record.
- Related Records: Lists all modules associated with the specific record. For example, when opening related records in the Staff module, you can access documents, vacation details, and more.
- Tasks: Allows you to assign tasks related to the specific record.
- Generate and Attach PDF File: Generates a PDF file and attaches it to the specific record.
- Camera: Activates the camera for capturing pictures, which can be attached to the files within the specific record.
- Delete: Removes the currently opened record.
- Settings Button: Reveals a menu for customizing the interface, offering options to add a new field, create a process tab, insert a general tab, or generate a new fieldset - allowing users to tailor the system to their specific data management and workflow needs.
Setting up the mobile app
The mobile app allows you to access the OBS2GO ERP platform while traveling or when you don't have access to a laptop or desktop computer. Follow the steps below to set it up:
How to set up the mobile app:
Step 1: Download the OBS2GO ERP mobile app from the Google Play Store or Apple App Store.
Step 2: Open the app after downloading to begin the setup process.
There are three methods to set up the app:
Method 1: Manual Setup
-
Enter the URL for your company's instance. The URL will have a missing part where you need to add your company's name.

- Click the Validate URL button to confirm the URL is correct and points to your company's instance.
-
Fill in your profile information, including your Username and Password.
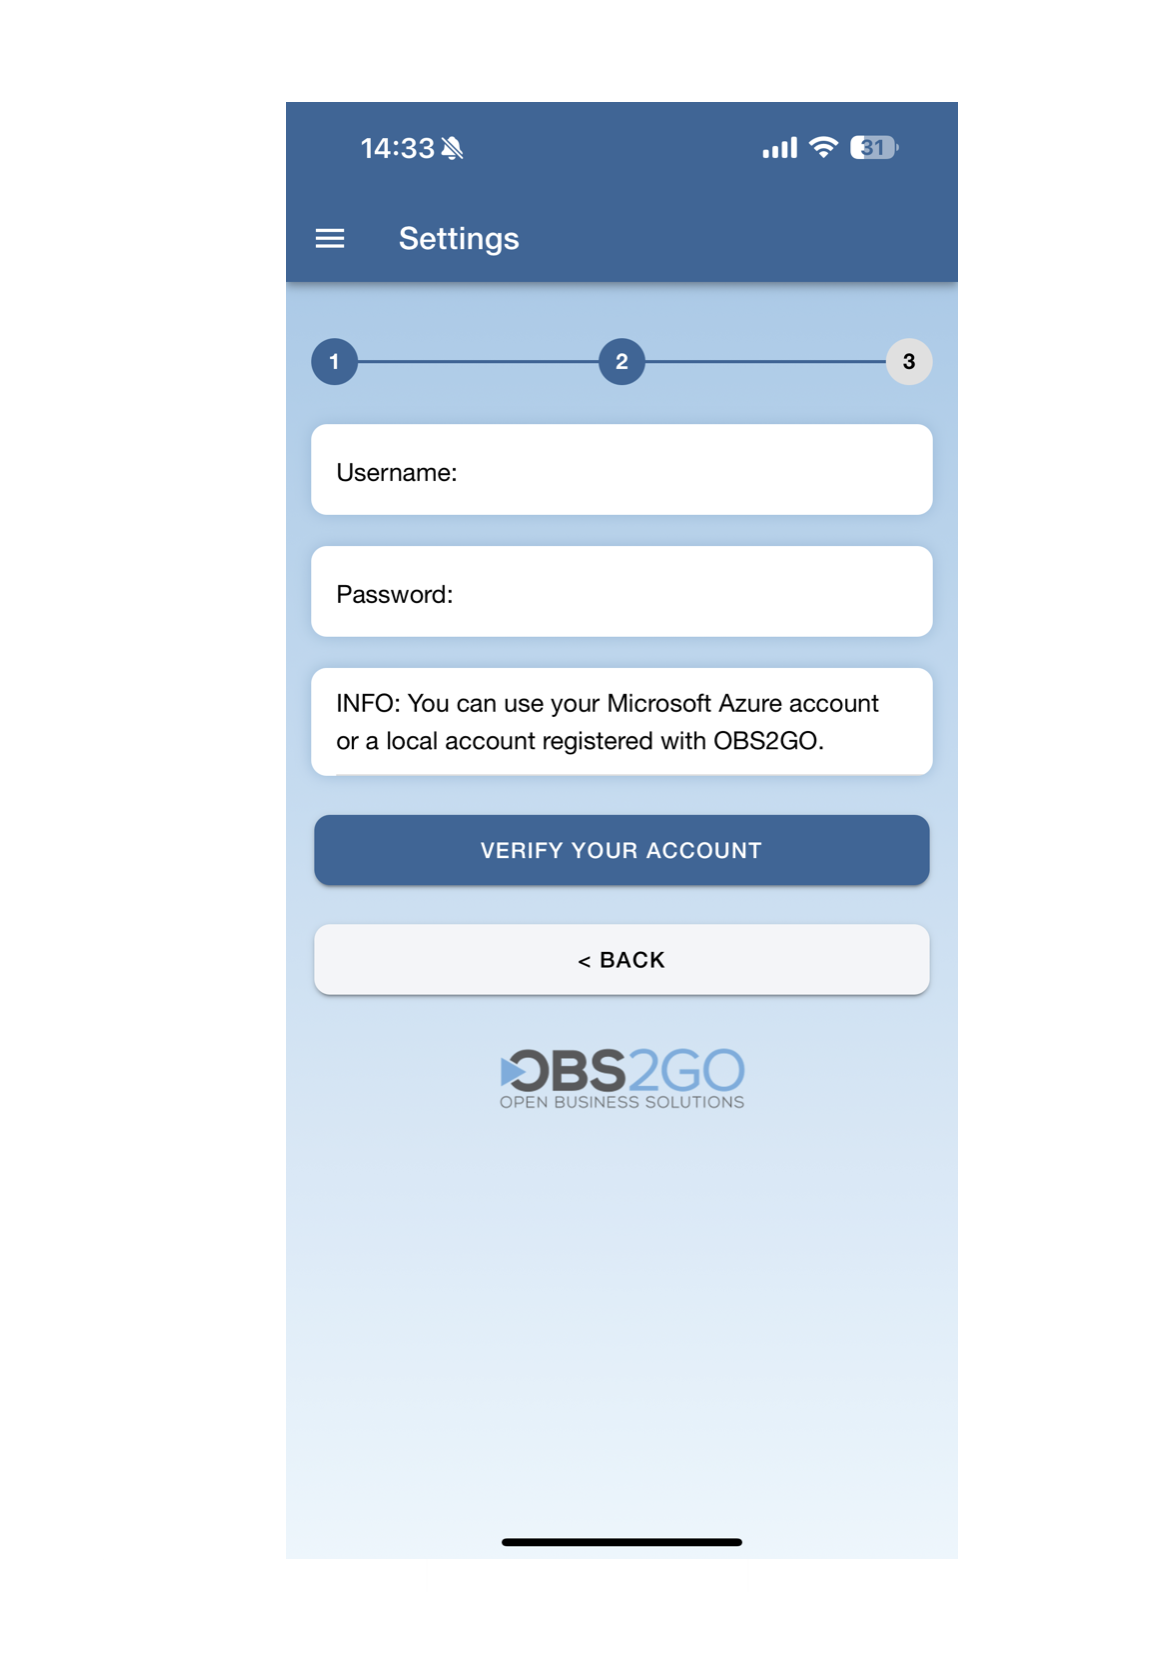
Fig. 2: Entering username and password
-
Choose a 6-digit PIN for your account. This PIN provides better security and is used to quickly access the app after setup.
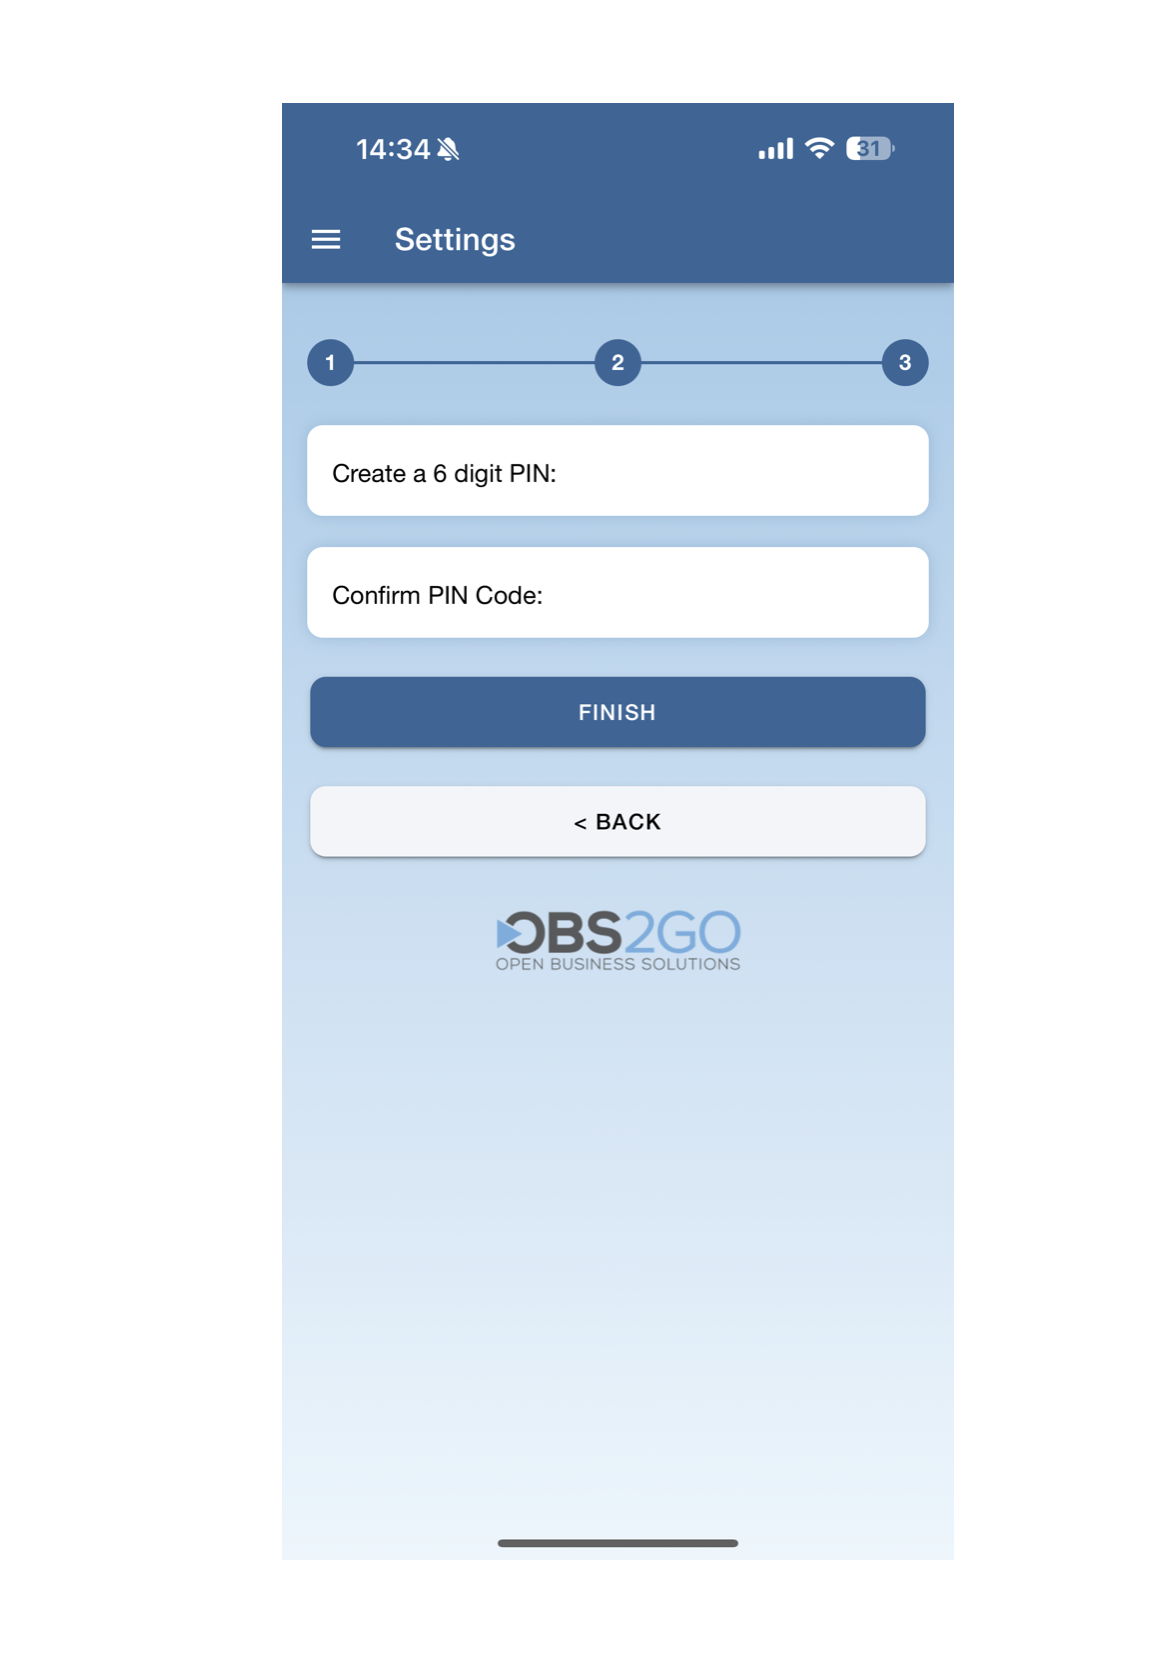
Fig. 3: Setting up the PIN
- Once completed, you can use the app just as you would on a desktop or laptop.
Method 2: QR Code Setup
- Log in to your OBS2GO ERP account on your desktop or laptop.
- Click the menu icon in the top-left corner and select the wrench icon to open Settings.
-
Go to the Devices section to generate a QR Code.
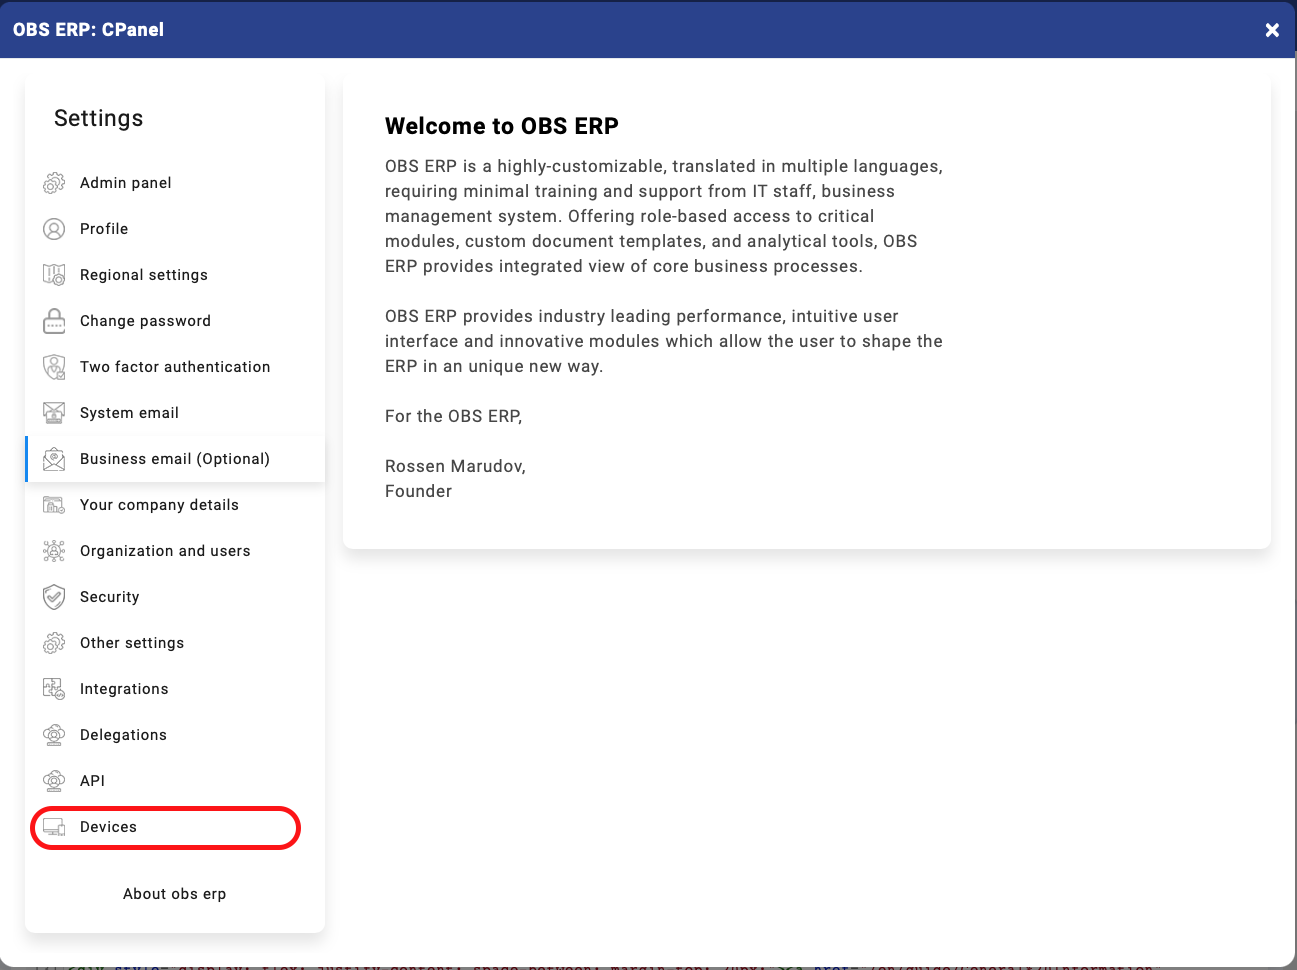
Fig. 4: Generating the QR Code
- In the mobile app, tap the Scan QR Code option (available before entering the URL). This opens the camera to scan the QR Code displayed on your desktop/laptop.
- Once scanned, the app validates your profile and prompts you to set up a 6-digit PIN for security.
- After setting the PIN, the app is ready to use.
Method 3: One-time code setup (manual entry)
- Log in to your OBS2GO ERP account on your desktop or laptop.
- In your user profile, open Control Panel → Devices.

- Copy the text of the one-time QR code (one-time registration code).
- Send the copied code to the user (preferably via a secure channel).
- On the mobile app, open Settings and paste the copied code.

- Confirm to complete the setup. The app will then prompt you to set up a 6-digit PIN (if not already set).
Additional Information:
- In the Devices section where the QR Code is generated, you can see all devices connected to your account.
- If you notice unfamiliar devices, you can remove them from this list for added security.