Security
Security
We at OBS look at information security as a mixture of organizational and technical activities aiming to prevent security-related incidents. Keeping the information safe and preventing unauthorized access to confidential information is crucial and requires a well-established company policy and constant efforts in that direction.
OBS ERP centralizes the information and provides it in a well-structured and easy to use way. In that regard, it is vital to define role-based privilege groups allowing the users to access only the information they are allowed to. In addition, you need to terminate the access of leaving employees (preferably before their last working day). These are only a few of the best practices that need to be followed in order to keep your data safe.
Good security practices recommended by OBS2GO and implemented in OBS ERP:
- Deactivation (withdrawal of access) of leaving employees before the last working day
- Requirement of complexity of passwords - minimum 8 characters, including special characters and numbers
- Restrict the access to an ERP system to certain IP addresses only
- Obfuscation of personal data (GDPR)
- Two-factor authentication
- Regular overview of system access logs
- Session termination after a specified time of inactivity
- Regular verification of the access granted to employees
Privilege groups
OBS ERP controls the access to the information using role-based privilege groups. For example, you might want to create the following groups:
- Accountants - providing access to module "Finance" and "CRM",
- HR - providing access to module HR,
- Operations - access to the Time tracking module, projects and tasks,
- Administration - full access everywhere
- etc...
By default, OBS ERP creates only one privilege group - "Administrators". This group has full access to all ERP modules.
Privilege groups are created via the module "Privileges" located in Administration -> Settings menu. The module allows you to delegate read or write permissions over an OBS ERP component to a user.
Create a privilege group
Go to Administration > Settings > Privileges and click on the "Add" button. Provide the group name and a brief description, then click "Add." Once the changes are saved, a comprehensive list of modules will become visible, as depicted in Fig. 1. You will have the option to either individually open specific modules or open them all simultaneously.
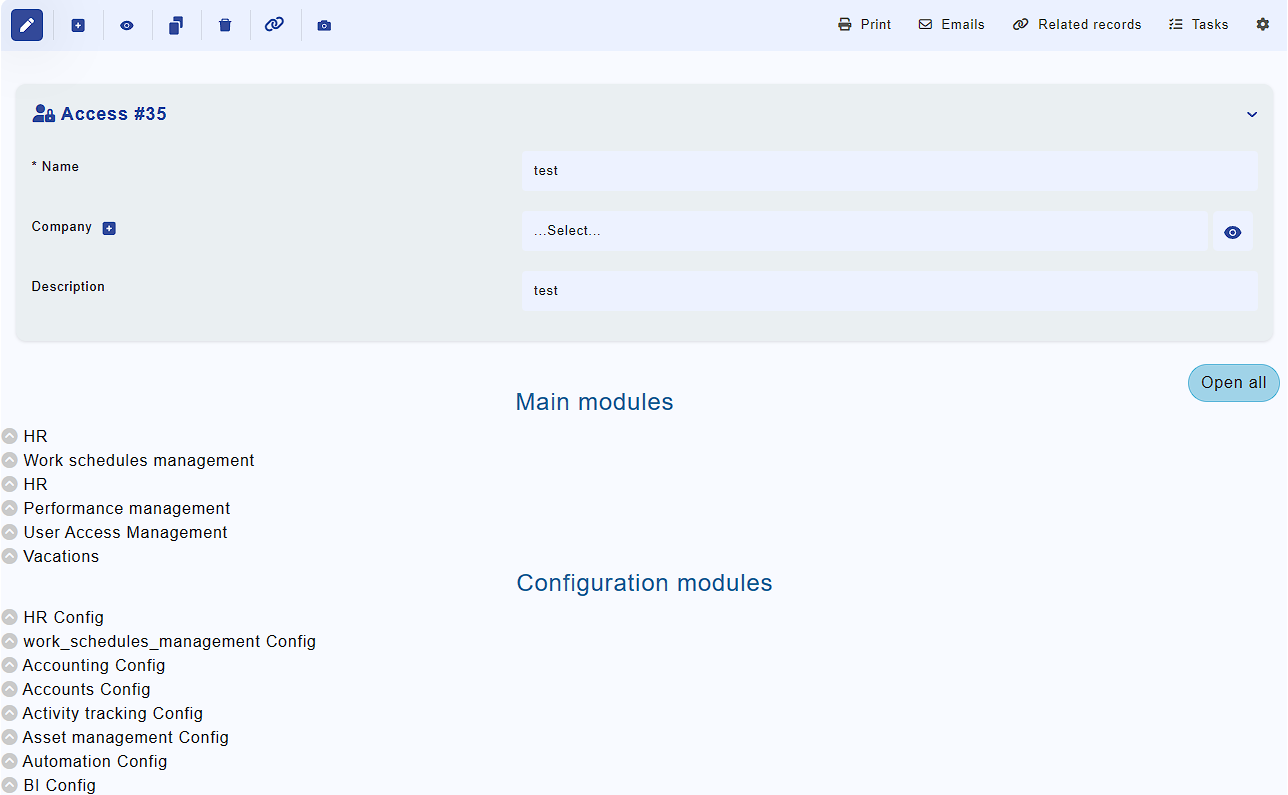
Fig. 1
Choose "Read" or "Write" access where applicable and press "Save". This concludes the configuration of the privilege group. Now you can assign this group to a user in module "Administration" -> Settings -> Users
User access
Open respective module and click the 'wrench' icon at the top-right corner. Click on "Manage permissions" to manage access for users.
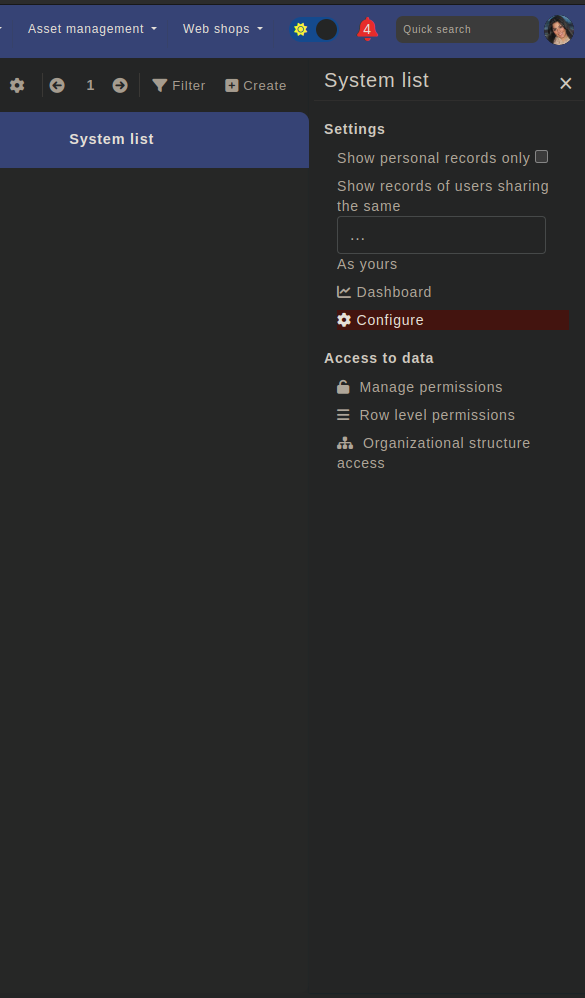
This will open a pop-up that will give you the option for changing permission.
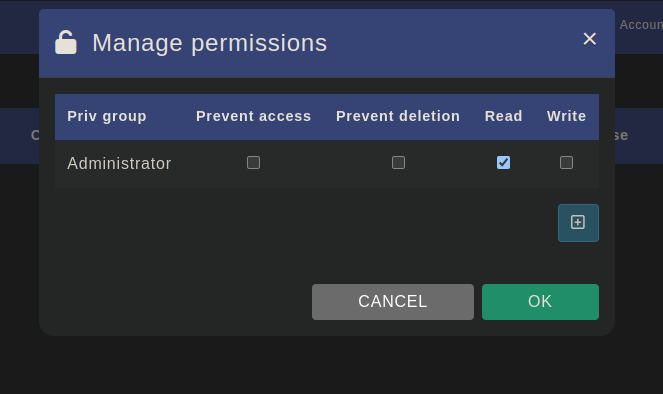
- Prevent access - Prevents access to the certain module
- Prevent deletion - Prevents deletion from the certain privilege
- Read - Can only read the module
- Write - Can write in the module
By clicking the "+" button you can add more privileges to the module and edit their access.
Create a user
Create users manually:
Navigate to Administration -> Settings -> Users and click the Add button. Fill in the form shown in Fig. 2 and press "Add."
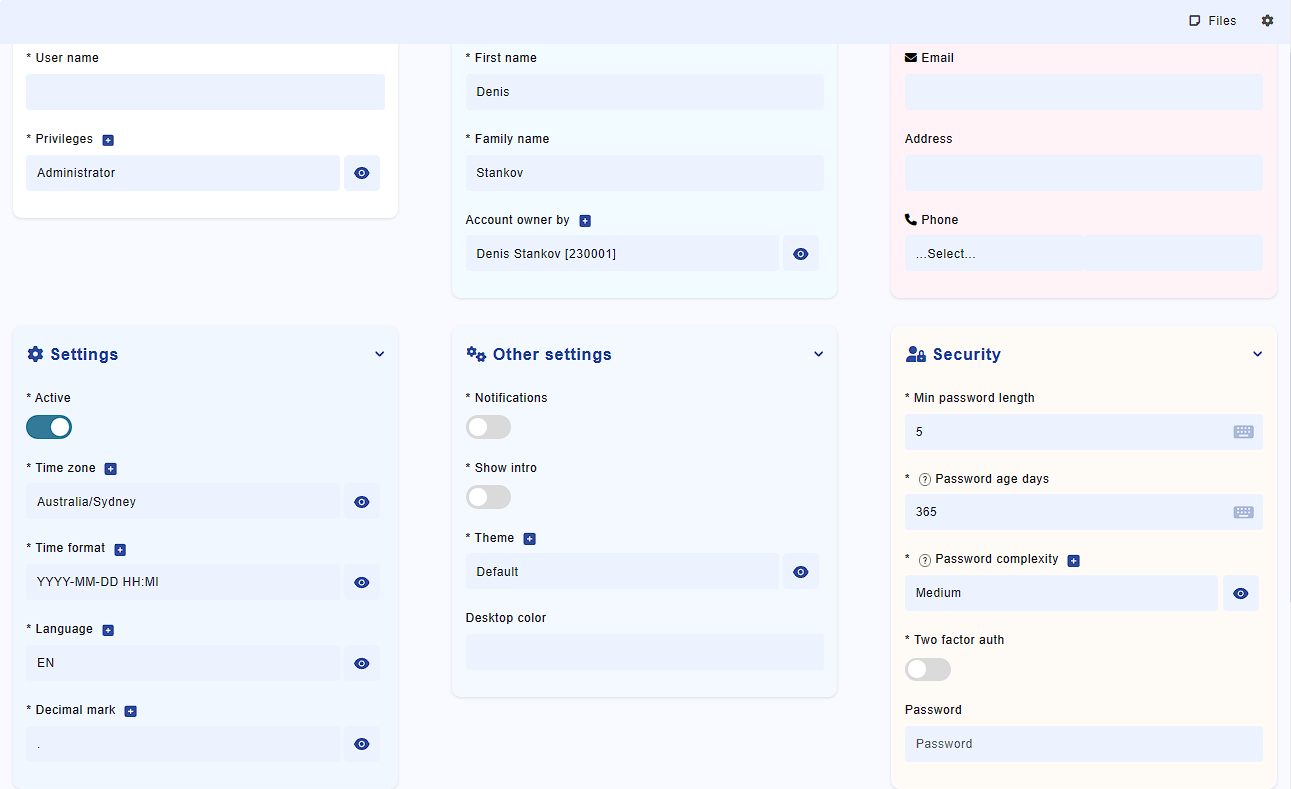
This will create a new user. Note the "Privileges" field, which allows you to select a privilege group for the user. The "Account owner by" field is linked to the "Staff" module, letting you associate the account with a specific employee.
Automated user creation via the "Create User" button:
You can also create a user directly from the "Staff" module. Navigate to Staff -> Edit record -> Create User as shown below:
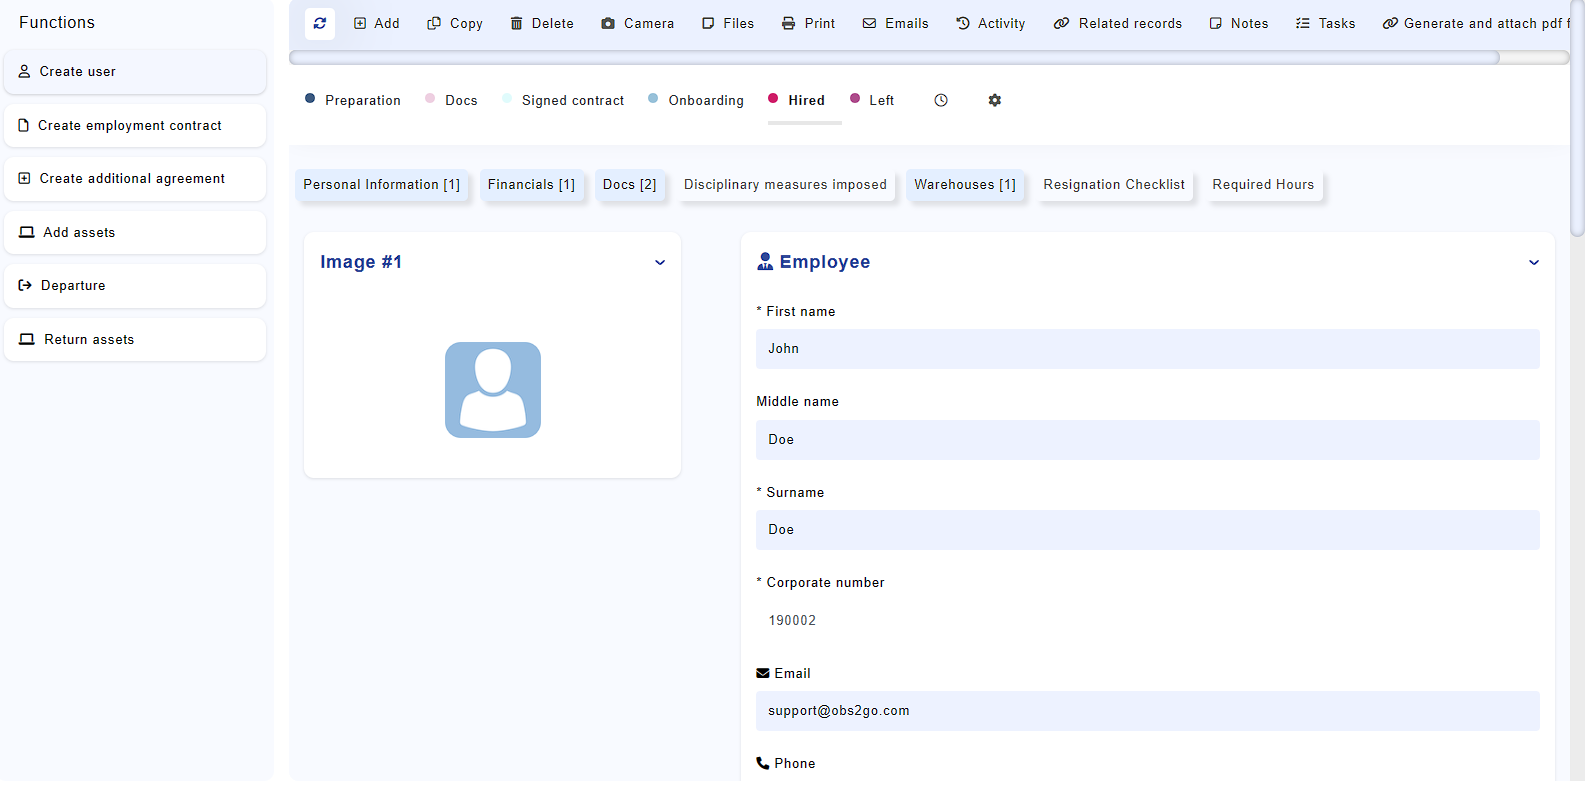
In this process, select a privilege group and set a password for the account, then press "Submit" to complete the creation.
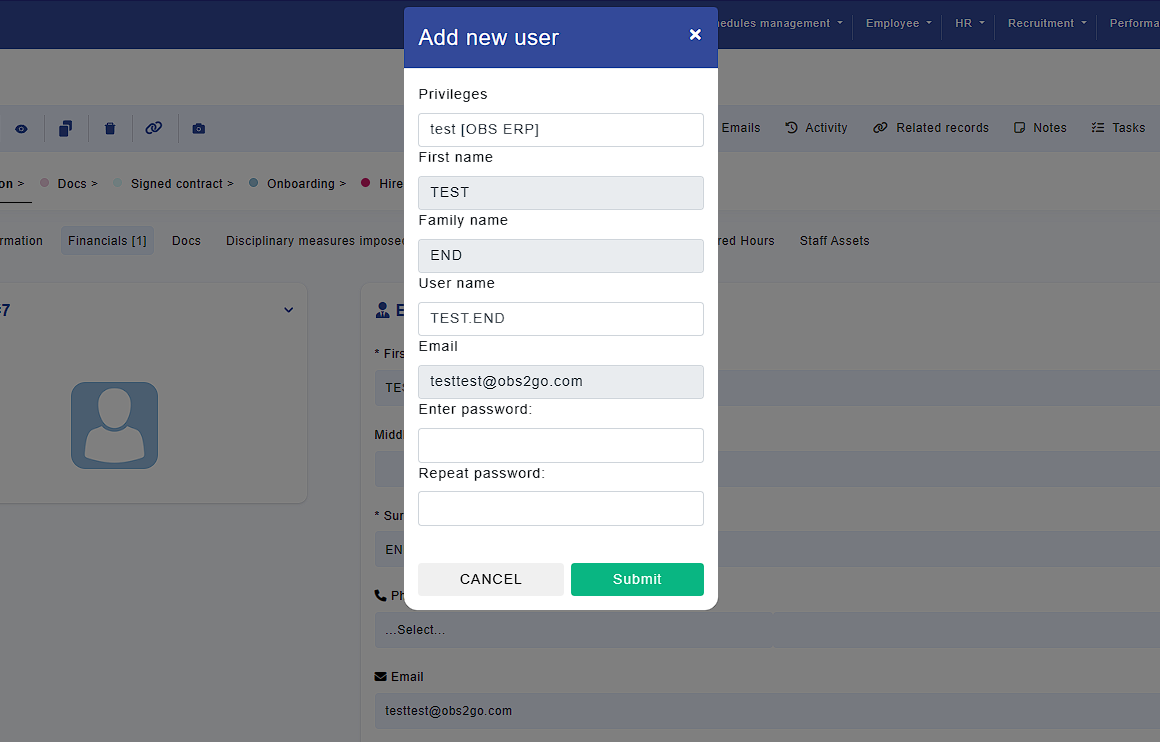
Home screen > Staff > Create User
Fully automatic user creation:
The system also offers fully automatic user creation, making it easy to streamline the process for organizations with consistent requirements. This method is controlled by settings in the "Settings" module and ensures user accounts are generated automatically under predefined conditions.
With automatic creation, users can be created at two key points:
- Immediately when the employee is created: As soon as a new employee record is added to the "Staff" module, the system generates a corresponding user account based on the configured settings.
- When the employee is hired: A user account is created automatically when the employee’s status is updated to "hired" (or another specified status). This ensures the account is only created when the employee officially joins the organization.
By using automatic creation, you can save time, reduce manual work, and maintain consistency across all user accounts. This is especially useful for organizations with large workforces or frequent employee onboarding.
The process is governed by a set of configurable settings that determine when and how user accounts are created, what their usernames look like, and the default privileges they are assigned. Here are the key settings you can configure:
User Creation Settings
- User Creation Trigger:
- Key: user_creation_trigger
- Purpose: Defines the event that triggers user creation.
- Options:
- on_insert: Creates the user immediately when a new employee is added.
- on_hiring: Creates the user when the employee's status changes to "hired" (or another defined status).
- Username Generation Method:
- Key: username_generation_method
- Purpose: Determines the format of the username for new users.
- Options:
- email: Uses the full email address as the username.
- email_prefix: Uses the part of the email before the "@" symbol.
- FLastname: Combines the first initial and last name (e.g., "John Doe" → "JDoe").
- alt_FLastname: Similar to FLastname but based on the employee's alternative name in their profile.
- FirstLastname: Combines the full first name and last name (e.g., "John Doe" → "John.Doe"). If the username already exists, a numeric suffix is appended (e.g., "John.Doe2").
- alt_FirstLastname: Similar to FirstLastname, but uses the employee's alternative full name from their profile
- Default Privilege for New Users:
- Key: default_user_privilege
- Purpose: Assigns a default privilege group to new users.
- Options: Any predefined privilege group, such as "Employee," "Initiator," or "Administrator."
To adjust these settings, navigate to the "Settings" module, search for the specific keys listed above, and modify their values as needed. This provides a flexible way to customize the user creation process, ensuring it aligns perfectly with your organization’s requirements.
Note: If you prefer to disable the automatic creation of users, simply set the "user_creation_trigger" option to "n/a" in the system settings.
Delegation Rights
Delegating approval rights ensures smooth task management during absences. By entrusting colleagues with tasks like vacation requests and overtime approvals, operational efficiency and productivity are enhanced.
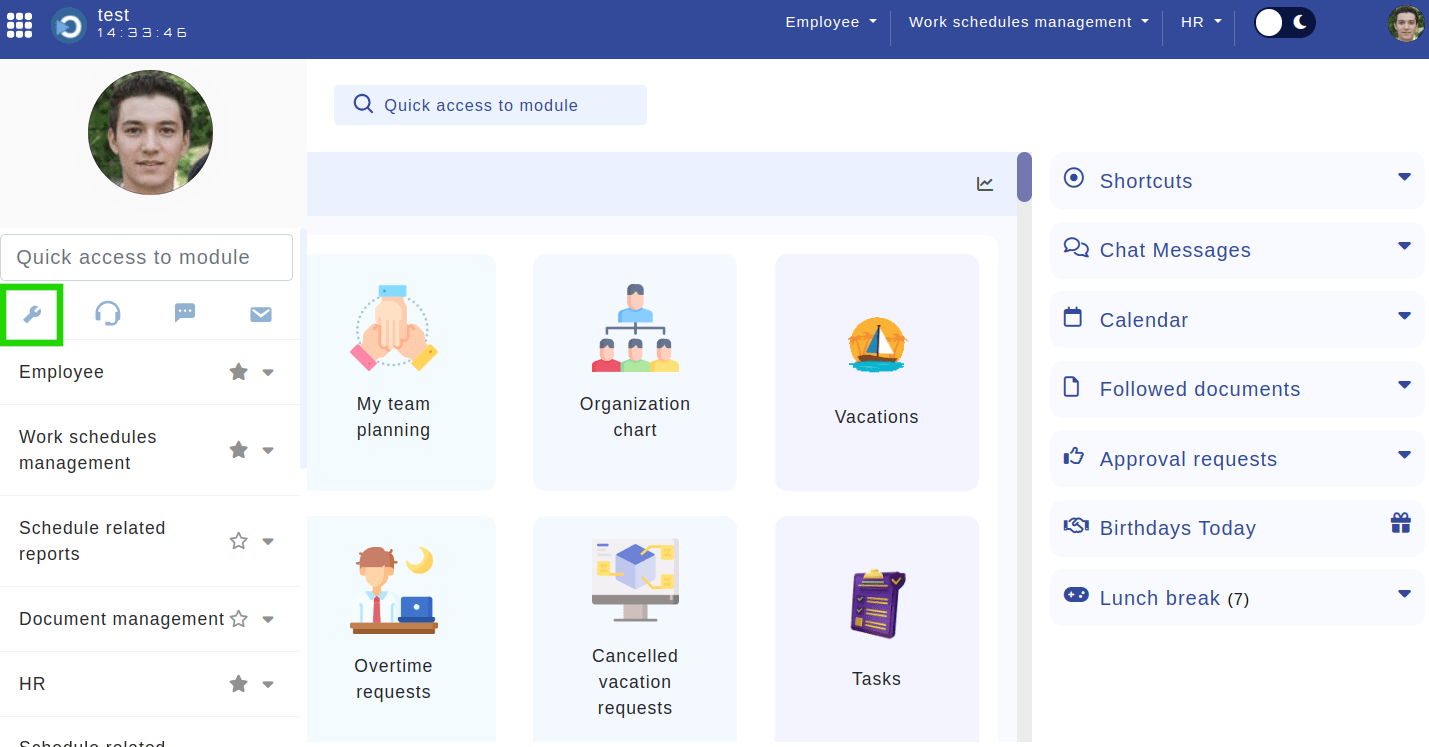
- Navigate to the Control Panel.
Location: Home > Left panel. Highlighted is the button that access the control panel.
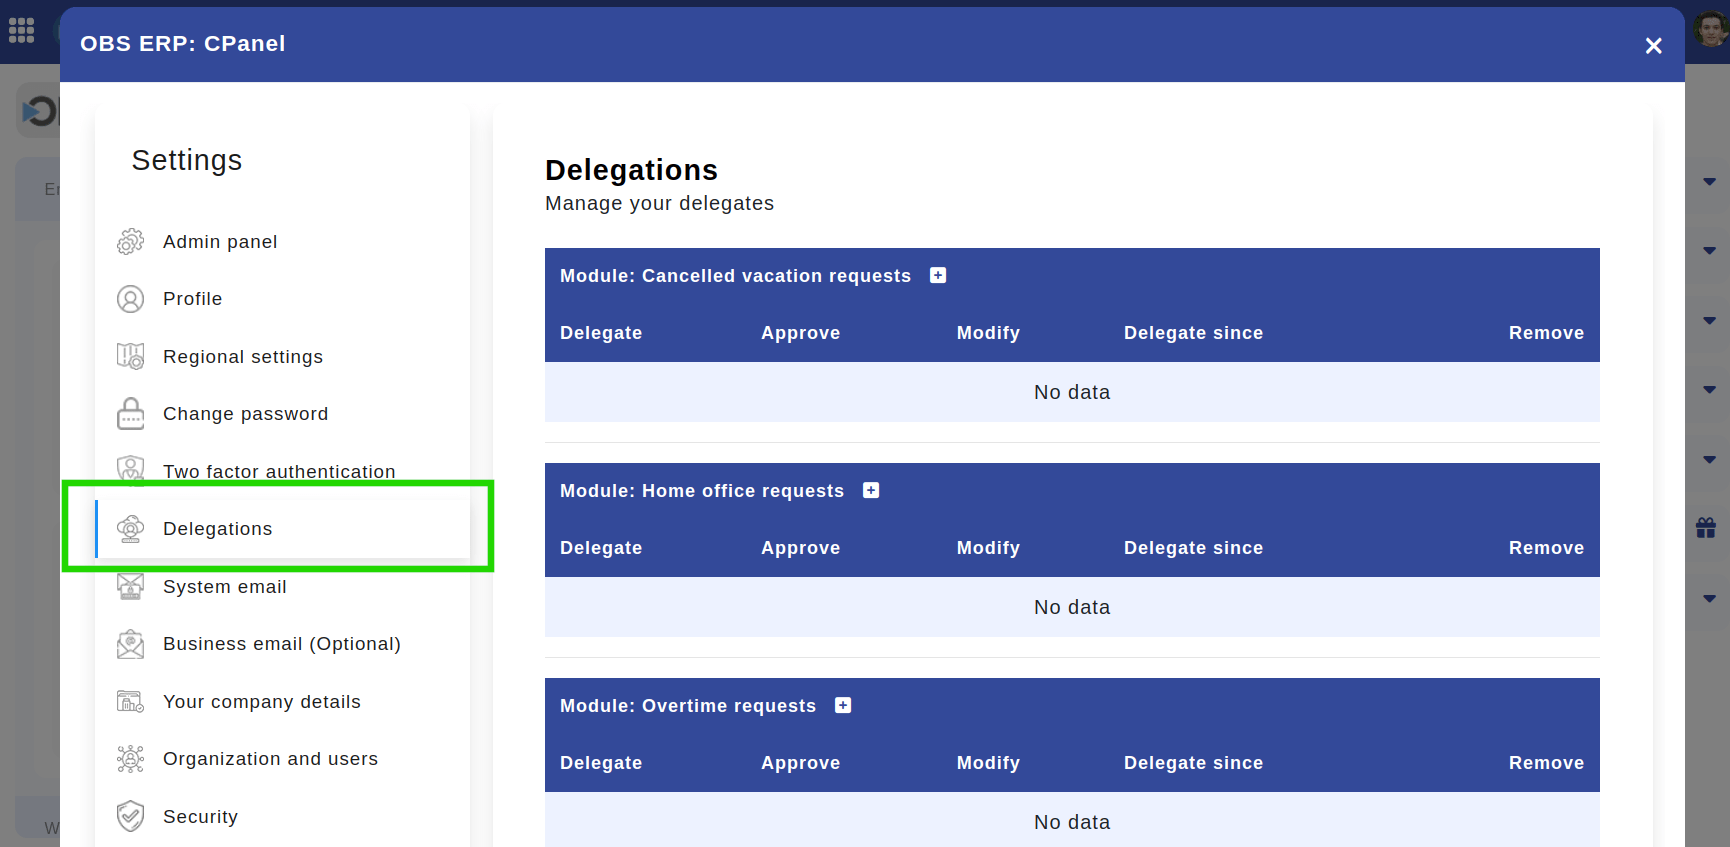
- Select the "Delegations" section.
Location: Home > Left panel > Delegations. Highlighted is section "Delegations".
- Choose the module for which you want to delegate rights for approval, such as Vacations, Vacation cancellation requests, Overtime requests, or Home office requests. Each module requires a separate delegation.
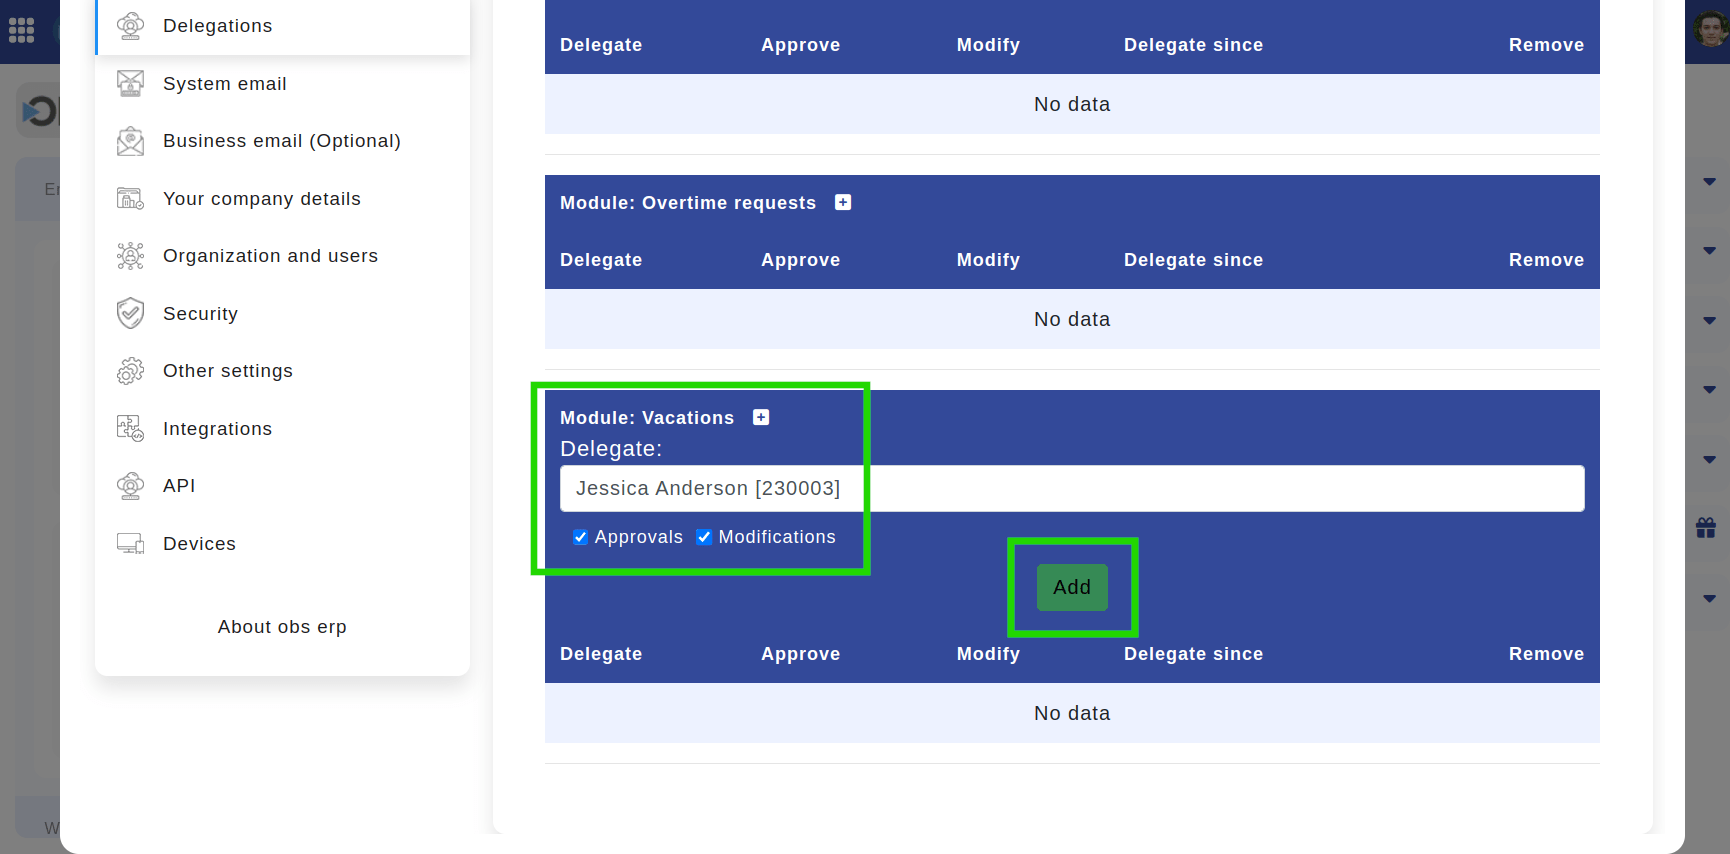
- To add a delegate, click on the plus icon, select the delegate from the list, and choose the specific rights you want to delegate, such as approvals or modifications. Click "Add" to confirm the delegation. This grants the selected delegate the rights to submit, approve, or reject requests for your subordinates.
Location: Home > Left panel > Delegations. Highlighted are the plus icon, the dropdown for selecting a colleague, the approvals / modifications settings, and the "Add" button.
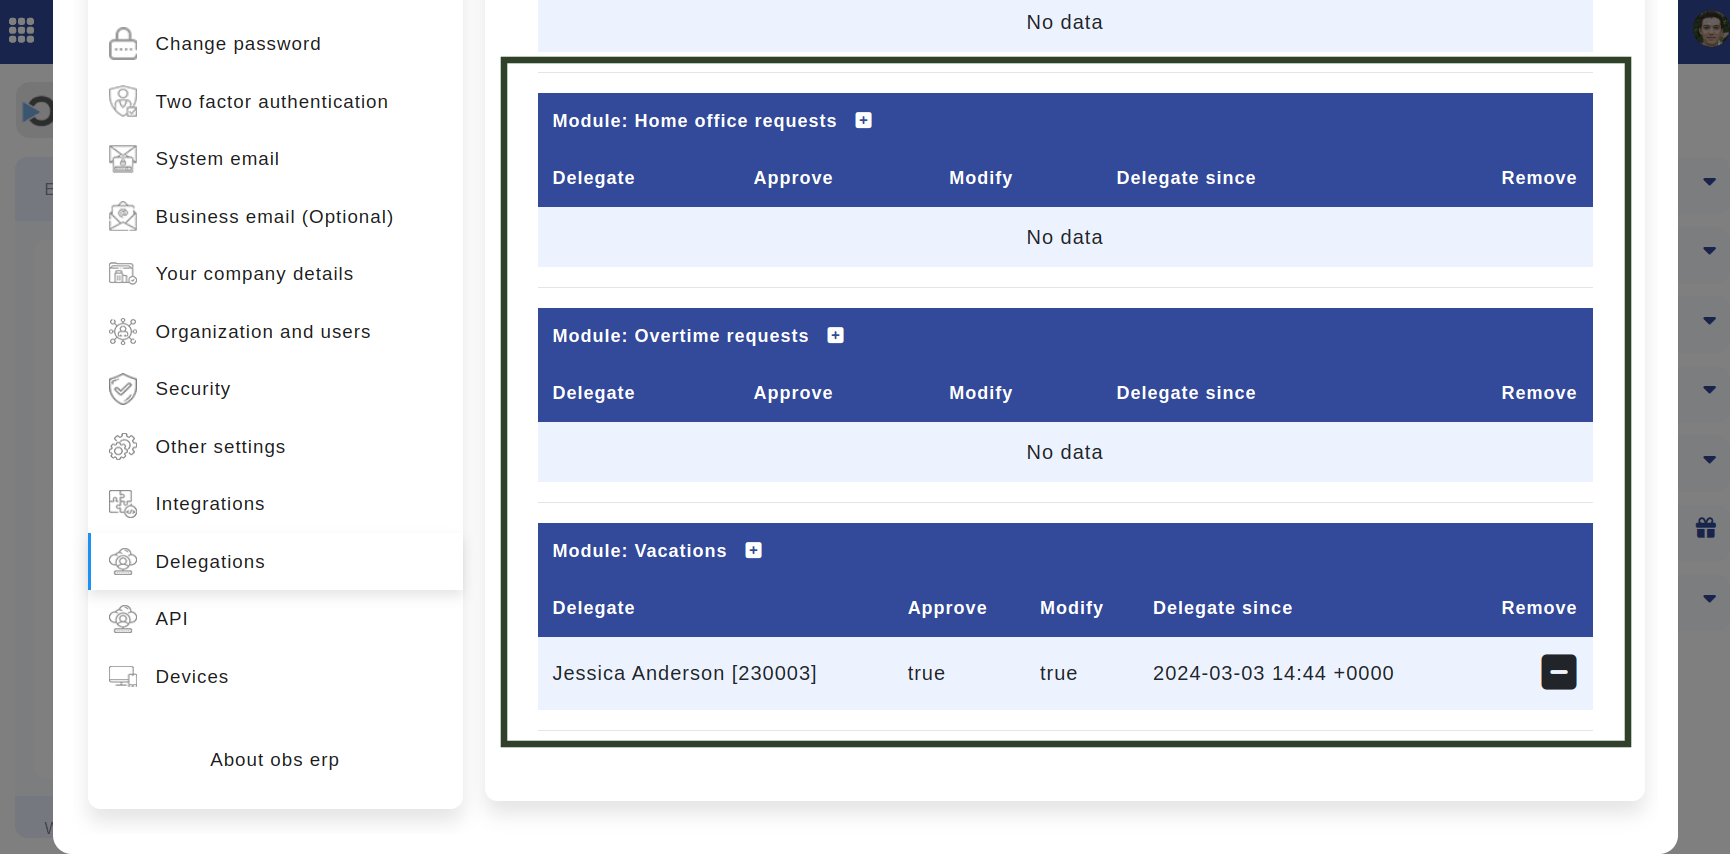
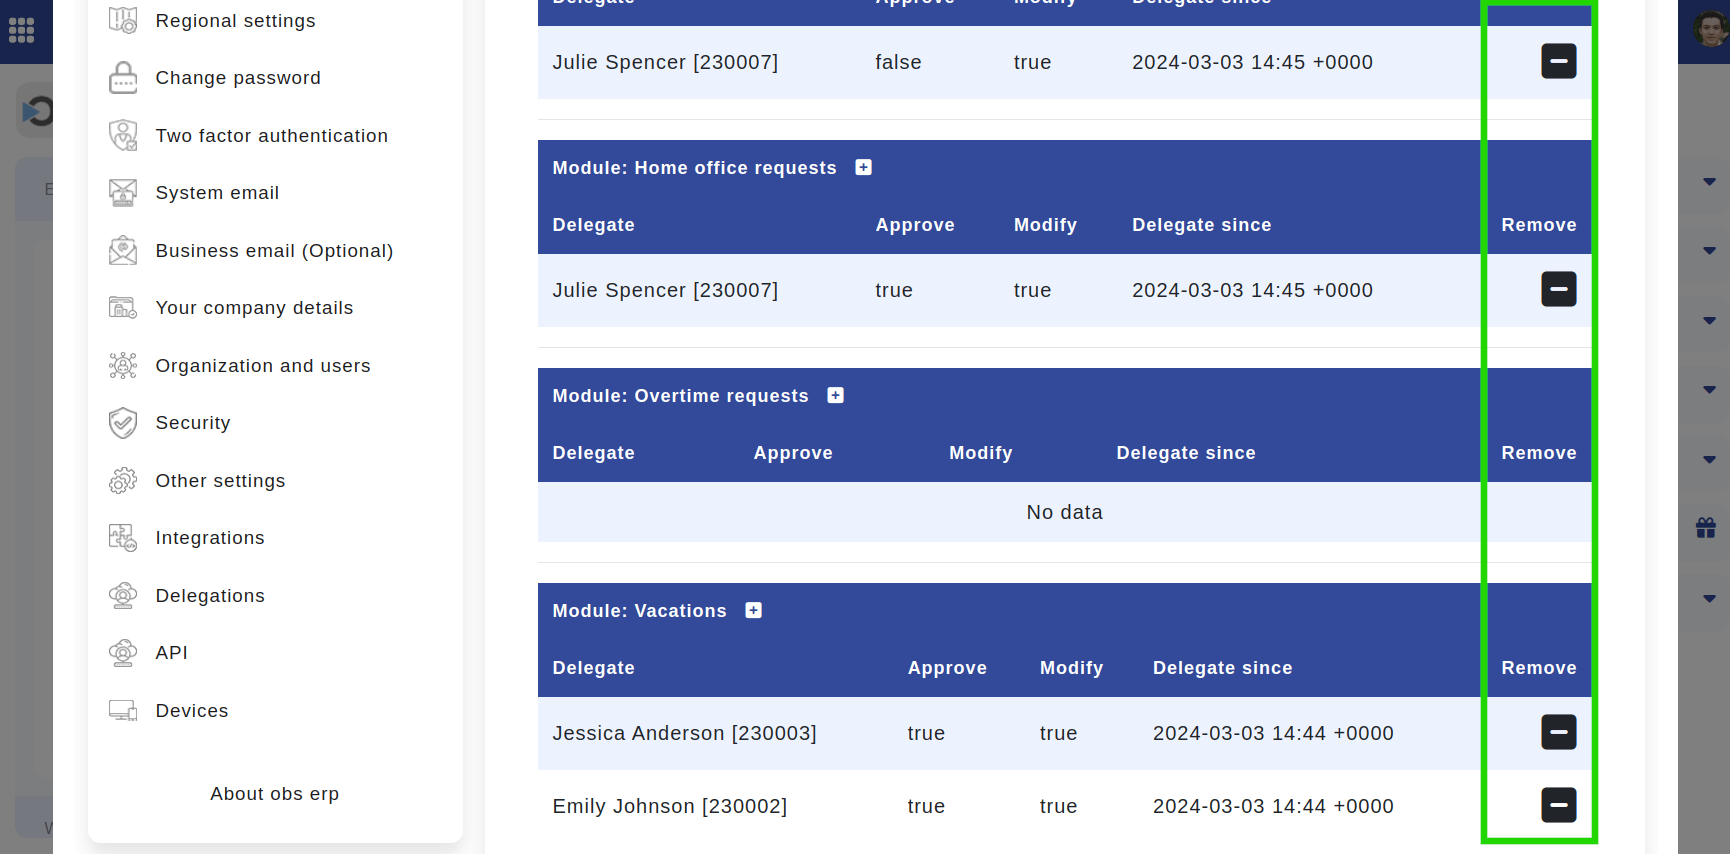
You can view your delegates in each module in a table view.
Location: Home > Left panel > Delegations. Highlighted is the Delegations Menu where users can find the tables with their delegates.
- To remove delegations, locate the delegate in the table for the respective module, and click the minus icon labeled "Remove."
Location: Home > Left panel > Delegations. Highlighted are the "Minus" icons which removes the delegates.
By following these steps, managers can ensure seamless management of requests for their team even during their absence. Delegating user rights enables efficient workflow management and ensures continuity of operations.
Deactivate user account
You can terminate the access of an employee by click on switching off the "Active" checkbox in the user account.
IMPORTANT Note: cloud users are charged based on the number of users marked as "Active" or the number of employees in the Staff module marked as "Active" - whichever of these two numbers is larger.
Two factor authentication
To enable two factor authentication, you need to open the Left panel Menu and go to Control Panel.
Home screen > Left panel menu
Then, select "Two factor authentication".
Open a Two-Factor Authenticator app on your mobile device (like Google Authenticator). After scanning the code, your authenticator application will produce a code you need to fill in the form under the QR code shown in the next image.
Left panel menu > Control panel > Two factor authentication
If you activate your two factor authentication for the first time, you need to enter the code and click "Activate" to enable 2FA.
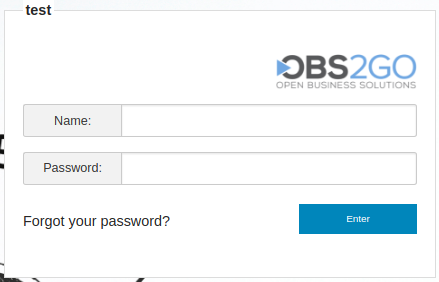
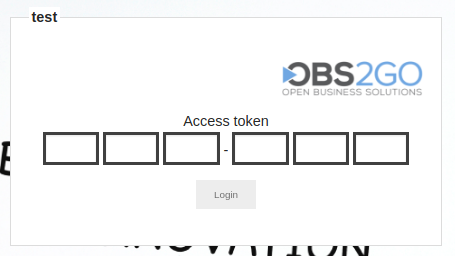
From this step on, OBS ERP will require you to login with security code as well as password as shown on the images below.
Login screen
Access token in 2FA
2FA using your user email address
If you haven't scanned your QR code and the system requires a 2FA, then you can use your email address to generate one-time access token.
First, click "Send it to my email" on the login screen. Then, check your email for the access token and enter it on the login screen to access your account.
OBS ERP will generate a QR code and it will invite you to scan it with your favorite authenticator app.
Encryption
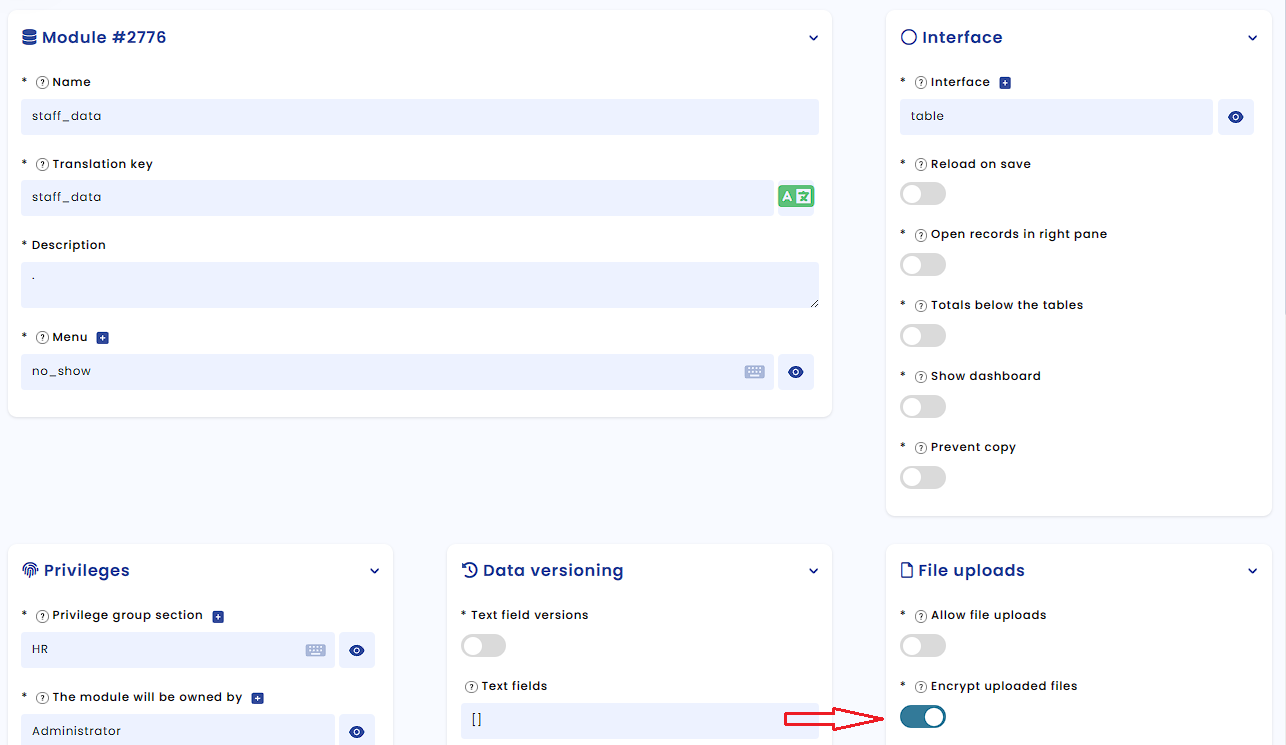
OBS ERP implements AES encryption (formerly Rijndael), as defined in U.S. Federal Information Processing Standards Publication 197. In order to activate encryption in a certain module, navigate Administration -> Constructor -> Find Module -> Edit -> Activate "Encrypt uploaded files". This way the uploaded files in the module will be encrypted.
IP Address restriction
You may choose the IP addresses allowed to log in to the system. The setting is available at module Administration -> Settings -> ip_address_restriction
GDPR
With reference to the General Data Protection Regulation, the data on our servers is obfuscated, the passwords encrypted with AES256 (Advanced Encryption Standard) and the personal data - protected.
Row-level Permissions
Row-level permissions serve the purpose of determining which files each privilege group can view and edit.
Navigate to the respective module, for example, "Internal Processes."
Click on the "wrench" icon at the top-right corner and then select "Row-level permissions." A pop-up will appear where you can grant permissions to specific privilege types for viewing the corresponding files.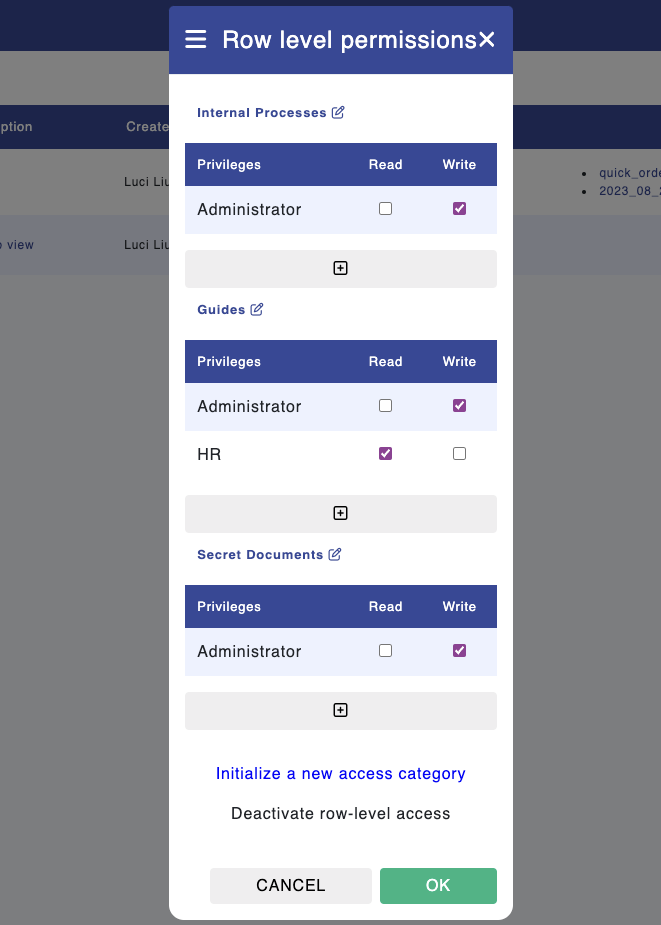
To add new privileges for a specific file, click the "+" icon.
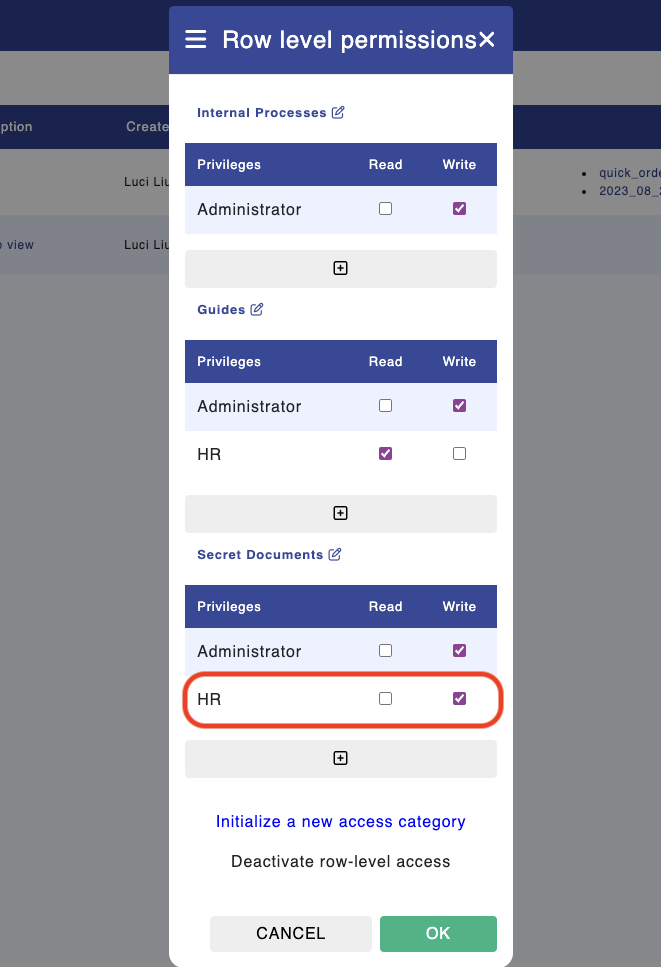
In this example, we added "HR" to the "Secret Documents."
You can create new categories and assign privileges to them by clicking "Initialize a new access category."
Organizational Structure
Manage organizational structural access
You can modify the display of records in the respective module based on the hierarchical structure (employee -> managers -> directors).
For instance, if you navigate to the "Vacations" module and access the list of all vacations, you can adjust the visibility of records by clicking the "wrench" icon at the top-right corner and selecting "Organizational Structural Access."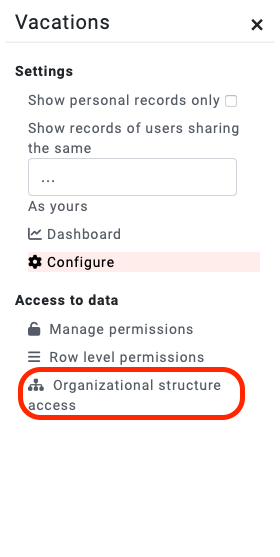
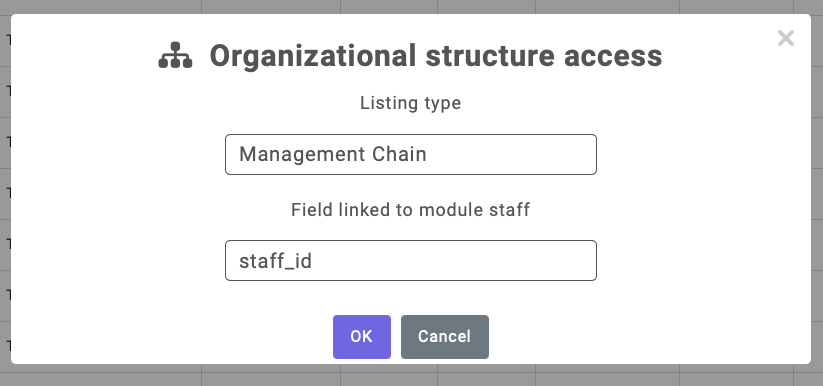
This action will open a pop-up where, if you choose "Management Chain" as the Listing Type, records will be displayed based on the hierarchy for the specific group.

