User guide
/Data Operations
Data Operations
Add record
Open an OBS ERP module and click the "Create" button. Depending on the module, you would need to fill in a set fields to create a new record. Let's take the "Contacts" module for example (Fig. 1).
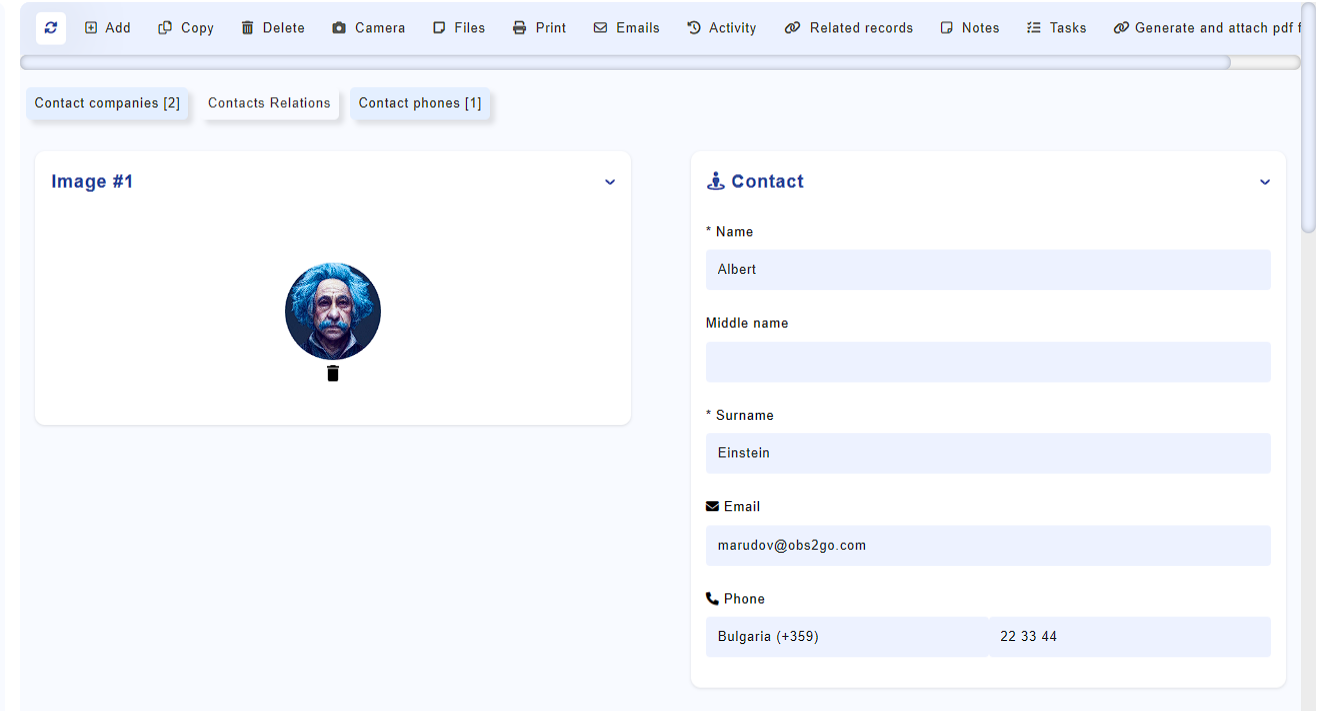
Fig. 1
As you might notice, the fields are grouped in field sets (Personal, Business, Social, etc). You can expand or retract a field set by clicking on it.
Field types:
- Number - allows numbers only
- Drop down - pick list. Please note that the labels of these fields are underlined. This means that you can click a label to add a value to the drop down menu.
- Live search - this field allows you to write a single letter or part of a word in order to find what you are looking for. For example, you can write the letter "a" in field "Country" and OBS ERP will enlist all countries containing the letter "a" in their name as shown on Fig. 2.

Fig. 2
In order to make a selection, you are required to choose a row from the displayed results. To deselect, simply click the circle containing a red "X" within it.
Keep in mind that the labels of live search fields are marked with a "keyboard" icon. This indicates that you can click on a label to input a value into the live search menu.
- Text - opens up an HTML editor as a pop-up, where you can fill in information.
- Date - allows dates only. Opens up a calendar on click.
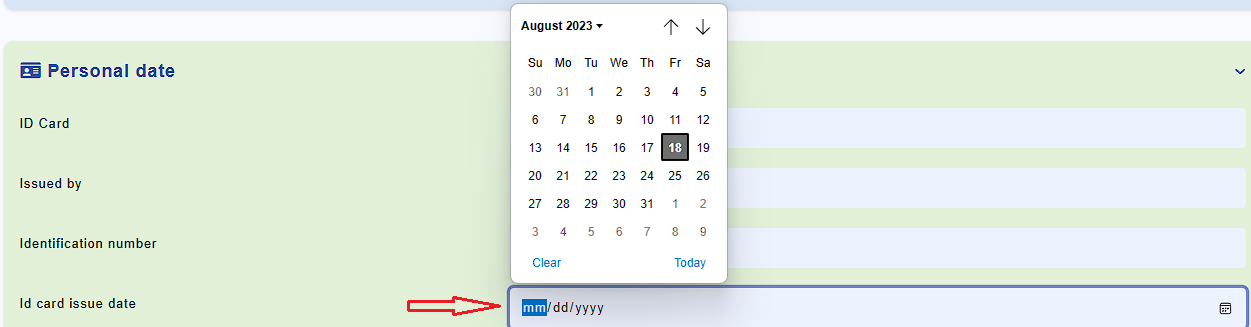
Fig. 3
- Time - allows date and time. Opens up a date and time selector.
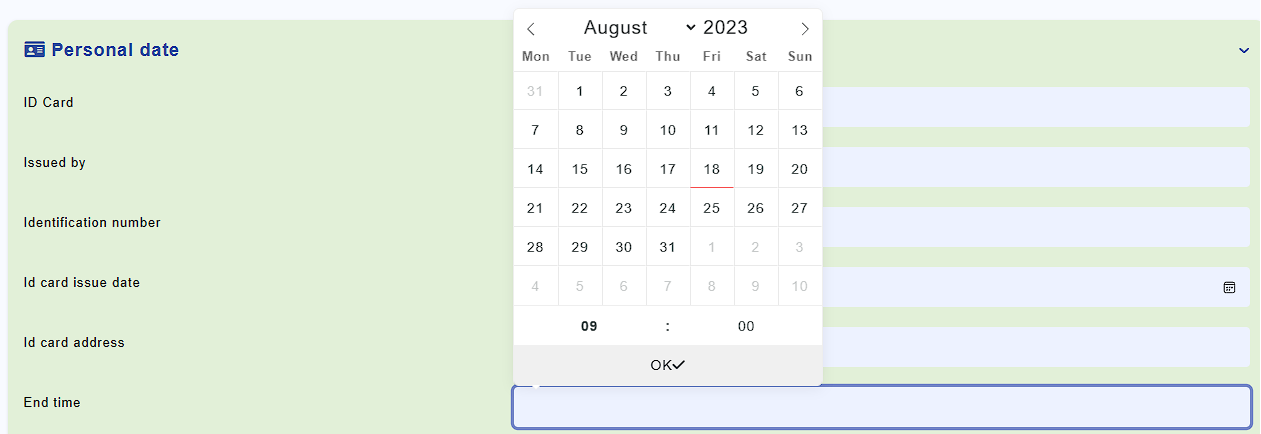
Fig. 4
- Code - allows you to write unformatted text
- Check Button - toggle button (on / off)
- Slider - the name says it all

Fig. 5
After filling in the form, you need to press the "Create/Save" button to create the record. OBS ERP will highlight with red border fields that are mandatory but not filled in.
Edit record
As soon as you have the record created, you would be able to edit it. In case you use table template for data listing, you need to click the ID on the target row and select Edit as shown on Fig. 6. Then the form on Fig. 1 will appear.

Fig. 6
Delete record
You can click the "Delete" button as shown on Fig. 7. while in editing the record. Alternatively, you might use the "Delete" button from the pickup list shown on Fig. 6.

Fig. 7
Copy record
To duplicate a record, select the "Copy" button as illustrated in Fig. 6. Alternatively, you can also use the "Copy" button featured in Fig. 8. If a field is designated as unique (meaning duplicates are not permitted), OBS ERP will append a random prefix to the field's value before copying. This process will also encompass the associated records.
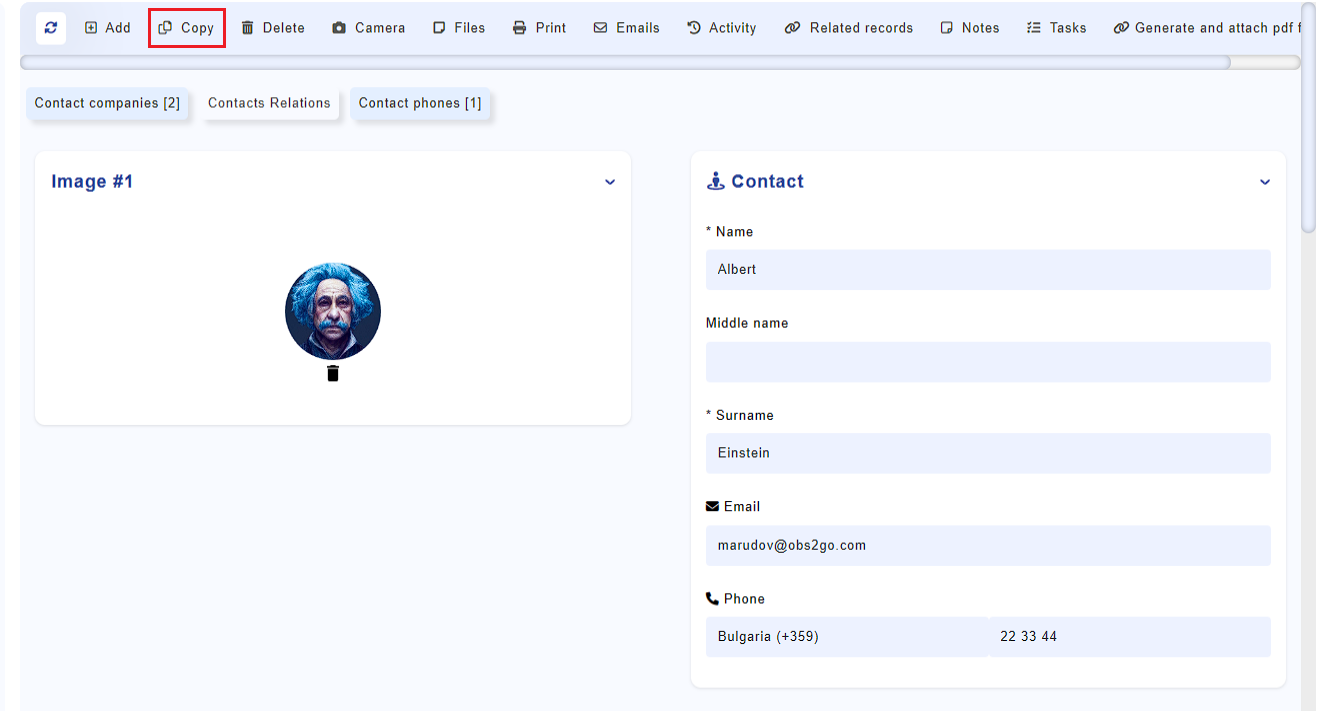
Fig. 8
View record
Click the "View" button shown on Fig. 6 to view a record. OBS ERP will show all related records alongside the record information.
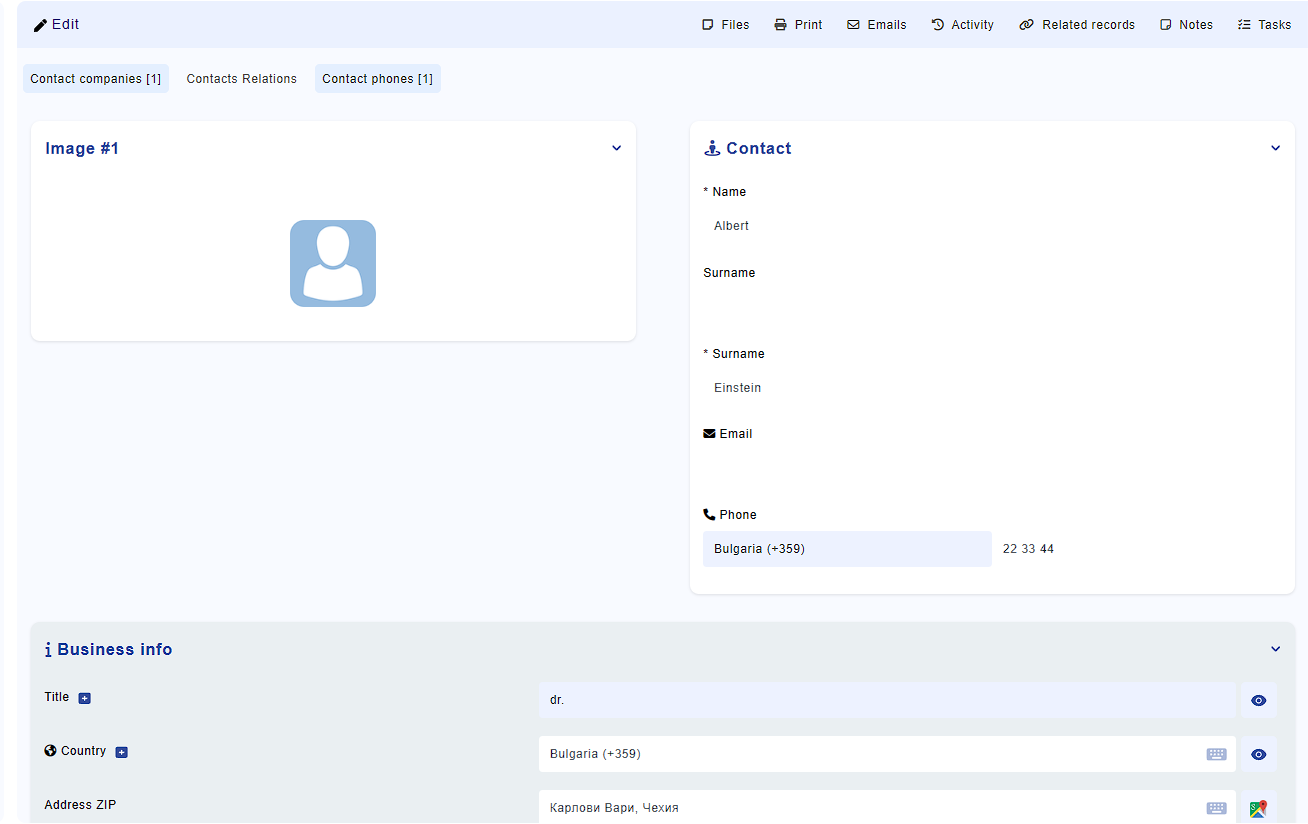
Fig. 9
Note: Emails sent through OBS ERP record get attached to the OBS ERP document. These emails remain in the database even if deleted from your mailbox.
Add Notes
The “Notes” feature allows users to leave internal comments or observations directly on a record. This is useful for:
- Documenting key updates or decisions
- Leaving reminders or follow-ups for yourself or colleagues
- Collaborating across departments
- Creating an internal timeline of activity related to the record
Where to Find It
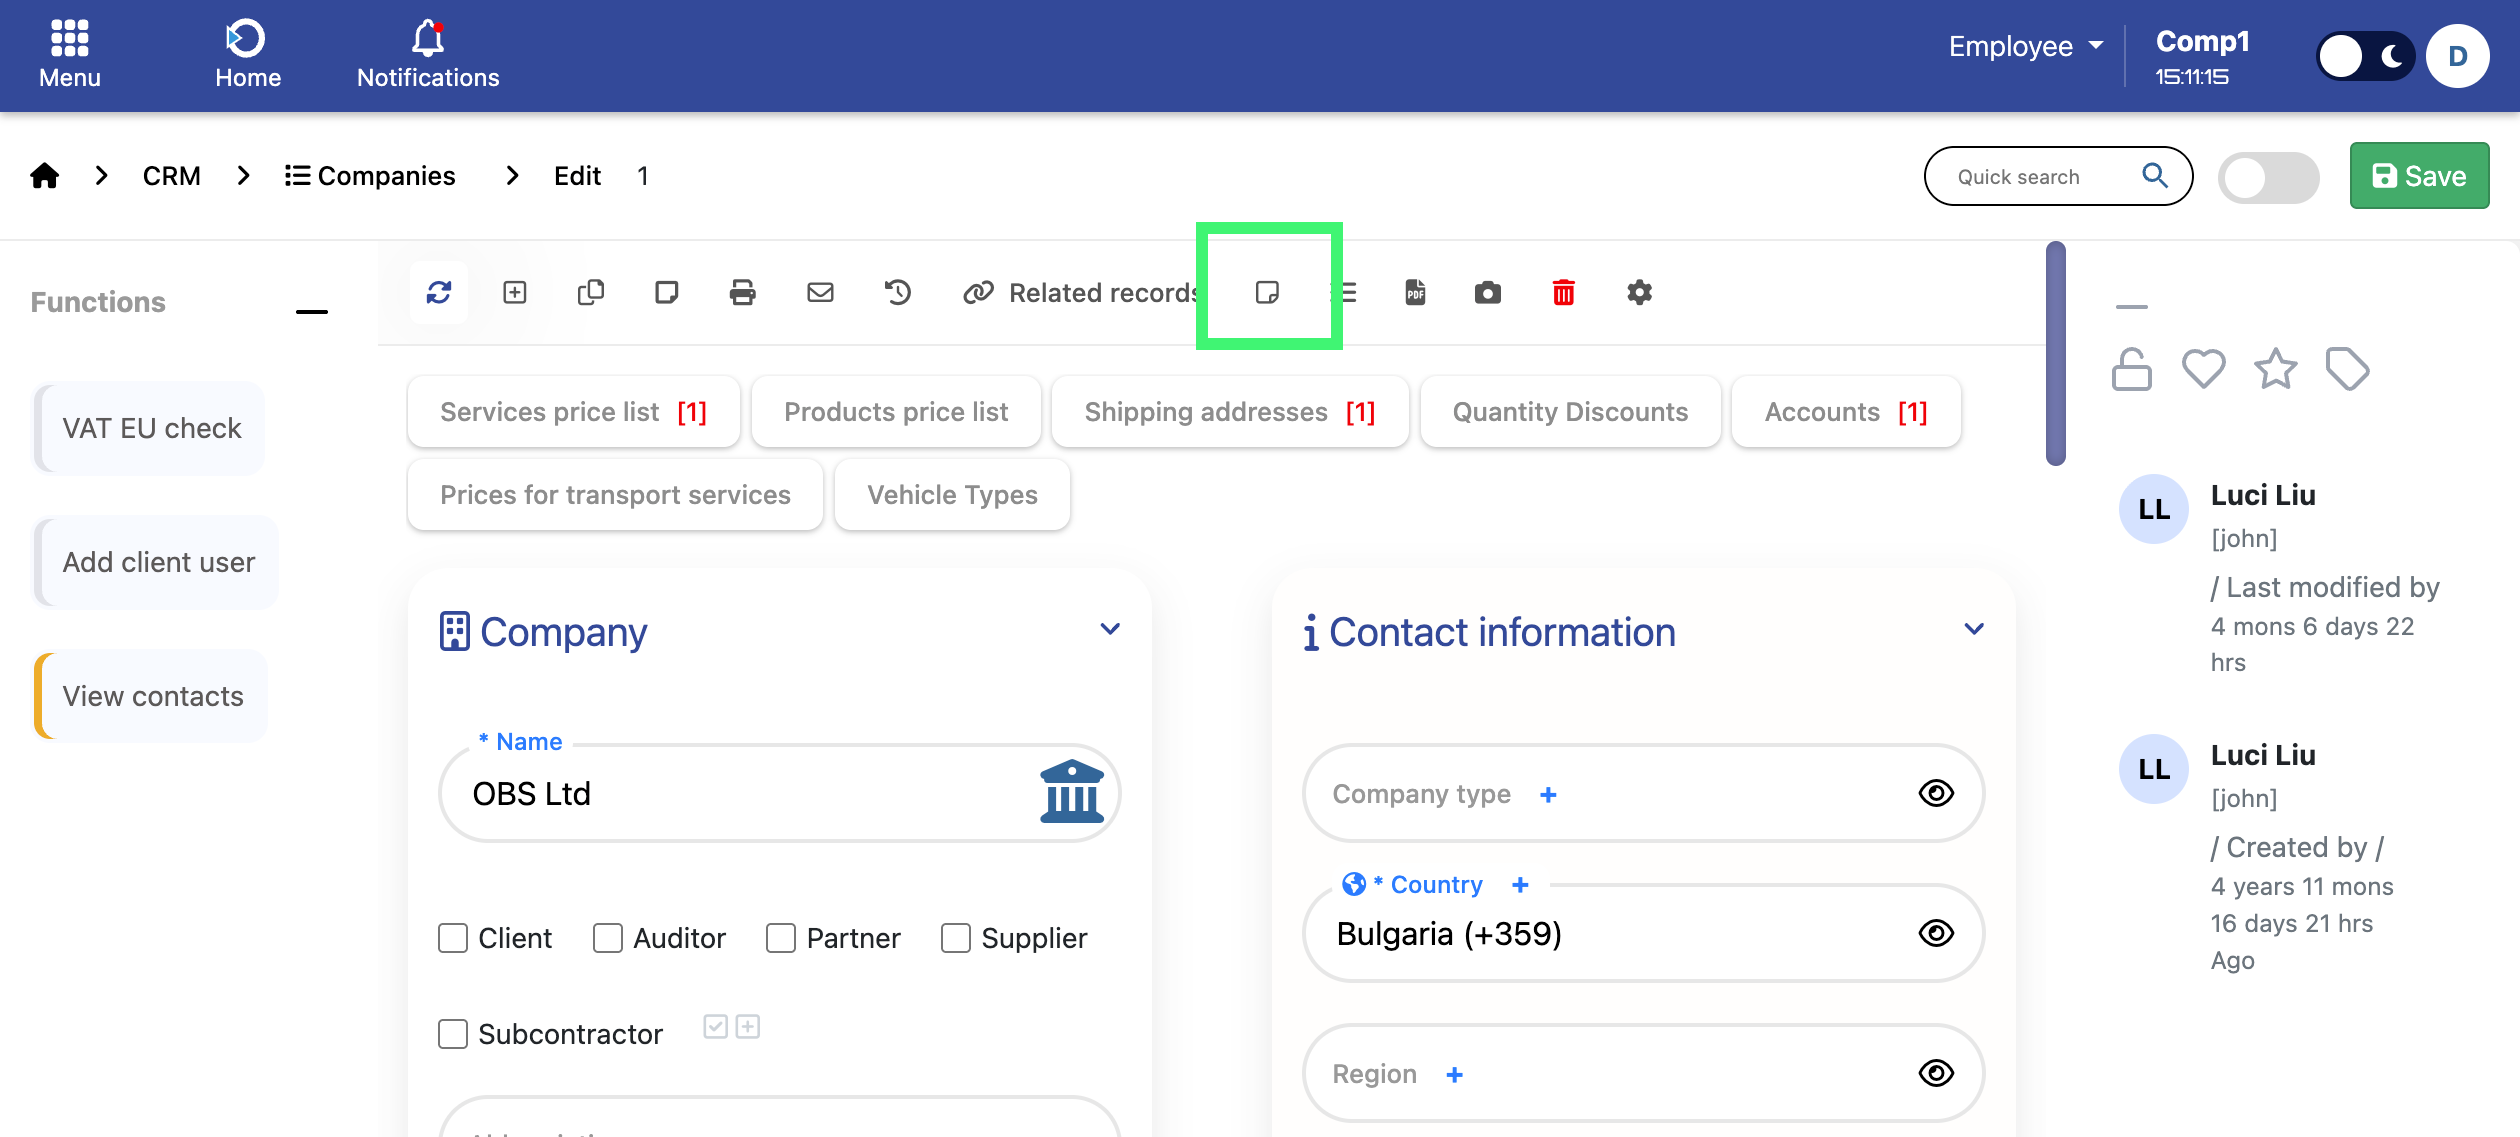
Once activated for a module (e.g., Contacts, Companies, Projects), the Notes function is available for each record as a sticky note icon in the top toolbar.
How to Add a Note
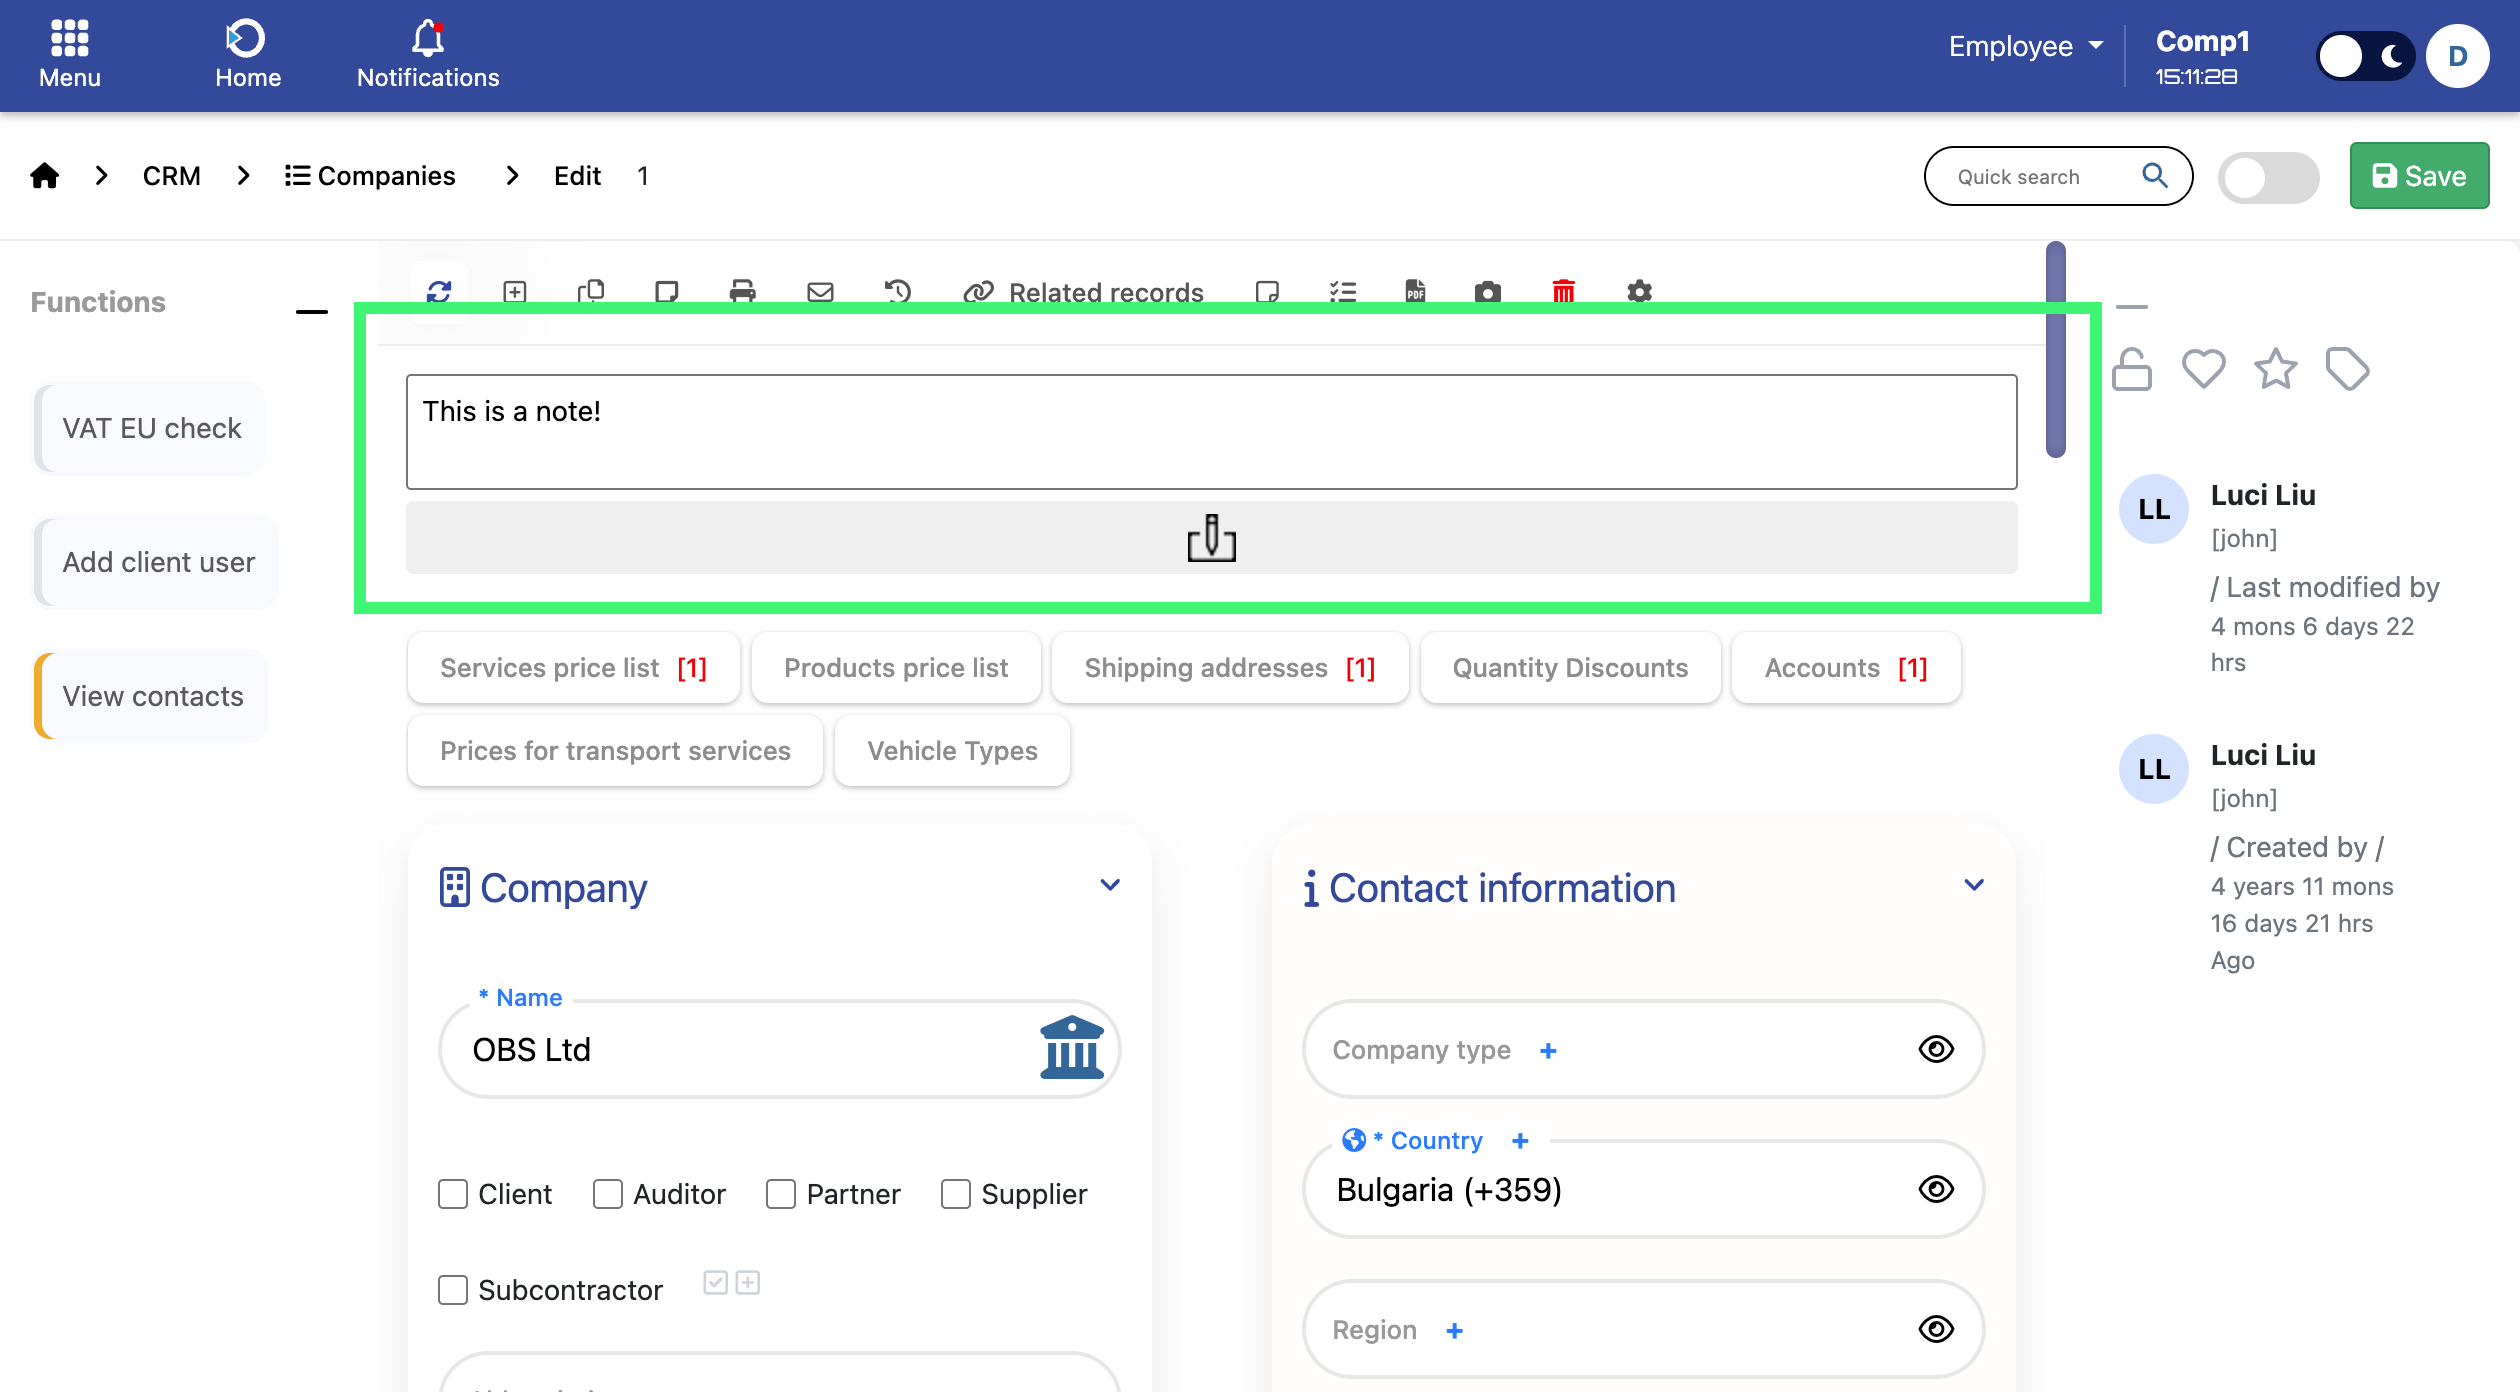
- Click the sticky note icon on the top right of the screen.
- A text input field will appear at the top.
- Type your note in the field.
- Click the pencil icon to submit.
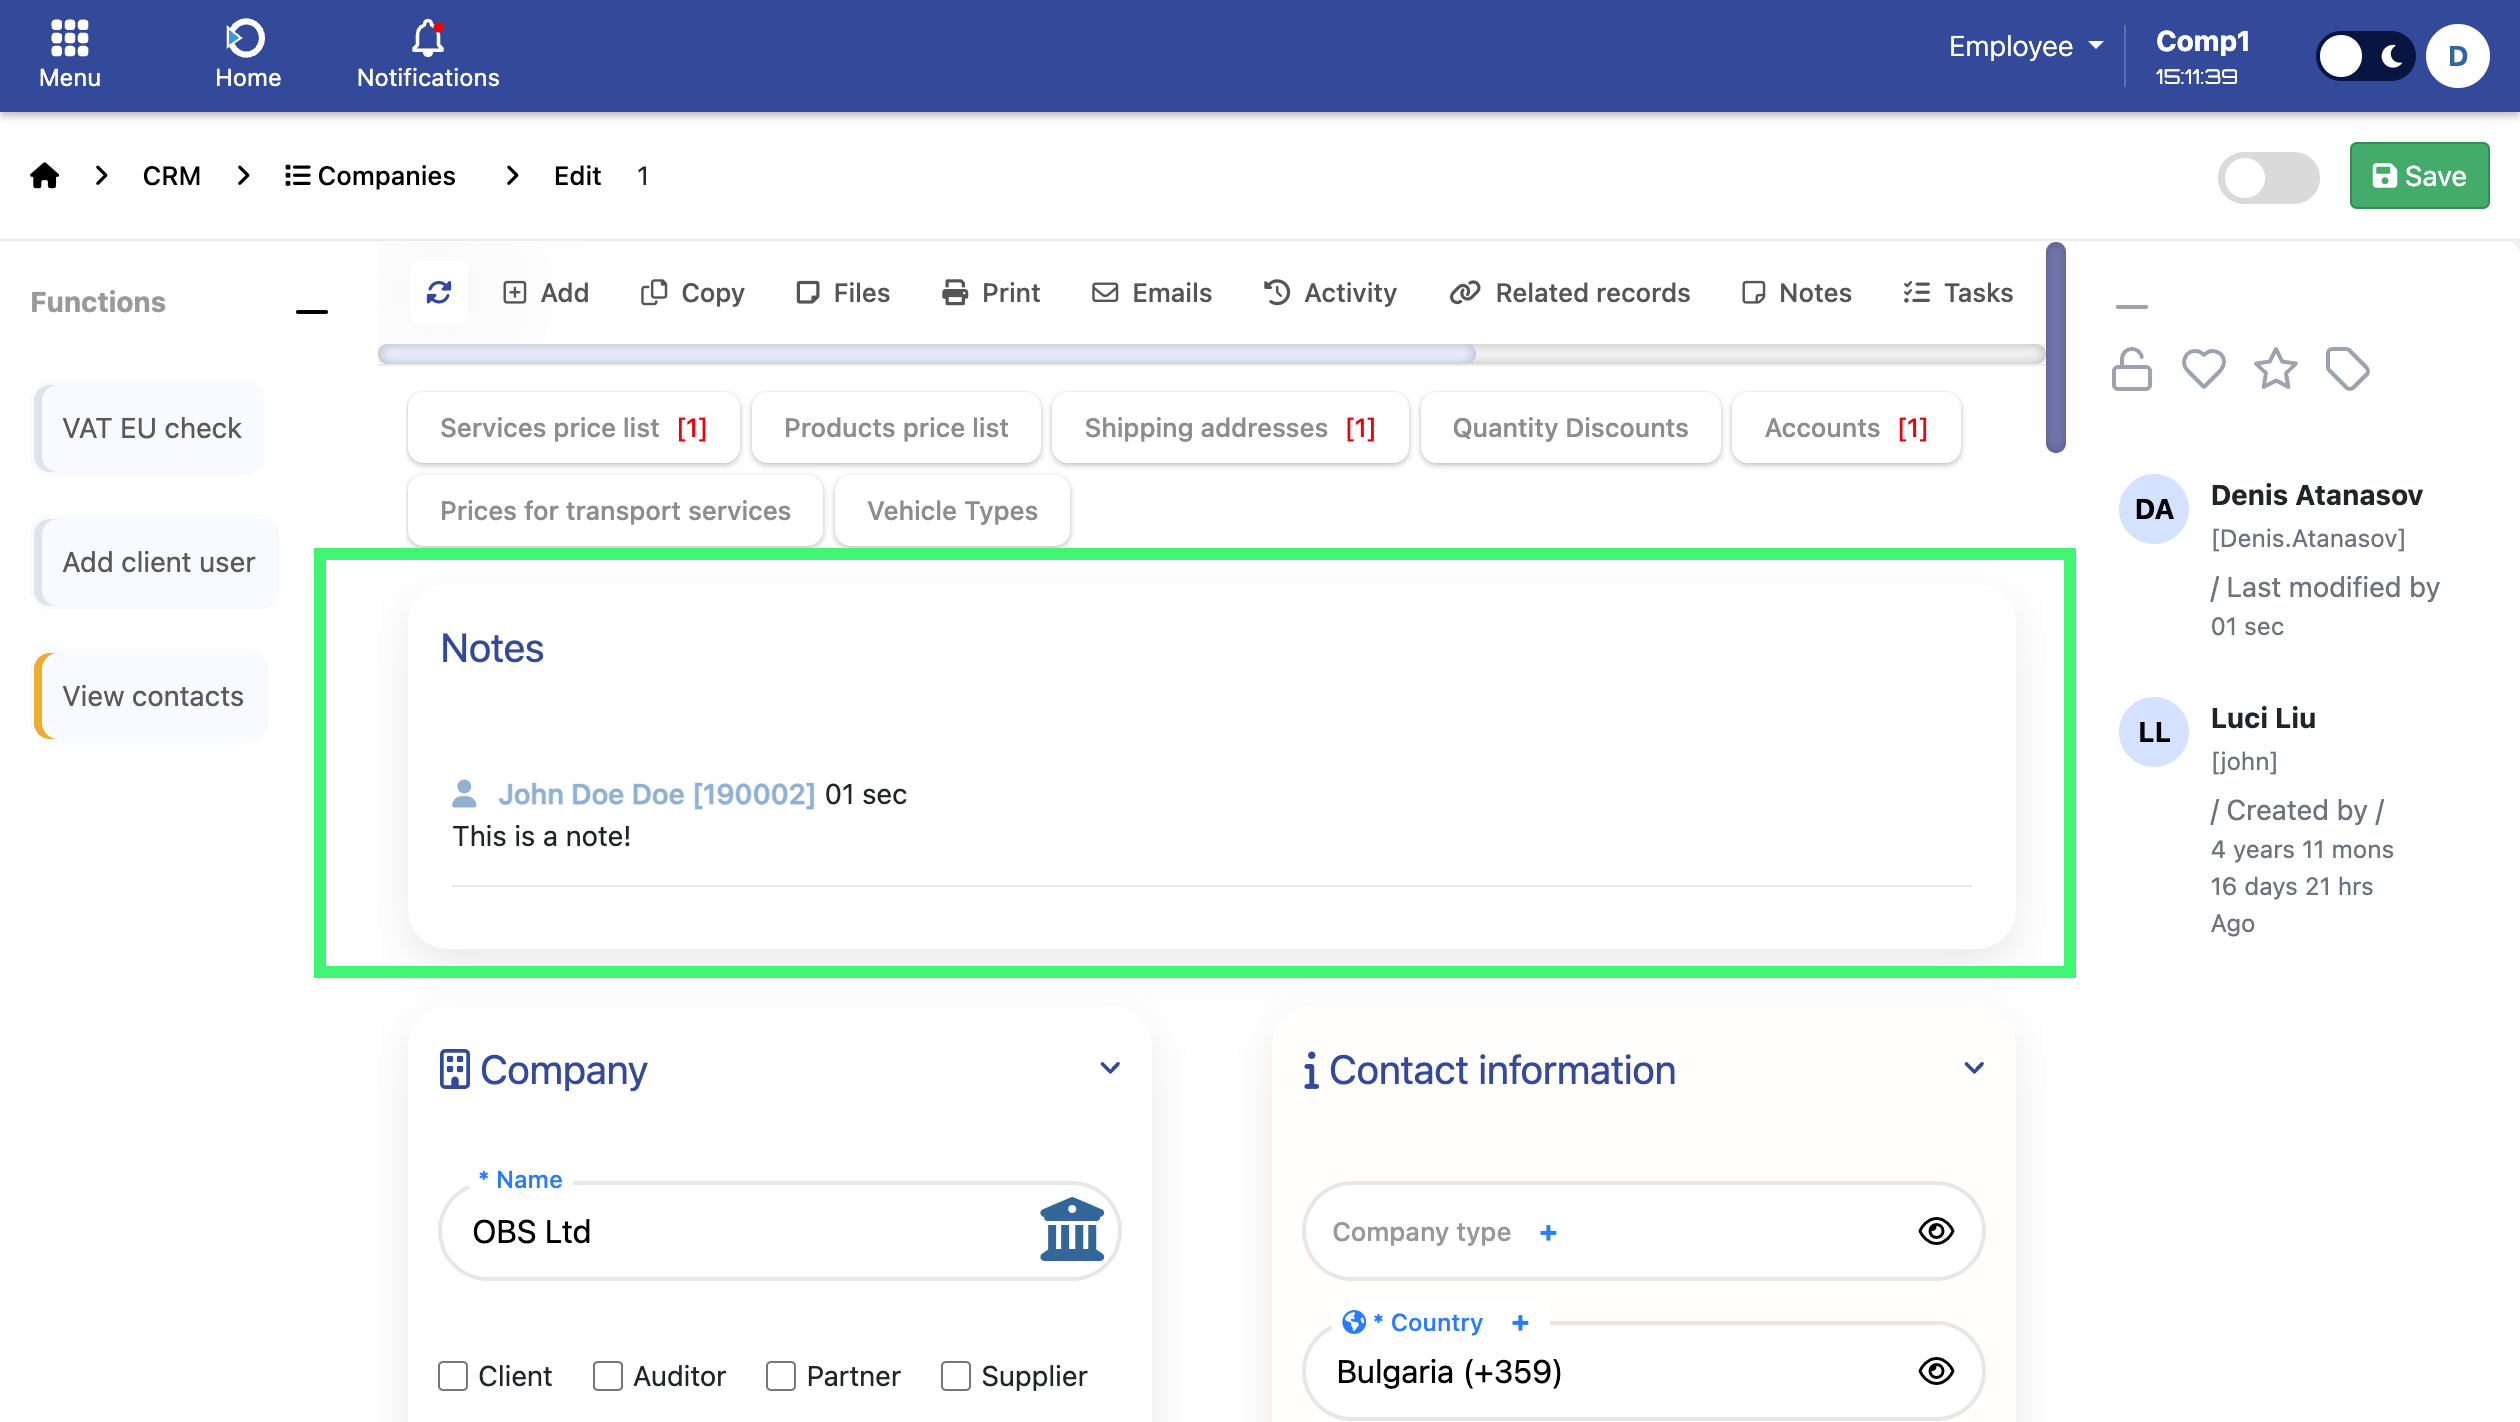
Where Notes Are Displayed
All submitted notes are shown at the top of the record in a dedicated “Notes” section.
They are displayed in chronological order and include:
- The author of the note
- A timestamp for traceability
- The full text of the note
Mass update
OBS ERP allows you to update a field value for multiple records at once using the bulk update option in table view. This is useful when you need to apply the same change to a group of records (e.g., updating a location field for several employees).
How to mass update records
- Open the target module (e.g., Staff) in table view.
- Use Filter to narrow down the results (e.g., Location = Office A).
- Select the records using the checkbox in the table header to mark all visible rows.
- If needed, increase the number of records per page by clicking the page number in the top-right corner and selecting Rows per page.
- Click the mass update icon in the top-right corner (as shown in the screenshot), choose the target field (e.g., Location), and set the new value (e.g., Office B).
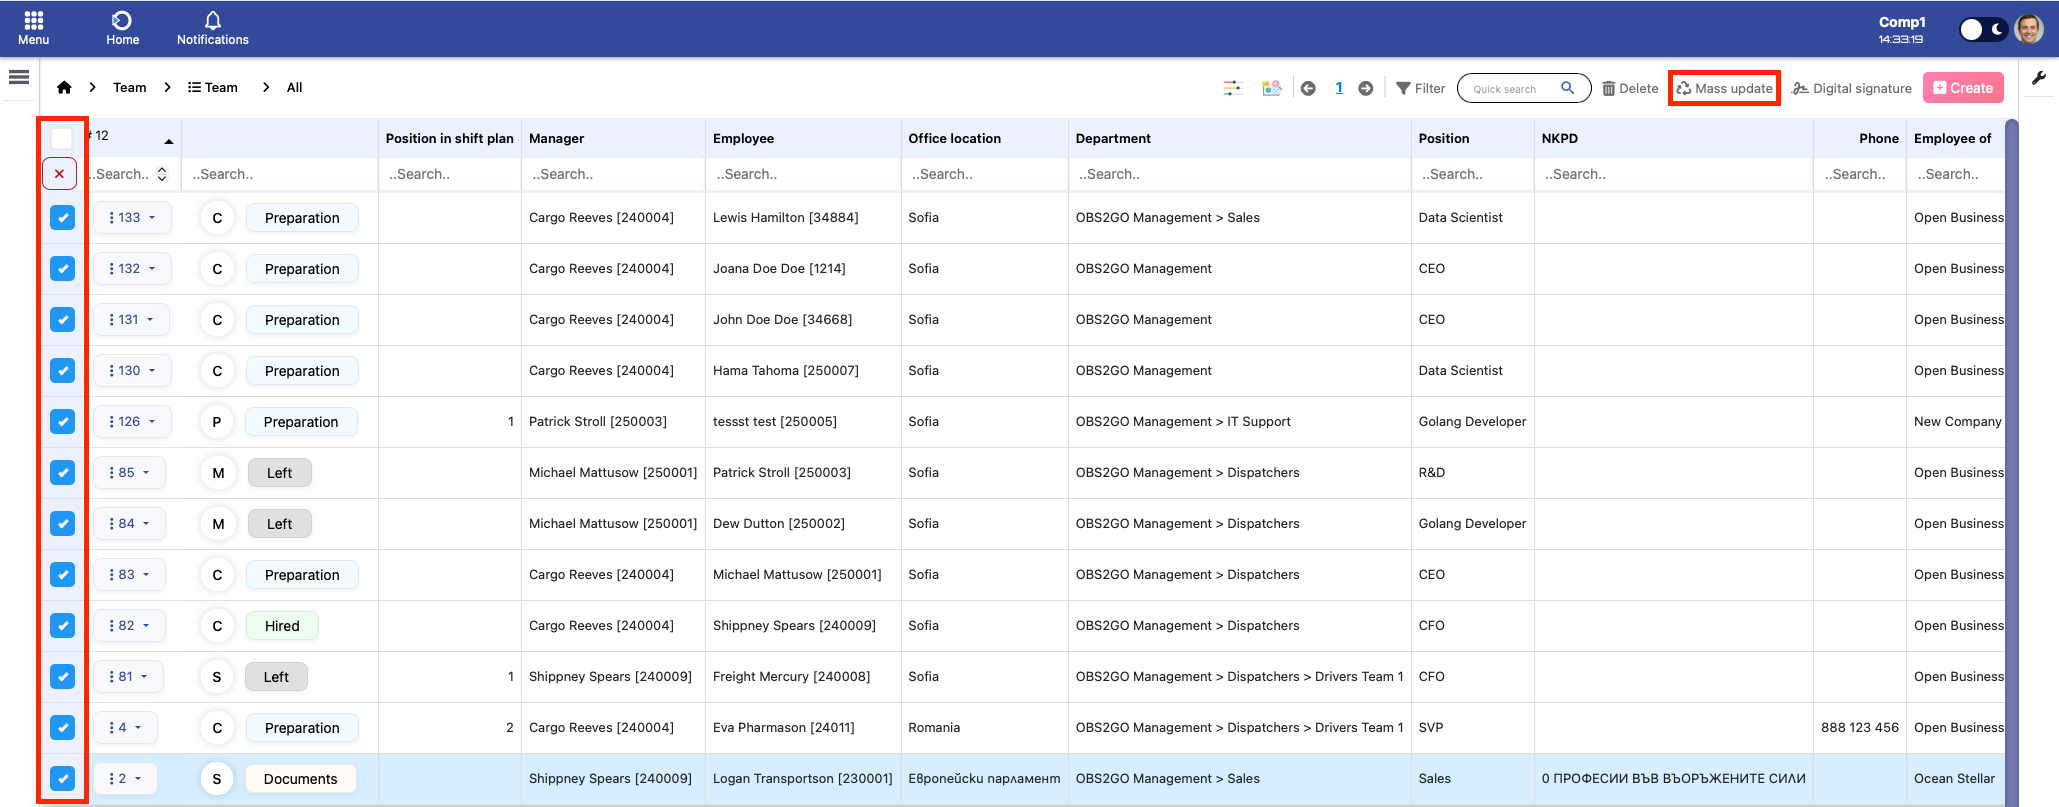
Fig. 'Mass update button | Checkboxes'
Additional Information
- Notes are internal and visible only to users who have access to the record.
- They cannot be edited or deleted once submitted.
- All notes remain permanently attached to the record.
View History
The "Activity History" feature provides a complete audit trail of all changes made to a record. You can see:
- Who made the change (user name)
- When the change was made (timestamp)
- What was changed (field name)
- Old value → New value (before and after)
Changes are tracked for the main record and all related submodules (e.g., personal information, documents, team assignments).
Where to Find It
Once you open any record, click the "Activity" tab to view the complete history.
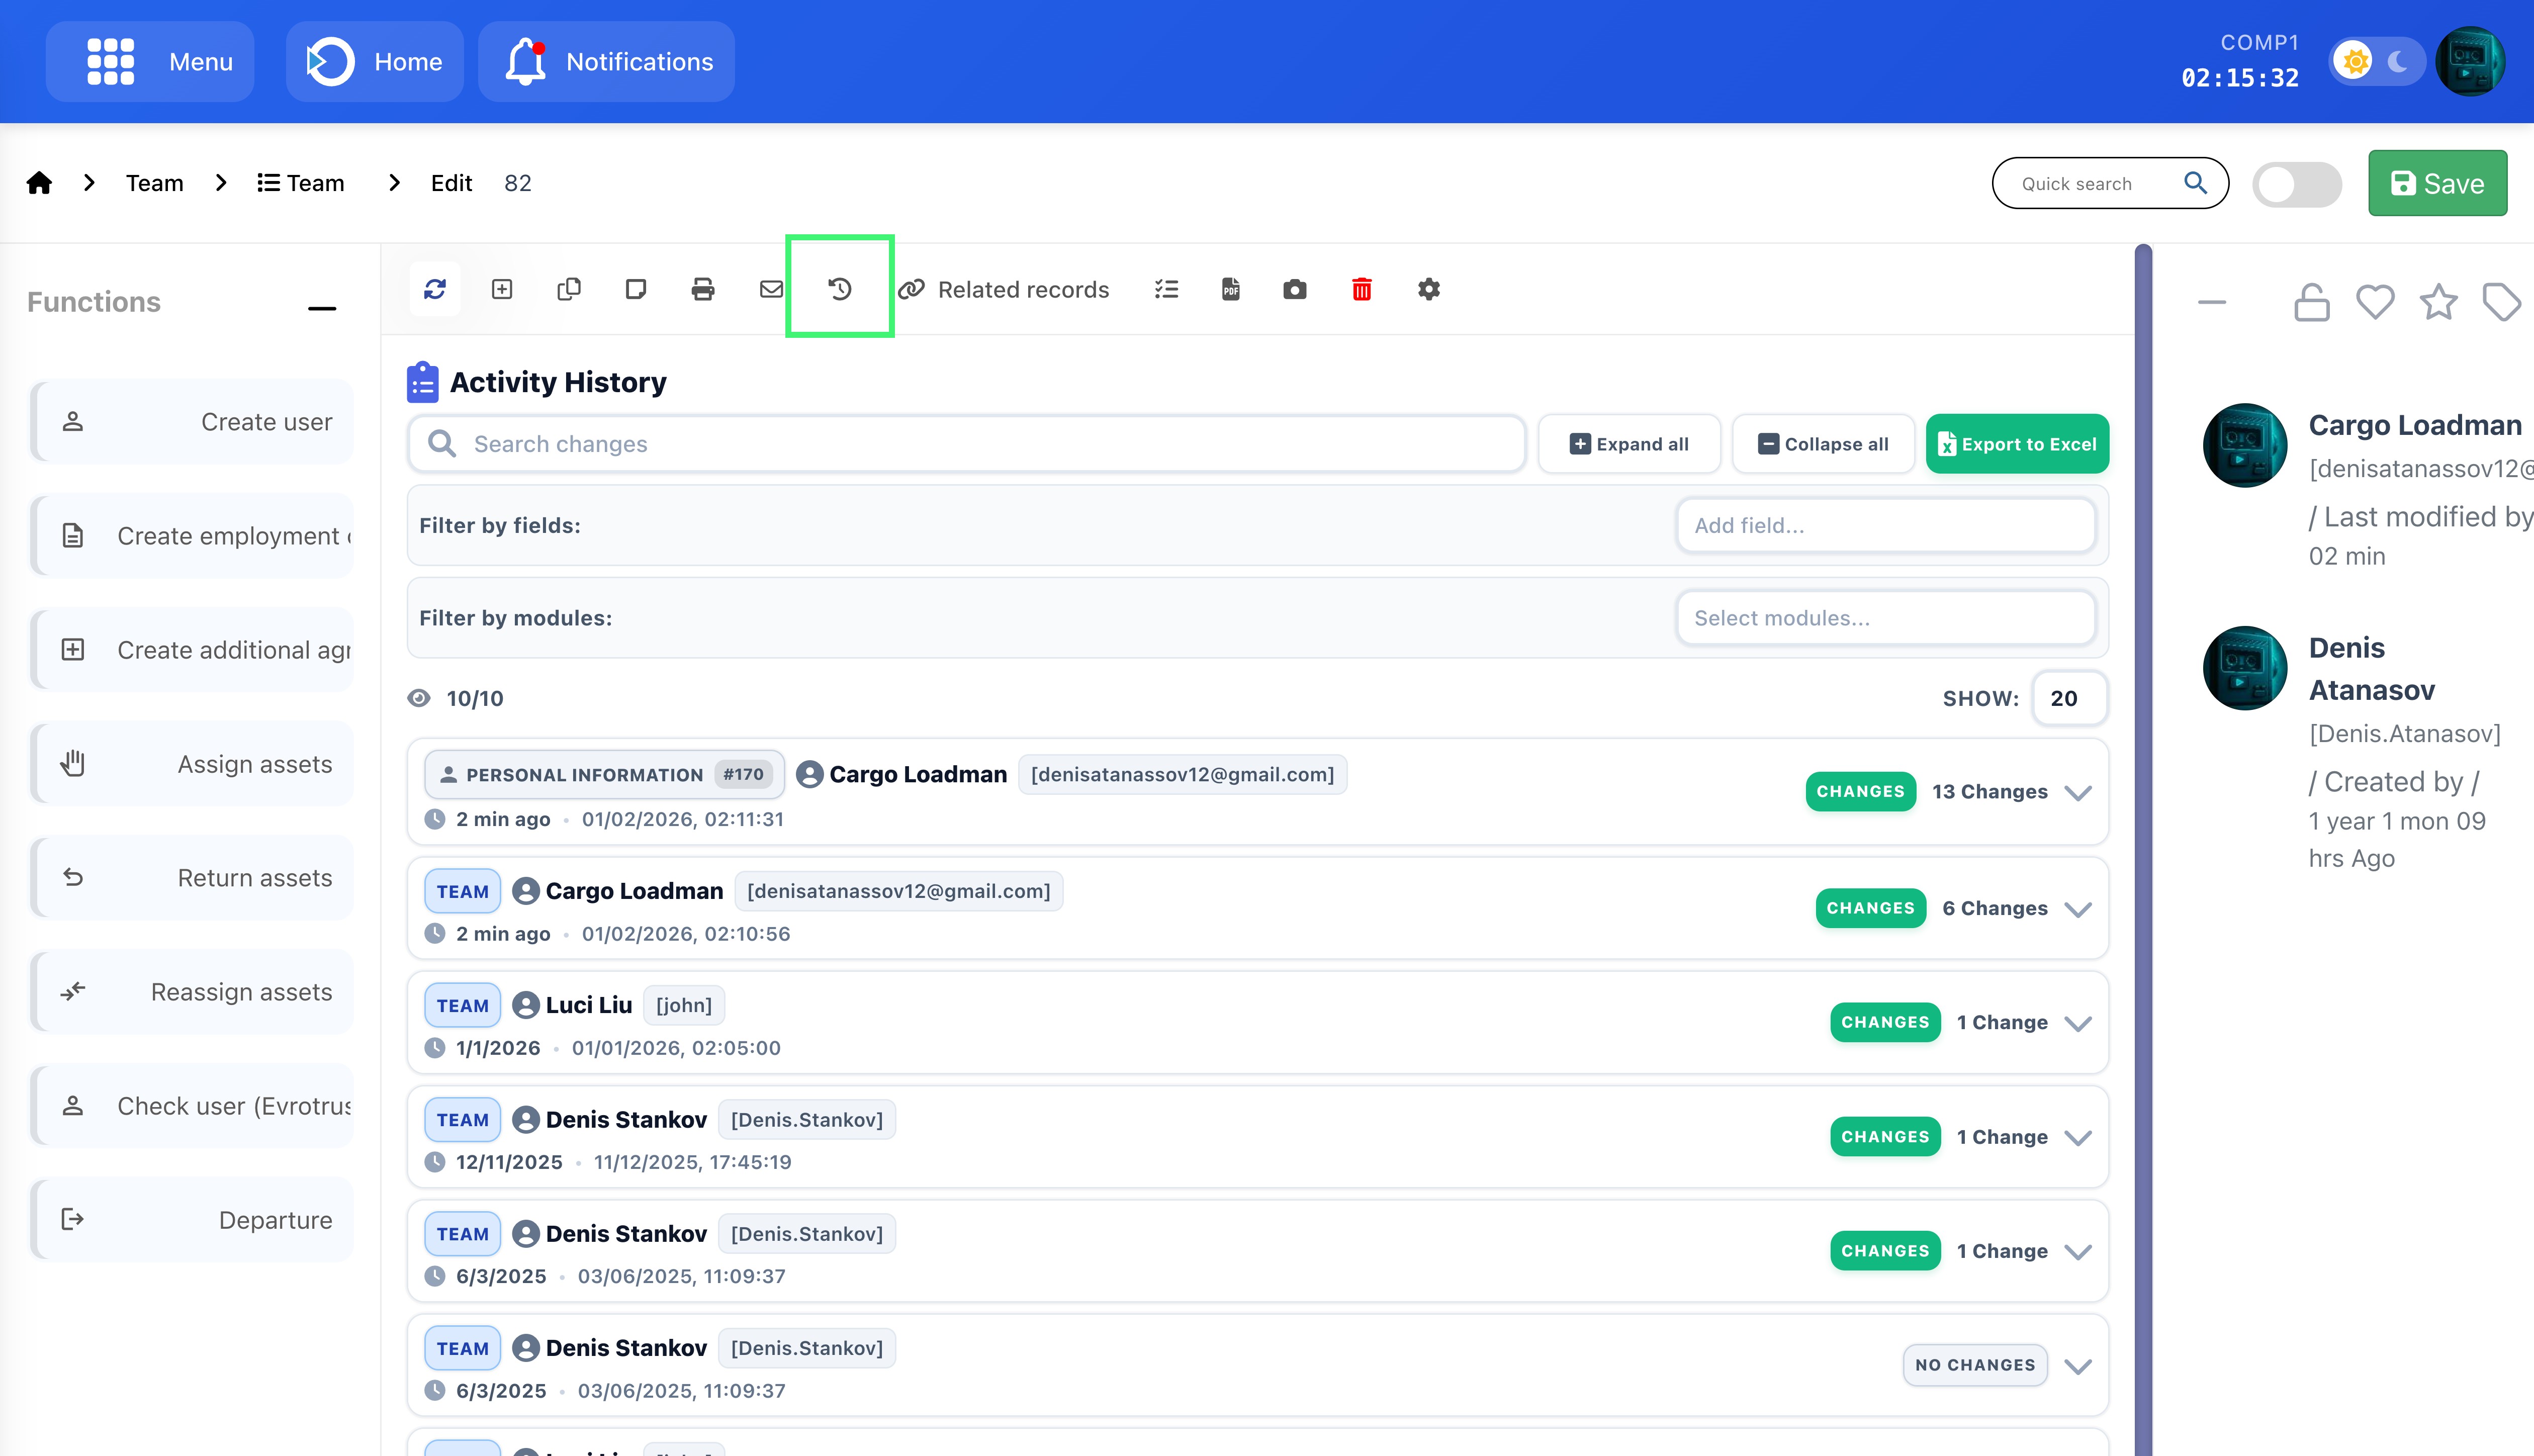
Fig. Activity tab location
Main Features
1. Search
Use the search box at the top to find specific changes instantly. Type any keyword: names, field names, or values.
2. Filter by Module
When working with records that have multiple submodules (Team, Documents, Assignments), you can focus on specific areas:
- Click "Select modules..."
- Check the modules you want to see
- Change counts are displayed next to each module (e.g., "Team - 92 changes")
- Selected modules appear as blue tags
Click the ❌ on any tag to remove that filter.
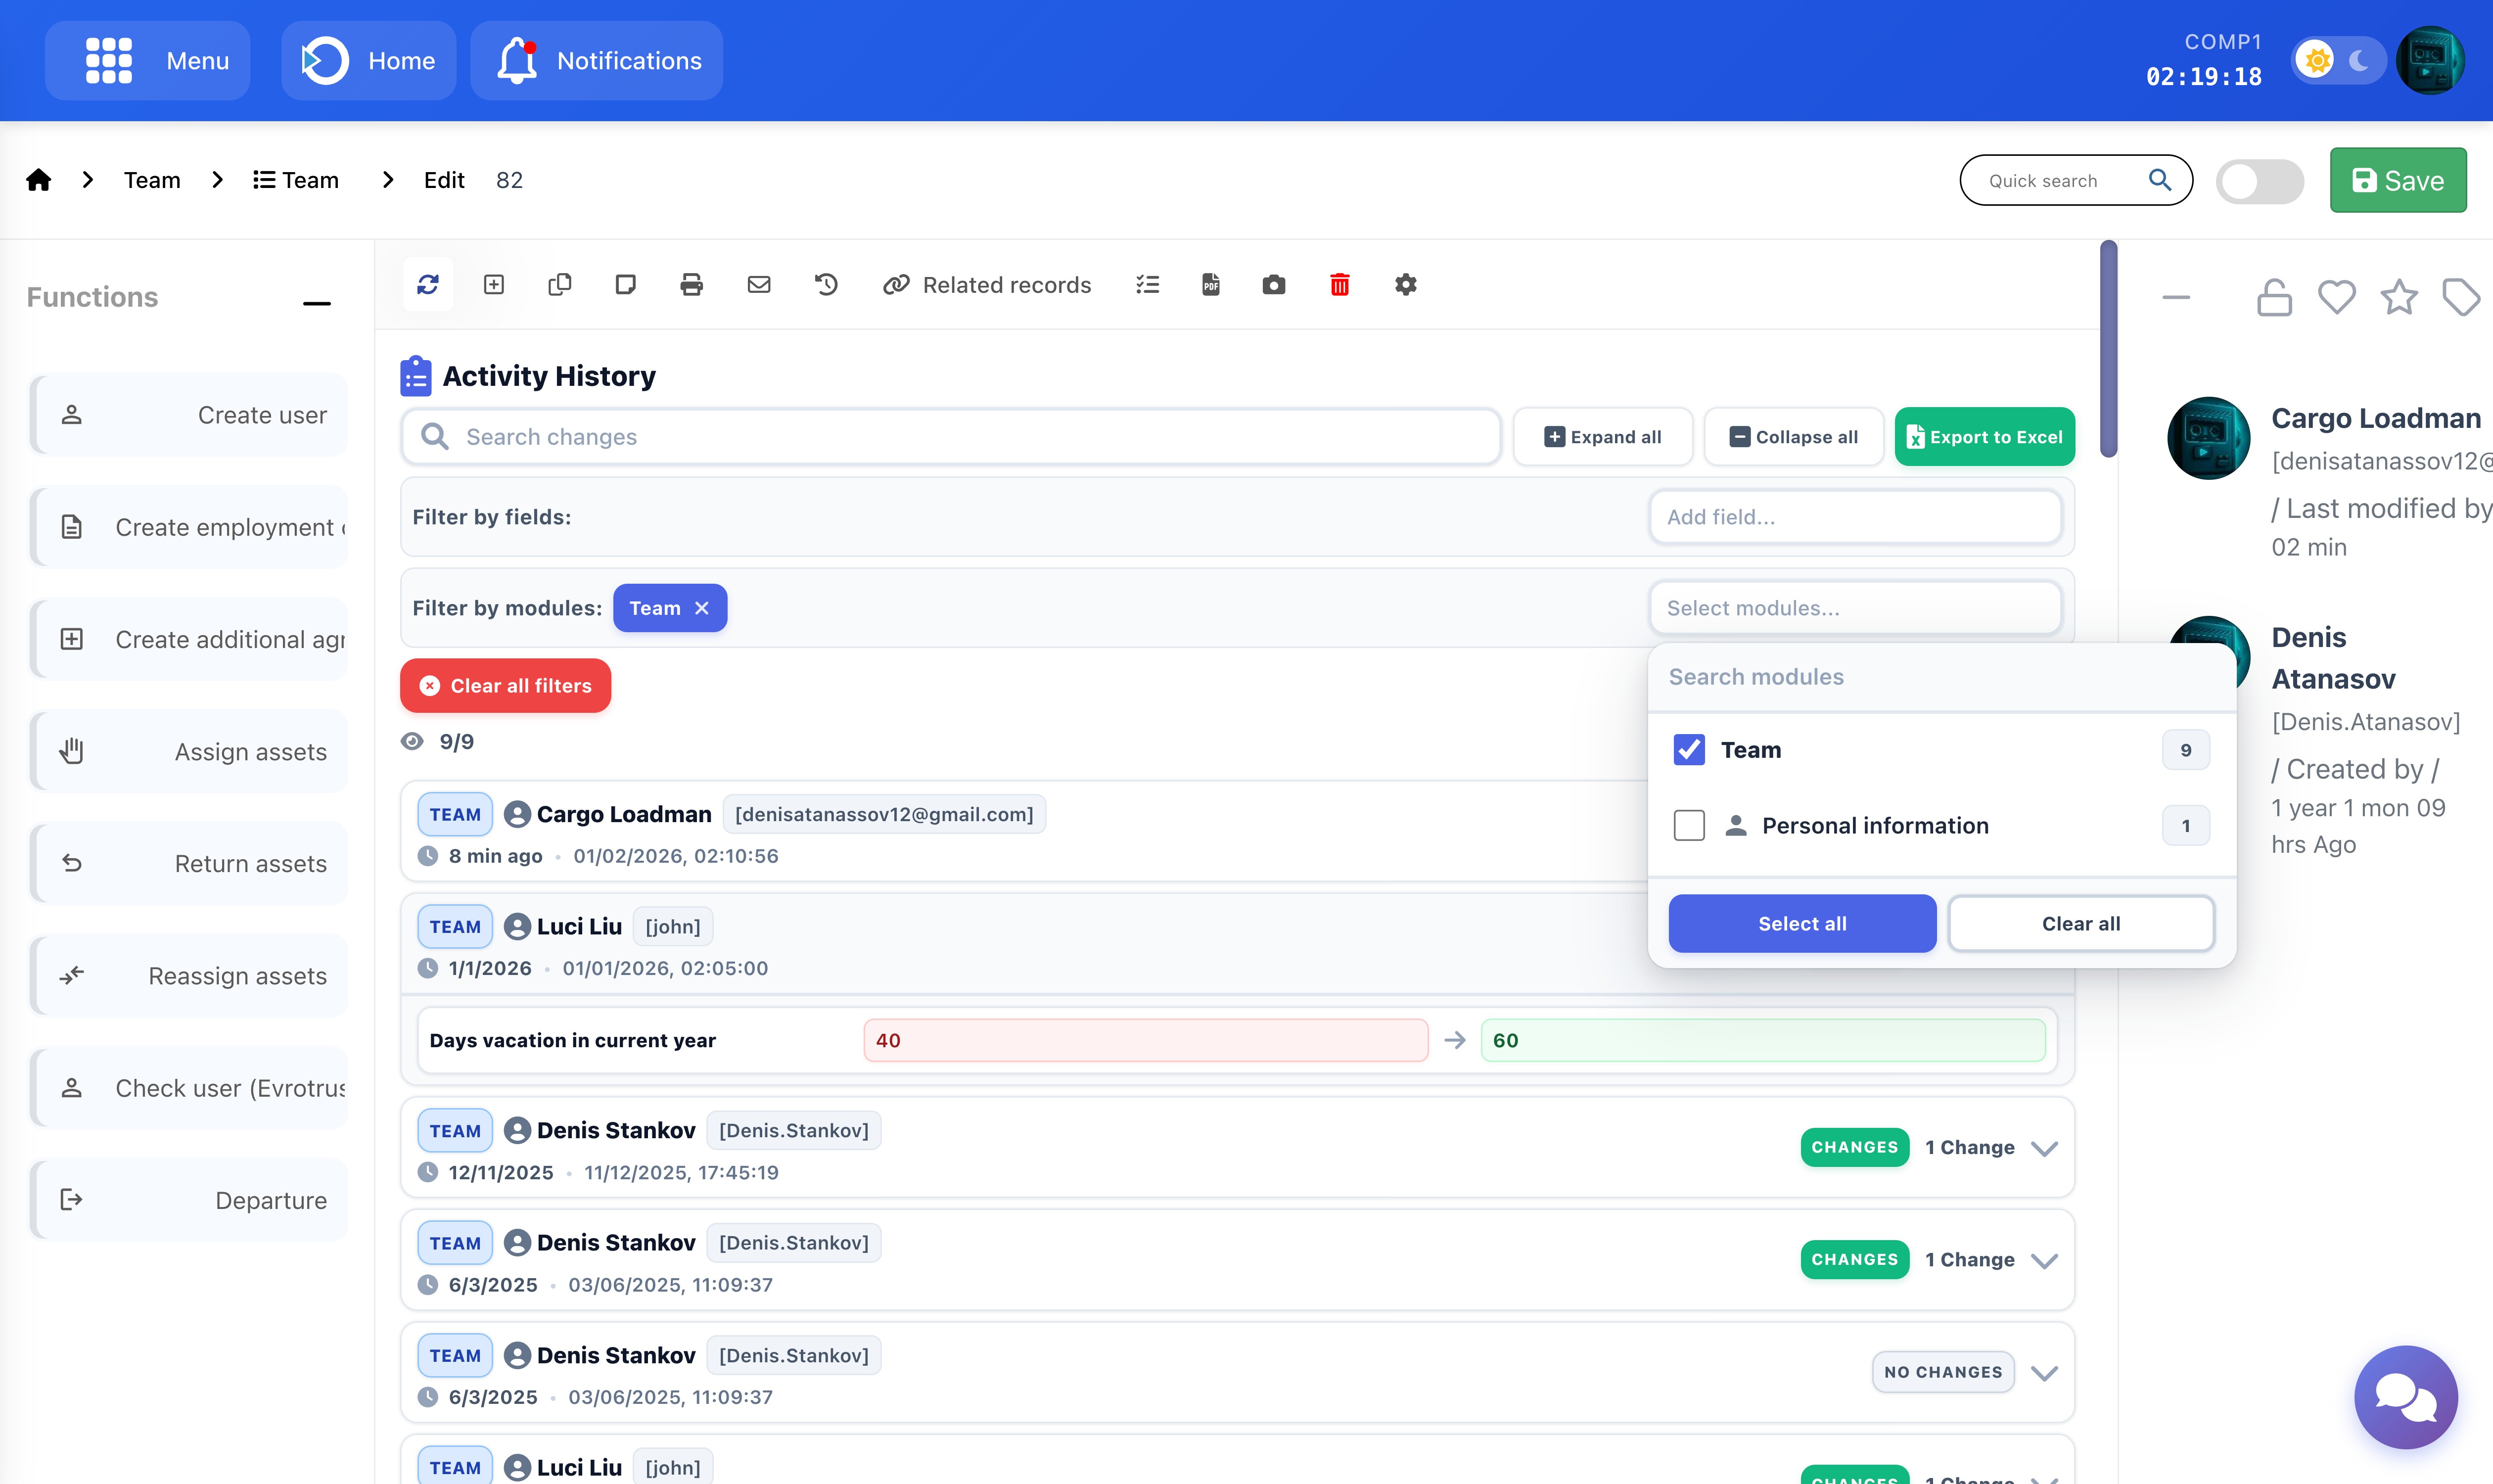
Fig. Filter by module with change counts
3. Filter by Field
To see changes for specific fields only (e.g., salary, position, status):
- Click "Add field..."
- Fields are grouped by module
- Check the fields you want to track
- Change counts are shown next to each field (e.g., "salary - 15 changes")
- Selected fields appear as blue tags
Note: When you filter by fields, the view automatically switches to table format for easier comparison.
4. Using Filters Effectively
Choose the filter that matches your goal:
Use Module Filter when: You want to see all changes from specific modules (e.g., "Show me everything that changed in Personal information and Documents")
Use Field Filter when: You want to track specific fields within their modules. Fields are organized by module: first you see fields from the main module, then fields from each submodule. This lets you select exactly which fields to track (e.g., "Show me changes to salary from the main module and address from Personal information").
Note: You can combine both filters for advanced scenarios, but most users will use one filter type at a time.
Click "Clear all filters" to reset and view all changes again.
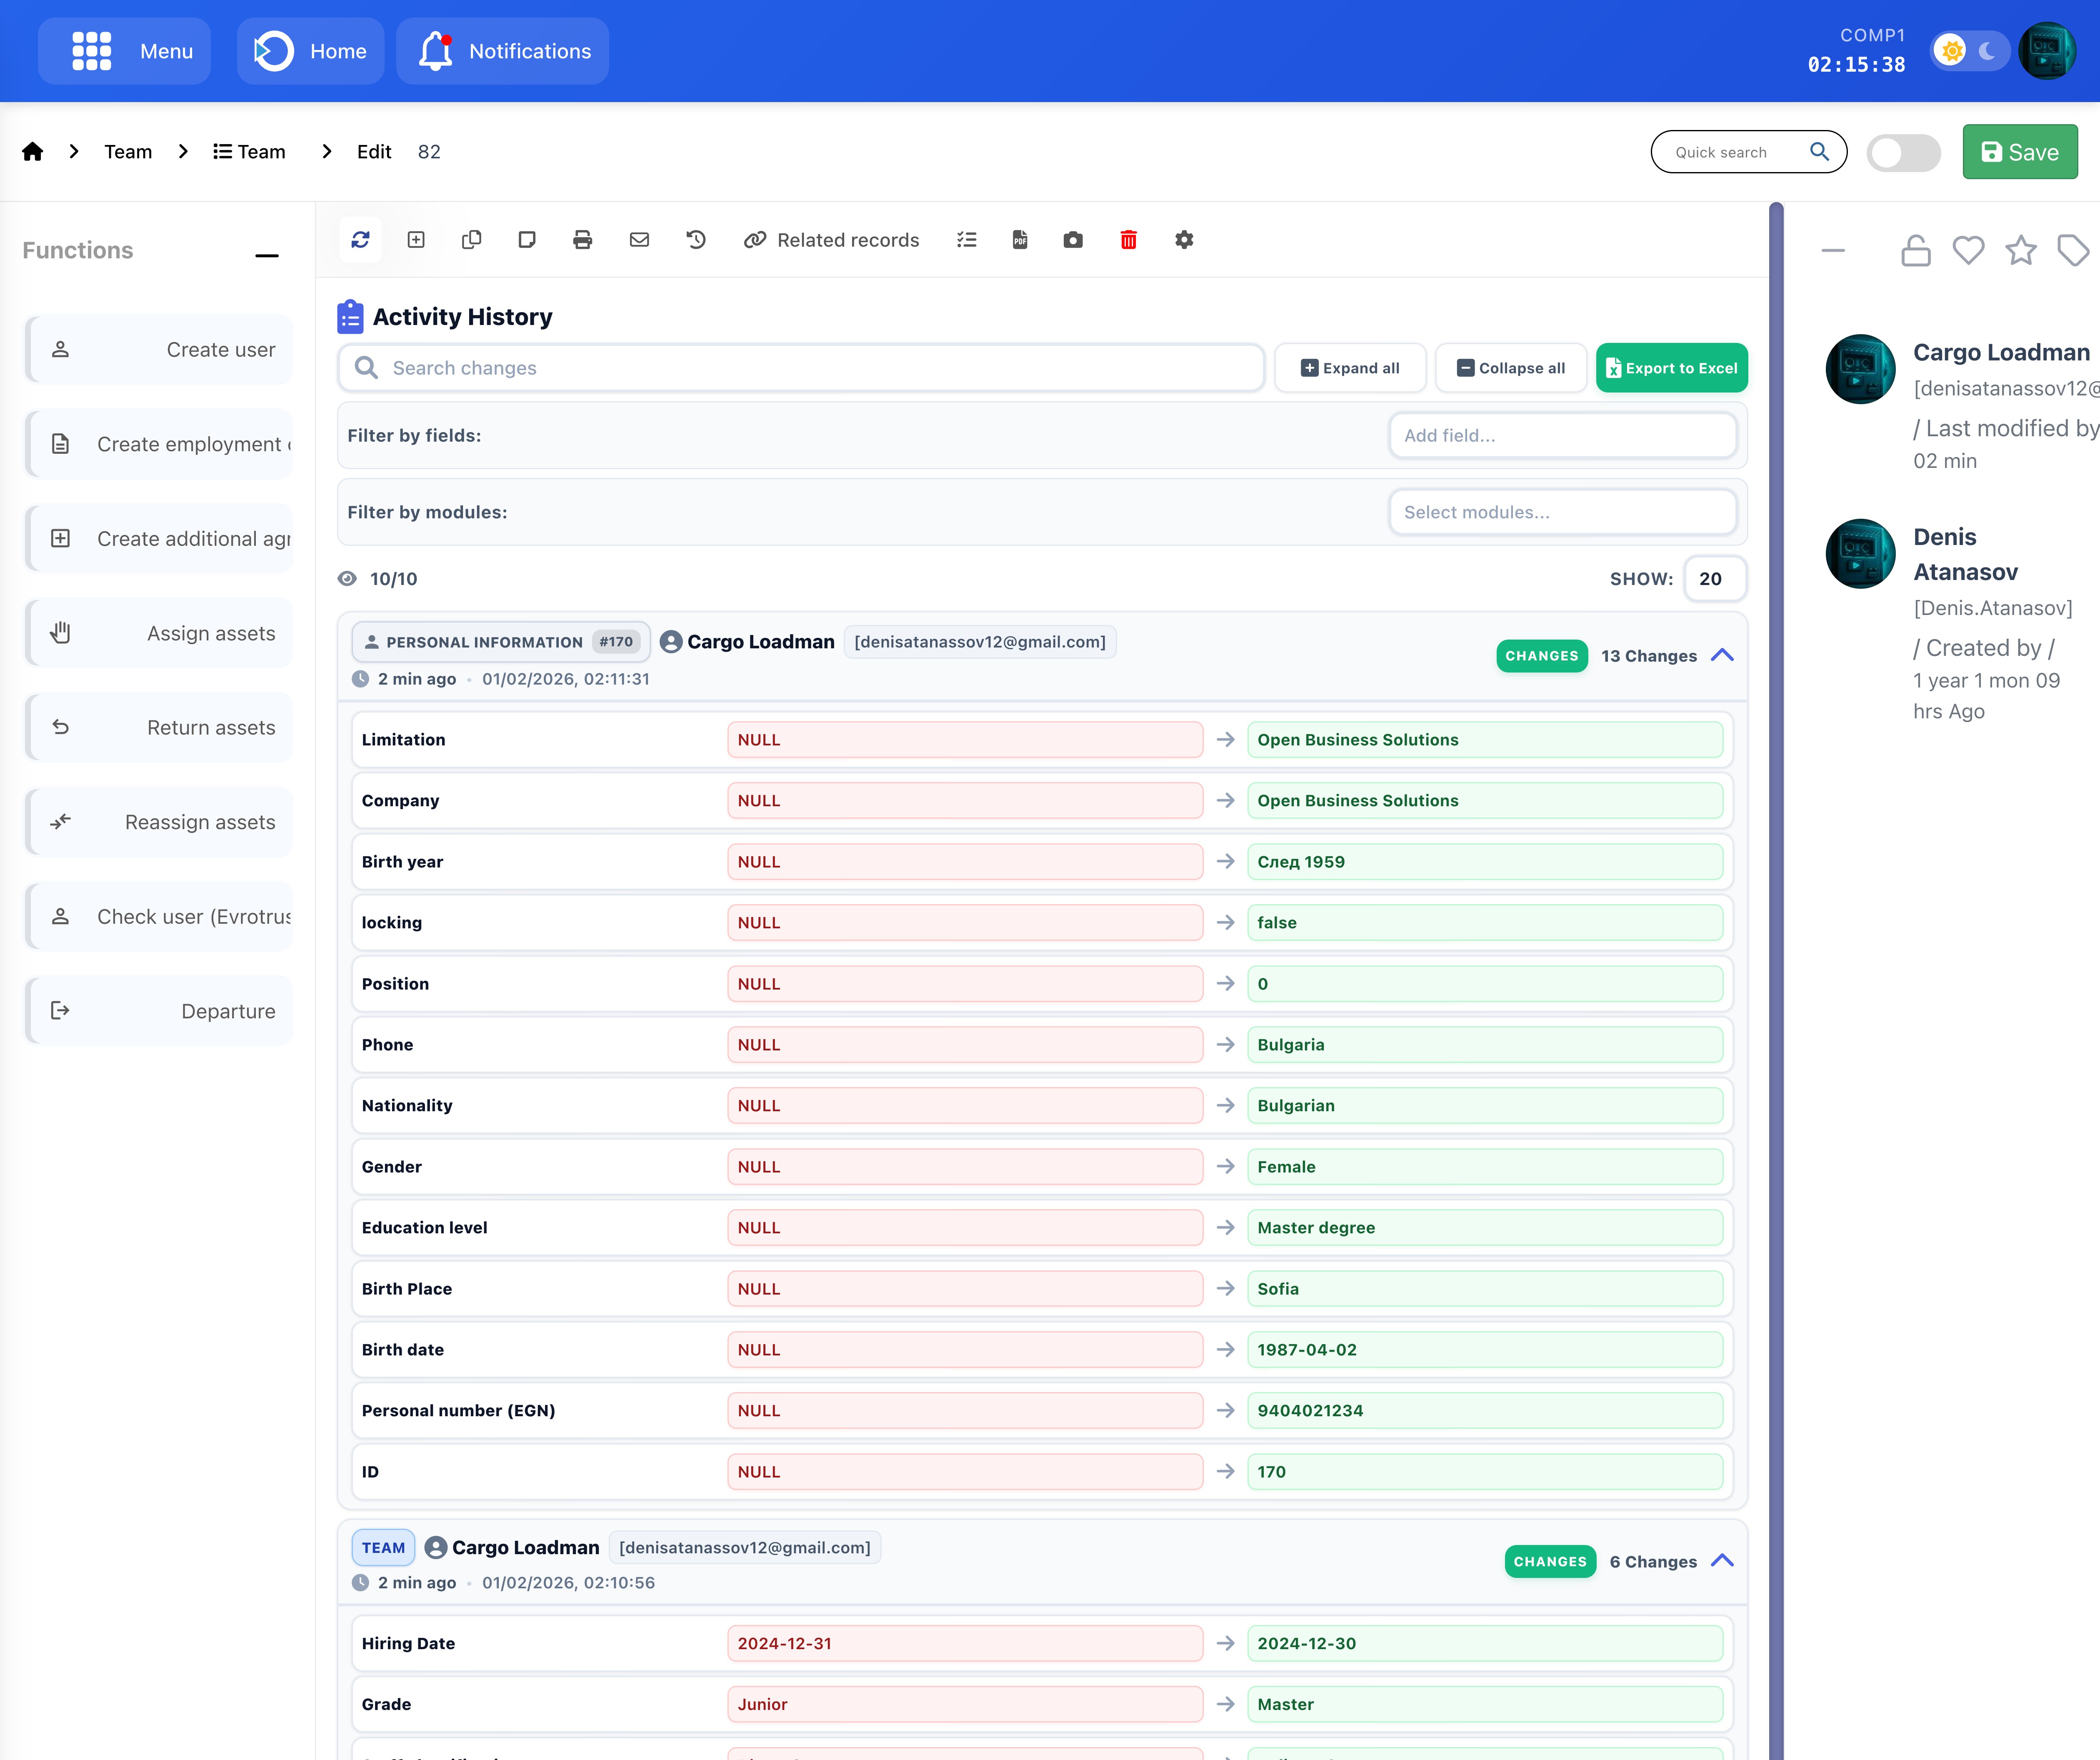
Fig. Activity History with filters and change cards
5. Export to Excel
Click the green "Export to Excel" button to download your filtered results as a spreadsheet. The export includes: User, Date/Time, Module, Field, Old Value, and New Value.
Tip: Set the page size to "All" before exporting to include all filtered results in the file.
6. Page Size Control
Use the dropdown in the top-right corner to control how many changes are displayed:
- 20 - Default view
- 50 - Medium list
- 100 - Large list
- All - Show everything (useful before exporting)
7. Expand/Collapse Changes
Click any change card to expand or collapse details. Use the "Expand all" or "Collapse all" buttons to control all cards at once.
Quick Reference
| I want to... | How to do it |
|---|---|
| Find who changed something | Use search box → type their name |
| See only salary changes | Filter by field → select "salary" |
| See only Personal information changes | Filter by module → select "Personal information" |
| Export everything | Set "Show: All" → Click "Export to Excel" |
| Compare multiple fields | Filter by fields → auto table view |
| Clear all filters | Click "Clear all filters" button |
Additional Information
- You only see changes for records you have access to view
- All changes are stored permanently in the system
- The audit trail is read-only and cannot be modified
- Changes are sorted by newest first